
If you want to cut a taper on a table saw the best way how to do it is by using a table saw taper jig. In this blog post, I’ll show you how to make one, using simple materials you likely have lying around your workshop.
A taper jig is perfect for achieving precise tapers, especially when crafting table legs and other furniture pieces. To build it, you won’t need to spend much – just grab some plywood or MDF scraps you probably already have in the workshop, and you’re good to go.
In this article, I’ll walk you through a step-by-step guide to building your very own table saw taper jig. Plus, I’ll show you how to cut tapers on a table saw. So let’s dive in and add another great table saw jig to your workshop equipment.
DIY Adjustable Taper Jig for Table Saw
If you want to see how it is done, watch the video below for a step-by-step guide on how to make a tapering jig.
I appreciate every YouTube subscriber. It’s free and easy to subscribe to — just Click Here To Subscribe. Thank you!
Table of Contents
- Table Saw Taper Jig Video
- Download Taper Jig Plans
- The Material you will need
- General Questions
- What is a Table Saw Taper Jig?
- Benefits of a Tapering Jig
- How to Build a DIY Taper Jig for Table Saw (Step-by-Step)
- Step 1: Cut the Base
- Step 2: Cut the T-Slots
- Step 3: Build the Fence
- Step 4: Make the Stop Block
- How to Cut a Taper on a Table Saw
- Conclusion
- Woodworking Jigs I used to build it
- FAQ
*Safety is your responsibility. Make sure you know what you’re doing and take all necessary safety precautions while working with power tools. Safety comes first!
The material you will need to build it
Taper jig
MDF Base Board – 300mm x 600mm x 12mm (11.81″ x 23.62″ x 0.47″)
Spruce wood strip – 80mm x 600mm x 18mm (3.15″ x 23.62″ x 0.71″)
Plywood Scrap Pieces for the Stopper – https://amzn.to/3TPULp2
Other:
Hold Down Clamps – https://amzn.to/3RJPEEf
Wood Glue – https://amzn.to/48ltKhJ
Sandpaper Sheets – https://amzn.to/41OMx2p
Drill Bits – https://amzn.to/48Kaaf7
Router Bits (Straight Router Bit) – https://amzn.to/3NQNDVX
M6 Bolts, Washers, T-Nuts, Wood Screws
Hardware Assortment Kit – https://amzn.to/41PodgQ
DIY T-track Bolts
Tools:
Table Saw – https://amzn.to/47mWiGf
Grr-Ripper Push Block – https://amzn.to/3vjQSP7
Trim Router – https://amzn.to/3HbQcOg
Cordless Hand Drill – https://amzn.to/3HqLEnH
Corded Hand Drill / Drill Press – https://amzn.to/3NSA3Bo
Guide Rail Clamps – https://amzn.to/3tEKaCW
F-Clamps – https://amzn.to/48ArzY1
One Hand Clamps – https://amzn.to/48jGxkZ
Machinist Square / Speed Square
Measure Tape – https://amzn.to/3TN0SKM
Check all the Tools I Use
We may earn an affiliate commission when you buy something through our retail links. As an Amazon Associate AllFlavor Workshop earns from qualifying purchases.
What is a Table Saw Taper Jig?
A table saw taper jig is a useful woodworking tool that helps create tapered cuts with precision and ease. It is particularly handy for making angled cuts on workpieces, where one end is narrower than the other, or straightening a live edge. The taper jig holds the workpiece securely and guides it along the table saw’s blade, resulting in smooth and accurate taper cuts. This jig is perfect for various woodworking projects, such as furniture making, trim work, and crafting decorative elements.
Benefits of a Tapering Jig
These are some of the benefits of using a tapering jig for the table saw.
- Precise Taper Cuts: A table saw taper jig enables you to achieve accurate and consistent tapered cuts on various workpieces. It ensures that your angles are just right.
- Versatility: You can create tapers on a wide range of materials, including wood, plywood, and even some metals. This versatility makes it a valuable tool for different woodworking and DIY projects.
- Increased Safety: It holds the workpiece securely, minimizing the risk of kickbacks and ensuring a safer cutting experience. It allows you to keep your hands away from the blade, reducing the likelihood of accidents.
- User-Friendly: Using a table saw taper jig is straightforward and doesn’t require advanced skills. Woodworkers of all levels can easily use.
Let's start building!
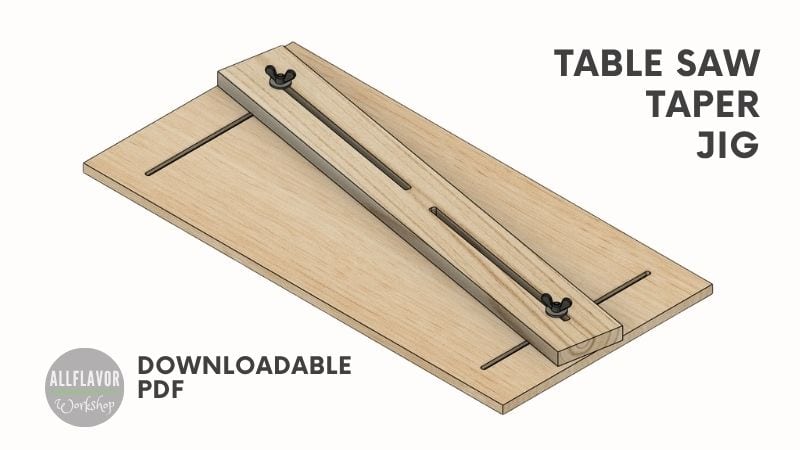
Making a simple tapering jig involves making the main board, the t-tracks, and the adjustable fence.
For the base, I used a plywood board, and the stop block is made of plywood scraps. The fence is made of spruce wood and should be slightly thicker to provide sufficient support for the material cut.
Properties:
- Material: Baltic birch plywood, Spruce wood
- Total dimensions: 300mm x 600mm x 12mm (11.81″ x 23.62″ x 0.47″)
- Clamping and attachment: Homemade T-track bolts, Wooden Knobs, Slot Clamps (optionally Toggle Clamps)
How to Build a DIY Table Saw Taper Jig (Step-by-Step)
Step 1: Cut the Base
Rip and crosscut the plywood base to the desired dimensions (300mm x 600mm x 12mm). Then draw the t-slots on the base and cut them out using a trim router.


Step 2: Cut the T-Slots
Cut a wider shallow slot deep enough to fit the bolts’ head and then use a straight router bit or a spiral bit to cut a groove all the way through in the center of the slot. Cut a t-slot on both sides of the board.
NOTE: Make sure the head of the bolt is sunk and does not protrude above the surface.


Once you’re done, the bolt’s head should snugly fit into the track, allowing it to slide with ease
Find This Blog Post Useful?
Join my newsletter to receive the latest news, tutorials, and project plans sent directly to your inbox!
Step 3: Build the Fence
Cut the fence to size (80mm x 600mm). Draw two t-slots along the centerline of the fence and cut them out (I couldn’t use a dado jig to route the slots since the fence is quite narrow, instead, I used my multi-function router base). Once finished sand the edges of the slots and the fence to get rid of splinters.
TIP: Instead of cutting one long line, opt for cutting two separate lines with some space in the middle. This approach will enhance the fence’s strength, preventing any bending or warping issues.
You can use these two long t-slots in the fence for multiple purposes. They’ll serve as attachment points for securing the fence to the base and also allow you to mount both the hold-down clamps and the back stopper conveniently.


Step 4: Make the Stop Block
Cut two plywood strips and join them together using glue and screws. Then drill a hole in the center of the longer piece for attachment.


Now you can assemble all the pieces together. First, attach the hold-down clamps and the stop block to the fence. Then use toilet bolts and wooden knobs to attach the fence to the base. The hold-down clamps hold the workpiece in place securely, while the back stopper helps with the positioning of the workpiece.
This is what the finished taper jig looks like

How to Cut a Taper on a Table Saw
Here are the steps on how to cut a taper on a table saw, explained in a few simple points:
- Place the taper jig on the table saw, aligning it between the fence and the table saw blade, ensuring the jig’s edge is flush with the inside edges of the blade teeth.
- Lock the ripping fence in position and check that the taper jig moves smoothly without any obstructions.
- Move the jig away from the base and draw a cutting line on the workpiece.
- Position the workpiece on the base so that the drawn line aligns with the edge of the base.
- Adjust the stop block if needed and secure the workpiece with clamps.
- Start the saw, keep your hand and fingers safely away from the blade, and guide the jig against the table saw fence while slowly moving forward.
TIP: If you need to cut multiple faces on a leg, rotate the workpiece and use the stop block to maintain the same position. Then clamp down the leg again, and safely make the cut. Use sandpaper to smooth the edges.


Conclusion
There it is – a Taper Jig for a table saw!
This table saw jig will allow you to rip long wooden pieces at an angle or taper furniture legs with ease. It is an easy-to-build jig and everyone can use it. Definitely worth having in the workshop.

Make a Taper Jig for Table Saw
Woodworking Jigs I used to build it:
These are the tools and jigs I have used to build the jig. Not all of them are necessary but they make life easier:
Frequently Asked Questions
Can a Table Saw cut at an angle?
A table saw is known for its suitability in ripping long pieces of wood and lumber. A table saw can also cut at an angle using a miter gauge while crosscutting and a taper jig when making rip cuts in longer pieces of wood at specific angles.
What is the best way to cut a taper using a table saw?
The best way to cut a taper using a table saw is by employing a tapering jig, which is a specialized tool designed to ensure accurate and safe taper cuts in woodworking projects.
How long should a tapering jig be?
The length of a tapering jig should be chosen based on the specific tasks required, but a typical length is around 24 inches, and generally, the longer the taper jig, the better it can accommodate workpieces of varying sizes and dimensions.
What are tapered legs on a table?
Tapered legs on a table refer to legs that possess a gradual reduction in width along their length, offering not only an aesthetically pleasing design but also enhanced stability for the table.
How many sides are typically tapered on a table leg?
When it comes to tapering table legs, typically two or four sides are tapered, which involves either tapering the two sides facing the inside of the table or tapering all faces of the leg, depending on the desired outcome and design.
