
A multi-purpose router jig is one of the most versatile woodworking jigs you can have in your workshop. What makes it so useful is that it can be adapted for a wide range of tasks — from cutting dados, grooves, and rabbets to making mortises, flattening wooden surfaces, creating custom T-tracks, and even cutting circles.
I originally built this jig as a way to make custom T-tracks and improve the versatility of my trim router. Over time, it became one of my most-used router jigs. Today, I use it regularly as the upper carriage for my router flattening jig, but it also serves as a dado jig, mortising jig, circle-cutting jig, and general-purpose router guide.
One thing I really like about this build is that it replaces several dedicated jigs while taking up very little space in the workshop. Instead of building a separate jig for every task, you can start with this router base and add simple accessories as needed.
The jig is made from Baltic birch plywood and MDF, which are two of my favorite materials for making woodworking jigs. They are strong, stable, easy to work with, and perfect for workshop projects like this.
This project is best suited for advanced beginners and intermediate woodworkers. It requires a bit more precision than some of my simpler jigs, but the result is a tool you’ll likely use for years.
If you want the more complete version of the build, I also now offer premium woodworking plans for selected workshop jigs and cutting board projects.
DIY Multi-Purpose Router Jig Video
Watch the video below to see the complete build process and some of the different ways you can use this multi-purpose router jig. I’ll show you how to build the router base, install the handles, make the guide rails, and use the jig for tasks like cutting dados, mortises, T-tracks, circles, and flattening wooden surfaces.
I appreciate every YouTube subscriber. It’s free and easy to subscribe to — just Click Here To Subscribe. Thank you!
Table of Contents
- Multi-purpose Router Jig Plans
- The Material you will need
- General Questions
- What are the benefits of making a multi-purpose router jig?
- How to Make a Multi-Purpose Router Jig
- Step 1: Cut the Router Base Pieces
- Step 2: Make the Handles
- Step 3: Cut the MDF Router Base Desk
- Step 4: Assemble the Router Base
- Step 5: Attach the Handles
- Step 6: Attach the Router to the Base
- Step 7: Make Accessories for the Multi-Purpose Router Jig
- What Can you do With a Multi-Purpose Router Jig
- Woodworking jigs used for the project
*Safety is your responsibility. Make sure you know what you’re doing and take all necessary safety precautions while working with power tools. Safety comes first!
Multi-Purpose Router Jig Plans
If you want the more complete version of the plans, I also now offer premium woodworking plans for selected workshop jigs and cutting board builds. This router jig is one of the most useful builds in my shop because it replaces several dedicated jigs while also working as the upper carriage for my router flattening setup.
What You'll Need to Build the Multi-Purpose Router Jig
Here are the materials and tools I used to build this versatile router jig.
Router Base
Plywood 1x – 300 mm x 170 mm x 6 mm
MDF/HDF 1x – 300 mm x 170 mm x 6 mm – https://amzn.to/3S7vzt4
Handles
Plywood 2x – 100 mm x 30 mm x 27 mm – https://amzn.to/3TPULp2
M6 Bolts – 30 mm – https://amzn.to/41PodgQ
Router Base Guides (Base Attachments)
MDF 2x – 230 mm x 40 mm x 16 mm
Check all the Tools I Use
Tools:
Trim Router – https://amzn.to/3HbQcOg
Drill Press – https://amzn.to/3NSA3Bo
Hand Drill – https://amzn.to/3HqLEnH
Circular Saw – https://amzn.to/4aMD0xg
Angle Grinder – https://amzn.to/48K2klD
Narex Chisels – https://amzn.to/3tHNJrT
One Hand Clamps – https://amzn.to/48jGxkZ
Spring Clamps – https://amzn.to/41Nuh9D
Japanese Ryoba Saw – https://amzn.to/48if4Qz
Center Punch – https://amzn.to/48Fq7mv
Machinist Square / Speed Square
Other:
Wood Glue – https://amzn.to/48ltKhJ
Epoxy – https://amzn.to/3tJ5R4L
Drill bits – 6mm – https://amzn.to/48Kaaf7
Router bits – 6mm – https://amzn.to/3NQNDVX
Forstner bits – 10mm – https://amzn.to/3Hd1aDb
Double-Sided Woodworking Tape – https://amzn.to/3tPMGpM
Sandpaper Sheets – https://amzn.to/41OMx2p
Spray Laquer – https://amzn.to/3RRED3J
Some of the links above are affiliate links. If you buy through them, I may earn a small commission at no extra cost to you.
📌 Pin this to your woodworking board so you can build this multi-purpose router jig later:

What Are the Benefits of Making a Multi-Purpose Router Jig?
A multi-purpose router jig is useful because it replaces several dedicated router jigs with one adjustable base. Instead of building a separate jig for every task, you can use the same router base with different guides, accessories, and setups.
Here are the main benefits:
- Versatility – You can use it for cutting dados, grooves, rabbets, mortises, circles, homemade T-tracks, and even flattening wooden surfaces.
- Better Router Control – The larger base gives your trim router more stability, which helps reduce tipping and makes routing safer and more accurate.
- Adjustable Guide Rails – The guide rails can be moved and locked in different positions, so you can adapt the jig to different workpieces and cuts.
- Reusable Accessories – The T-slots allow you to attach guide rails, stops, pivot pins, and other add-ons whenever needed.
- Great for Cutting Board Jigs – I also use this router base as the upper carriage for my router flattening jig, which makes it especially useful when working on cutting boards.
- Small Workshop Friendly – It doesn’t take much space, and one jig can cover many routing tasks.
TIP: If you build your jigs around the same T-track system, you can reuse the same bolts, clamps, stops, and accessories across multiple projects.
| Woodworking Task | Multi-Purpose Router Jig | Additional Setup Needed |
|---|---|---|
| Freehand Routing | ✓ | None |
| Dados & Grooves | ✓ | Guide Rails |
| Rabbets | ✓ | Guide Rail |
| Mortises | ✓ | Guide Rails |
| Homemade T-Tracks | ✓ | Guide Rails |
| Circle Cutting | ✓ | Pivot Attachment |
| Flattening Small Parts | ✓ | Guide Rails |
| Flattening Cutting Boards & Slabs | ✓ | Router Flattening Jig |
One of the biggest advantages of a multi-purpose router jig is that a single router base can handle many different woodworking tasks simply by changing the guide rails or adding accessories.
Let's Start Building!
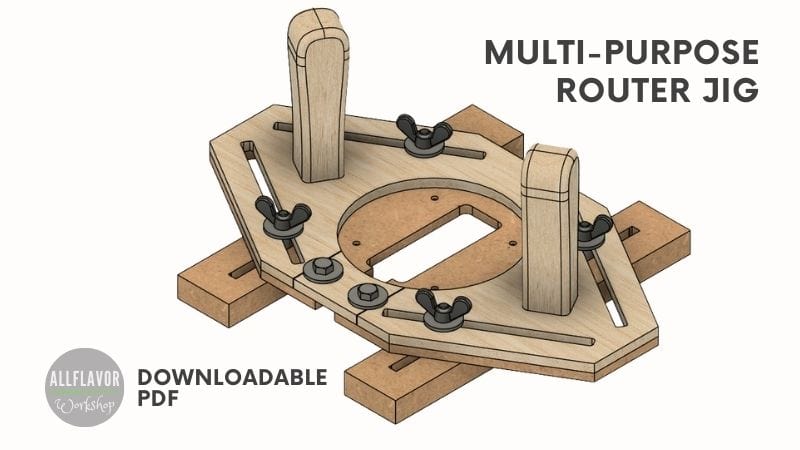
The multi-purpose router jig consists of three main parts: the router base, the handles, and the adjustable guide rails.
The base is made from Baltic birch plywood and MDF. Together, they create a strong and stable platform that gives the router more support and reduces tipping during cuts.
What makes this jig so useful is the integrated T-slot system. It allows you to attach guide rails, stops, pivot pins, and other accessories, turning the same router base into a jig for cutting dados, rabbets, mortises, circles, homemade T-tracks, and more.
The handles are positioned to provide good control while routing and are secured with both screws and epoxy to withstand the pressure applied during use.
Multi-Purpose Router Jig Features
- Large Router Base – improves stability and control
- Integrated T-Slots – supports accessories and add-ons
- Adjustable Guide Rails – useful for dados, mortises, and rabbets
- Expandable Design – adapts to many routing tasks
- Workshop-Friendly – replaces several dedicated router jigs
NOTE: One of my favorite uses for this jig is as the upper carriage for my router flattening jig. Combined together, they make flattening cutting boards, slabs, and glued-up panels much easier.
Building the Multi-Purpose Router Jig
Step 1: Cut the Router Base Pieces
To build the router base, you will need to cut two rectangles: one from plywood and the other from MDF. The dimensions of each rectangle are 170 x 300mm. To ensure precise cuts, I used a circular saw straight edge guide. (If you have, use a table saw)
The router base is made from two identical pieces — one from Baltic birch plywood and one from MDF. Both pieces measure 300 mm × 170 mm and will later be joined together to create a strong, stable, and smooth router base.
To make the cuts, I used a circular saw together with a straight edge guide. If you have a table saw, this is a perfect opportunity to use it. The most important thing is that both pieces are identical in size and square, since they will be used together throughout the next steps of the build.
TIP: Before cutting the slots, temporarily attach the plywood and MDF pieces together using double-sided tape. This allows you to cut both pieces at the same time and ensures the slots line up perfectly afterward.
Once the base pieces are cut, you can move on to creating the T-slots and router opening.


1. Cut the T-Slots in the Base
The T-slots are what make this jig adjustable and versatile. They allow you to attach guide rails, stop blocks, pivot pins, and other accessories that transform the router base for different tasks.
Start by marking the slot locations and cutting the corners of the router base. Then rout the slots using a router and a dado jig. This is one of the most important steps of the build, so take your time and make sure the slots are straight and evenly spaced.
If you don’t have a router dado jig, a jigsaw can also be used, although the cuts may require a bit more cleanup afterward.
NOTE: Accurate T-slots are the foundation of this project. Most of the jig’s accessories rely on them, so spending extra time here will pay off later.

2. Cut the Router Opening
Next, cut the opening in the center of the plywood base. I used a circle cutting jig to make a clean opening, but a jigsaw works just as well.
The opening only needs to be large enough to provide clearance for your router bits and for the entire router base. (I have a diameter of 100mm)
TIP: Before cutting, place your router on the base and confirm that the opening is properly centered. It’s much easier to adjust the layout now than after the hole is cut.

Step 2: Make the Handles
The handles are a small part of the build, but they make a big difference when using the jig. Since routing often requires steady downward pressure and good control, the handles need to be comfortable, sturdy, and securely attached.
For this build, I made the handles from laminated plywood. I glued three plywood strips together and then shaped them into a comfortable grip. The exact shape isn’t critical — a simple handle works just as well as a decorative one. The important thing is that it feels comfortable in your hand and provides a secure grip while routing.
1. Shape the Handles
Begin by gluing three strips of plywood together, each measuring 200mm x 30mm x 27mm. Secure the strips in a wooden vise and shape them to your desired handle shape. Once complete, cut the strips in half to create two handles.
Next, drill a 6mm hole in the bottom of each handle and apply a layer of lacquer to protect and strengthen the handles while also bringing out the beauty of the plywood grain.
TIP: Round over the edges slightly. Even a small chamfer or roundover makes the handles much more comfortable during longer routing sessions.
RELATED: How to make a herringbone pattern on a plywood handle


2. Prepare the Router Base for the Handles
Next, drill the mounting holes in the router base. These holes will hold the bolts that secure the handles to the jig.
To keep the bottom of the base flat, create recesses for the bolt heads. In my build, I cut hexagonal pockets so the bolt heads would sit flush and couldn’t rotate when tightening the handles.
NOTE: Make sure the bolt heads sit completely flush with the bottom of the base. Any protrusion can affect how smoothly the jig slides across the workpiece.
One thing I like about this design is that the handles are attached using both bolts and epoxy, creating a very strong connection that easily withstands the forces generated while routing.

Find This Blog Post Useful?
Join my newsletter to receive the latest news, tutorials, and project plans sent directly to your inbox!
Step 3: Cut the MDF Router Base Desk
Before assembling the router base, there are a few additional cuts that need to be made in the MDF layer. This piece forms the bottom of the jig and is responsible for creating the T-slot system as well as providing the mounting points for the router.
1. Create the T-Slots
The slots cut earlier in the plywood need to be enlarged in the MDF piece to create the T-slot profile. Once both layers are glued together, these enlarged slots will allow T-track bolts to slide freely while remaining captured inside the track.
You can cut the T-slots using a router, which gives the cleanest results, or a jigsaw if that’s what you have available in the workshop.
One thing I like about this setup is that I use the same T-slot dimensions across many of my projects. This allows me to reuse the same hold-down clamps, bolts, stop blocks, and other accessories from one jig to another.
TIP: Test a T-track bolt in the slot before assembly. It should slide smoothly without excessive play.
RELATED: How to make a custom T-track system

2. Cut the Router Mounting Openings
Next, cut a square opening in the center of the MDF base. This opening provides visibility around the router bit and improves chip extraction while routing.
After that, drill the four mounting holes used to attach the router to the jig. Make sure the holes are positioned accurately according to your router base.
NOTE: The mounting bolt heads should sit flush with the surface of the MDF base. Any protruding hardware can interfere with the workpiece or affect how smoothly the jig slides.
One advantage of the larger square opening is that it provides better visibility than a small circular hole, making it easier to see your layout lines and monitor the cut while routing.

Step 4: Assemble the Router Base
Now it’s time to bring the two base pieces together and create the finished router base.
Start by inserting the mounting bolts into the recessed pockets in the plywood base. I secured the bolt heads with epoxy to prevent them from spinning when tightening the router or accessories later. This also helps keep everything permanently aligned.
Once the epoxy has cured, apply wood glue to the MDF base and carefully align it with the plywood piece. Make sure the edges, T-slots, and center openings line up properly before clamping everything together.
Take a few moments to check that the assembly remains flat while the glue dries. A flat base is important because the jig needs to slide smoothly and consistently across the workpiece.
TIP: Use several clamps or add weight evenly across the surface during glue-up. This helps create a strong bond and prevents gaps between the two layers.
NOTE: Double-check that no glue squeezes into the T-slots. Any dried glue inside the tracks can interfere with bolts and accessories later on.
At this point, the router base is complete and you can move on to attaching the handles.

Step 5: Attach the Handles
Start by applying a small amount of epoxy to the mounting bolts and inside the handle holes. Then slide the handles onto the bolts and position them correctly on the router base.
The handles should be placed far enough apart to provide a comfortable grip while still leaving enough room for the router body in the center. Once installed, tighten everything securely and allow the epoxy to cure.
I decided to use both bolts and epoxy for attaching the handles. Routing puts a surprising amount of force on the handles, especially when flattening surfaces or making deeper cuts, so I wanted the connection to be as strong as possible.
TIP: Before the epoxy cures, hold the jig and test the handle position. Small adjustments now can make the jig much more comfortable to use later.
NOTE: The handles should feel solid with no movement or flex. A secure handle connection improves both control and safety when routing.

Step 6: Attach the Router to the Base
The final step is attaching the trim router to the completed base. Once installed, the jig is ready to be used for a wide range of routing tasks.
Start by turning the router base upside down and positioning the router over the mounting holes. The router should sit centered in the opening, providing enough clearance for the router bit while still leaving good visibility of the cutting area.
Insert the mounting screws through the base and secure the router in place. Before tightening everything fully, check that the router is properly aligned and that the bit is centered in the opening.
One thing I like about this design is that it can be adapted to different routers. Depending on the router model, you may need to adjust the mounting hole pattern or drill additional holes in the base.
NOTE: Make sure all mounting screws are tightened securely. Any movement between the router and the base can affect accuracy and lead to inconsistent cuts.
At this point, the multi-purpose router jig is fully assembled and ready for accessories, guide rails, and routing operations.

Adding Guide Rails and Accessories
The multi-purpose router jig can be used on its own, but its real strength comes from the accessories that can be attached to the integrated T-slots.
The simplest accessories are two adjustable guide rails. They help guide the router for cutting dados, grooves, rabbets, mortises, and homemade T-tracks. The same rails can also be used when flattening smaller workpieces.
To make them, cut two identical MDF strips measuring 230 mm × 40 mm × 16 mm and add a slot in each strip for a T-track bolt. The rails can then be attached to the router base using T-track bolts and wing nuts.
Because the rails are adjustable, you can position them differently depending on the task. In some cases you may use a single rail, while other operations benefit from using both rails together.
TIP: Build your accessories around the same T-slot system. This allows you to reuse bolts, clamps, stops, and other hardware across multiple jigs.


What Can You Do With a Multi-Purpose Router Jig?
This is where the multi-purpose router jig really shines. By adjusting the guide rails or adding simple accessories, the same router base can be used for a wide variety of woodworking tasks.
I originally built this jig to make custom T-tracks, but over time it became one of my most-used router jigs. Today I use it for everything from cutting dados and mortises to flattening surfaces and making circle cuts.
One thing I like most about this design is that it grows with your workshop. You can start with the basic router base and gradually add accessories as new projects require them.
1. Freehand Routing
The multi-purpose router jig can be used on its own without any guide rails or accessories attached. The larger base provides more stability and support than the original router base, making it easier to control the router during freehand cuts.
This is especially useful when working near edges, routing narrow parts, or flattening small areas where a standard trim router base might feel unstable.
I often use the jig in this configuration for quick routing tasks where setting up guide rails would take longer than the cut itself.
TIP: The larger base helps reduce router tipping and gives you better visibility and control while routing.
2. Cutting Dados, Grooves, and Rabbets
This is one of my favorite ways to use the multi-purpose router jig. By attaching one or both guide rails, the router can be guided accurately along the workpiece, making it easy to cut dados, grooves, and rabbets with consistent results.
For edge cuts such as rabbets, a single guide rail is often enough. For dados and grooves in the middle of a workpiece, both guide rails can be used to keep the router perfectly aligned throughout the cut.
This setup works especially well for longer boards and panels where maintaining a straight cut is important. Simply adjust the guide rails to the required position, set the cutting depth, and make several shallow passes until you reach the final depth.
I often use this setup when building workshop jigs, cabinets, and cutting board accessories where accurate joinery is important.
👉 RELATED: Router Jig for Cutting Dados and Slots
TIP: Take multiple shallow passes instead of removing all the material at once. The cuts will be cleaner, the router will work more efficiently, and you’ll have better control throughout the cut.
NOTE: If you need to cut wider dados, make one pass, adjust the guide rail position slightly, and make additional passes until you reach the desired width.

3. Making Homemade T-tracks and T-slots
One of the reasons I originally built this jig was to make custom T-tracks and T-slots for my woodworking projects. Since the guide rails allow you to cut accurate and repeatable dados, creating homemade T-tracks becomes surprisingly easy.
The process starts by routing the center slot where the T-track bolt will slide. Once that is done, route the outer grooves and glue thin strips of wood on top. Together, the center slot and the wooden strips form a simple but very effective T-track system.
I use this approach in many of my workshop jigs because it is affordable, customizable, and allows me to keep a consistent T-track standard across different projects.
👉 RELATED: How to make a custom T-track system
TIP: Make sure the wooden strips are perfectly flush with the workpiece surface. Even a small lip can interfere with accessories and make bolts harder to slide.
NOTE: Before gluing the strips permanently, test the fit with a T-track bolt. The bolt should slide freely along the entire length of the track.

4. Cutting Mortises
The multi-purpose router jig can also be used for cutting mortises. By adjusting the guide rails around the workpiece, the router is guided along a controlled path, making it easy to create straight and consistent mortises.
Depending on the workpiece and the size of the mortise, you can use one or both guide rails. The rails help keep the router stable and prevent it from drifting away from the layout lines during the cut.
To cut a mortise, position the guide rails around the workpiece, set the cutting depth, and make multiple shallow passes until you reach the final depth. This method works particularly well for furniture parts, frame construction, and other joinery projects.
RELATED: How to Make a Benchtop Router Mortising Jig
TIP: Make several shallow passes instead of one deep cut. This reduces stress on the router bit and results in cleaner mortise walls.
NOTE: Before routing, mark the mortise boundaries clearly on the workpiece. This makes it easier to stop the cut at the correct location and avoid overshooting the layout lines.


5. Flattening Wooden Surfaces
One of my favorite ways to use this multi-purpose router jig is for flattening wooden surfaces. By attaching the guide rails and using a surfacing bit, you can remove high spots and create a flat reference surface on a workpiece.
This setup works especially well for smaller projects such as cutting boards, handles, serving trays, and glued-up panels. The guide rails keep the router stable while the larger base helps distribute pressure evenly across the surface.
For larger workpieces, I use this router base as the upper carriage of my router slab flattening jig. Combined together, the two jigs make it possible to flatten cutting boards, slabs, and other wide panels that would be difficult to process with standard workshop tools.
👉 RELATED: Router Slab Flattening Jig
To flatten a workpiece, secure it firmly to a flat surface, adjust the guide rails to fit the width, set the cutting depth, and make overlapping passes across the surface. Continue until the entire face is flat and consistent.
TIP: Use a surfacing bit and take light passes. Removing too much material at once can leave a rougher surface and place unnecessary strain on the router.
NOTE: Make sure the workpiece is securely fixed before routing. Any movement during flattening will affect the final result.

6. Cutting Circles in Wood
Another useful application of this jig is cutting circles. By adding a simple pivoting attachment, the router base can be transformed into a circle-cutting jig capable of producing accurate circles of different diameters.
There are two ways to do this. The first uses a pivot pin placed directly in the workpiece, while the second uses a separate pivoting attachment that allows you to cut circles without drilling into the finished piece.
For occasional circle cuts, I typically use a simple pivot setup attached to the router base. For projects that require frequent circle cutting or precise diameter adjustments, I prefer using a dedicated circle-cutting jig.
This method works well for making round tabletops, signs, trays, templates, and other circular woodworking projects.
👉 RELATED: Router Circle Cutting Jig
TIP: Make multiple shallow passes when cutting circles, especially in thicker material. The cut will be cleaner and easier to control.
NOTE: Before starting the cut, rotate the router around the pivot point by hand to make sure nothing interferes with the travel path.

Why This Is One of My Most-Used Router Jigs
Over the years, I’ve built quite a few router jigs, but this one remains one of the most useful in my workshop. The main reason is its versatility. Instead of building a separate jig for every routing task, I can use the same router base and simply change the guide rails or accessories.
I regularly use it for cutting dados, rabbets, mortises, homemade T-tracks, and flattening smaller workpieces. It also serves as the upper carriage for my router slab flattening jig, making it an important part of my cutting board workflow.
Another thing I like is that it follows the same T-track system I use in many of my other jigs. This allows me to reuse the same bolts, clamps, stops, and accessories across multiple projects, making the entire workshop setup more flexible.
TIP: If you’re building several woodworking jigs, try to standardize your T-track dimensions. Being able to reuse hardware between projects saves both time and money.
Wrap-Up: Why a Multi-Purpose Router Jig Is Worth Building
A multi-purpose router jig is one of those workshop projects that keeps proving its value long after it’s finished. What started as a simple router base quickly became one of the most versatile jigs in my workshop.
What I like most about this design is that it can replace several dedicated jigs. With a few guide rails and simple accessories, the same base can be used for cutting dados, grooves, rabbets, mortises, circles, homemade T-tracks, and flattening wooden surfaces. Instead of building a separate jig for each task, you can build one platform and adapt it as your workshop grows.
I also use this jig regularly as the upper carriage for my router slab flattening jig. Combined together, they make flattening cutting boards, slabs, serving trays, and glued-up panels much easier. For that reason alone, this has become one of the most important router jigs in my cutting board workflow.
Another advantage is that the jig uses the same T-slot system found in many of my other projects. This allows me to reuse the same clamps, bolts, stop blocks, and accessories across multiple jigs, making the entire workshop setup more efficient.
If I were building my workshop from scratch again, this would definitely be one of the first router jigs I would make. It’s compact, versatile, affordable, and useful for a surprising number of woodworking tasks.
👉 If you’re building cutting boards, don’t miss my guide on Best Jigs for Making Cutting Boards. Many of the jigs in that guide work perfectly alongside this router jig, and if you want the more complete version of the builds, you can also browse my woodworking plans page.
Frequently Asked Questions
What is a multi-purpose router jig used for?
A multi-purpose router jig can be used for a variety of woodworking tasks, including cutting dados, grooves, rabbets, mortises, circles, homemade T-tracks, and flattening wooden surfaces. By changing the guide rails or adding accessories, the same router base can be adapted for different projects.
Can I use any trim router with this jig?
Yes. The design can be adapted to fit most trim routers by adjusting the mounting hole pattern. Before drilling the base, verify the mounting dimensions of your router.
Is this a good project for beginners?
This project is best suited for advanced beginners and intermediate woodworkers. The build requires accurate layout work and router cuts, but the construction itself is straightforward and can be completed in a weekend.
Can this jig be used for flattening cutting boards?
Absolutely. The jig works well for flattening smaller cutting boards on its own and can also be used as the upper carriage of a router slab flattening jig for larger boards and panels.
Do I need the guide rails for every operation?
No. The router base can be used on its own for freehand routing. The guide rails are mainly used when cutting dados, grooves, mortises, T-tracks, or flattening surfaces.
Can I add more accessories to this router jig?
Yes. The integrated T-slots allow you to attach guide rails, stop blocks, pivot pins, fences, and other accessories. This is what makes the jig so versatile and adaptable.
