
Having a drill press table is critical for anyone who has a drill press in the workshop and wants to achieve the best results in woodworking. A drill press table makes the work so much easier and helps ensure accurate results, especially when used with additional accessories such as table t-tracks, a table fence, or hold-down clamps.
There are a few ways how to attach a drill press table to a drill press. It can be mounted on an already existing table or attached to the base of the drill press. In this case, the drill press table forms the entire base of the drill press stand. It is removable and easily replaceable.

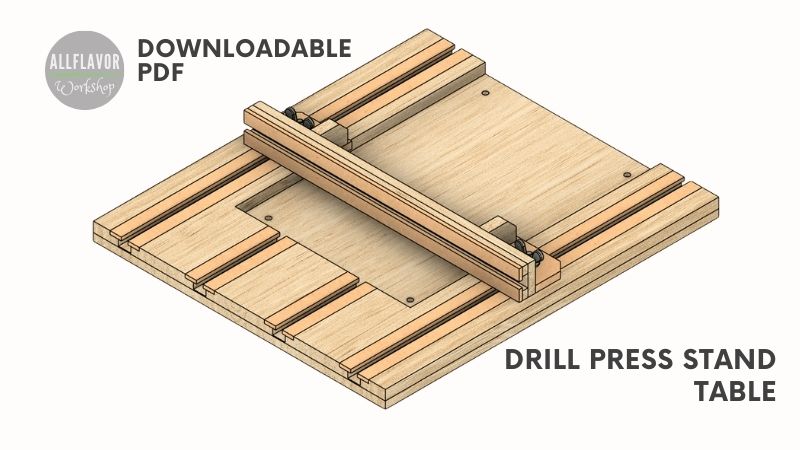
The drill press table built in this article is an add-on for a drill press stand I built earlier. It forms the base of the drill press stand, adds robustness, and improves stability. The table contains built-in DIY t-tracks and can be enhanced with additional accessories such as a table fence, stop blocks, or hold-down clamps.
The table is attached to the stand with screws which can be quickly removed, allowing the stand to be used independently. The entire build is made of Baltic birch and HDF, it is not too heavy, which makes it an easily portable solution that can be used anywhere in the workshop.
In this article, I will show you how to make a replaceable drill press table, how to attach it to a drill press, and how to use it and we will also look at accessories that can be used with the table.
Let’s get right into it.
DIY Replaceable Drill Press Table Video
If you want to know how to make a drill press table for a drill stand, watch the video below for a step-by-step guide.
I appreciate every YouTube subscriber. It’s free and easy to subscribe to — just Click Here To Subscribe. Thank you!
Table of Contents
- Drill Press Stand Table Plans
- The Material you will need
- FAQ Drill Press Table
- How big should a drill press table be?
- How to add T-tracks to a drill press table?
- How to Make a Drill Press Table (for a Drill Stand)
- Step 1: Prepare the Drill Stand Base
- Step 2: Cut the Shape of the Drill Press Table
- Step 3: Attach the Table Baseboards Together
- Step 4: Make the T-tracks
- Step 5: Attach the Drill Press Stand to the Table
- Step 6: Make a Simple Drill Press Table Fence
- How to Setup and Use a Drill Press Table for a Drill Stand
*Safety is your responsibility. Make sure you know what you’re doing and take all necessary safety precautions while working with power tools. Safety comes first!
What you'll need to make a DIY Drill Press Table
Drill Press Table
Plywood drill stand – 210 mm x 300 mm x 12 mm – https://amzn.to/3TPULp2
Plywood boards – (350 mm x 400 mm x 12 mm; 350 mm x 400 mm x 9 mm)
DIY T-tracks
HDF Strips – 330 mm x 60 mm x 35 mm
DIY T-track Fence
Plywood – 330 mm x 9 mm x 35 mm
Plywood – 330 mm x 10 mm x 6 mm
HDF Strips – 330 mm x 13,5 mm x 4 mm
DIY T-track bolts
Check all the Tools I Use
Tools:
Corded Hand Drill / Drill Press – https://amzn.to/3NSA3Bo (Bosch GSB 13 Review)
Trim Router – https://amzn.to/3HbQcOg
Hand Drill – https://amzn.to/3HqLEnH
One Hand Clamps – https://amzn.to/48jGxkZ
Spring Clamps – https://amzn.to/41Nuh9D
F-Clamps – https://amzn.to/48ArzY1
Chisels – https://amzn.to/3tHNJrT
Marking Gauge (Make your own)
Mini F- Clamps – https://amzn.to/3RJwNJK
Machinist Square / Speed Square
Other:
Double-Sided Woodworking Tape – https://amzn.to/3tPMGpM
Wood Glue – https://amzn.to/48ltKhJ
Forstner Bits – https://amzn.to/3Hd1aDb
Straight router bit – Straight Router Bit
Handle
Wood Screws, Washers, Bolts – https://amzn.to/41PodgQ
T-nuts, Wing Nuts
T-Track Clamps – https://amzn.to/3tEKaCW
We may earn an affiliate commission when you buy something through our retail links. As an Amazon Associate AllFlavor Workshop earns from qualifying purchases.

How big should a drill press table be?
A drill press table does not have a standardized size. The size of the table mainly depends on the size of the drill press, the tasks you want to perform, and the accessories the table should have. A sufficient drill press table size can range from 25x30cm to 50x60cm.
A drill press table with dimensions smaller than 25x30cm may not be sufficient due to its limited work surface. A table larger than 50x60cm may be unnecessarily big and take up a lot of space. The optimal dimensions of a drill press table would be around 40x50cm.
How to add T-tracks to a drill press table?
If you want to get the most out of your drill press table, use a table that is equipped with additional accessories such as table t-tracks, a table fence, and hold-down clamps. These table add-ons will make your work easier and help ensure better results.
There are a few ways how to add t-tracks to a drill press table. First, you can cut a slot in the table and screw a shop-made miter track into it. Secondly, you can directly cut a slot in the table with a specialized t-slot router bit. Thirdly you can make a custom t-track by routing a few slots in the table and gluing multiple layers of wood on top of each other.
Read this article, if you want to know in detail how to build DIY T-tracks – 3 Ways How to Make DIY T-tracks & T-Slots
Let's start building!
The drill press table is attached to the drill press stand with flat-head bolts. The body is made from plywood and the t-tracks are from HDF strips.
Drill Press Table properties:
- Material: Plywood, HDF
- Total dimensions: 21m x 30cm x 2,1cm
- DIY T-tracks for additional accessories
This is a project for woodworking beginners and can be finished during the weekend. If you are looking for a starter drill press table check this article: make a simple drill press table
How to Make a Drill Press Table (for a Drill Stand)
Step 1: Prepare the Drill Stand Base
Remove the base from the drill stand. Use double-sided tape and attach the base to a workbench.
TIP: Use a pad or a sacrificial board underneath the stand base.

1. Cut a Circle in the Center of the Base
Mark the drill position on the base and cut a ⌀6mm circle using a router circle cutting jig. You can also use a hole saw if you don’t have a router. (Don’t throw away the cut circle)
2. Mark Holes on the Base for Attachment
Mark the positions in the corners of the base (2cm from each side) and drill holes with a 2mm drill bit.


Step 2: Cut the Shape of the Drill Press Table
Cut 2 baseboards for the drill press table (12mm, 9mm thick).
Position the drill stand base on the baseboard (12mm) and cut a rectangle into it so that the stand base fits exactly into the cut shape.
To cut the exact shape in the table I am using a router dado jig with stoppers. As the name suggests, it is more intended to cut dados and grooves, but in this case, it will work great.


Clean the corners with a chisel.

Find This Blog Post Useful?
Join my newsletter to receive the latest news, tutorials, and project plans sent directly to your inbox!
Step 3: Attach the Table Baseboards Together
Glue the drill press table baseboards together. Additionally use screws to fix them tightly.
NOTE: Be careful where you drill. Drill the screws in places where you will not cut the slots for t-tracks.


Insert the drill stand into the table and see how it fits. Make adjustments as necessary. The drill press table and the drill stand base need to be flush.

Step 4: Make the T-tracks
Draw the t-tracks on the drill press table and use a dado jig to cut all the slots. You can find detailed measurements on the t-tacks in the following article – 3 Ways How to Make DIY T-tracks & T-Slots


Glue HDF strips in the slots to finish the t-tracks (optionally, you can use screws). Make sure the strips are flush with the surface.
NOTE: Also, make sure the glue does not get in the slots. It is quite hard to clean the tracks afterward.

Step 5: Attach the Drill Press Stand to the Table
Place the drill stand on the table and transfer the pre-drilled holes from the stand to the table. Drill ⌀20mm (Forstner bit) and ⌀7.5mm holes from the bottom of the table and insert t-nuts. Make sure the t-nuts are flush with the surface.


Countersink the screws on the drill stand and attach the stand to the table.

Step 6: Make a Simple Drill Press Table Fence
Cut all the wood strips for the table fence (plywood, HDF). Glue the layers on top of each other and use a straightedge or a straight piece of wood as a guide.
NOTE: The slot in the fence needs to be wide enough to accommodate a t-track bolt (I am using homemade t-track bolts).


Below is a picture of a finished drill press table with t-tracks. A great add-on for a homemade drill press stand.

How to Setup and Use a Drill Press Table for a Drill Stand
The steps provided below describe how to mount a drill press table on a drill press and how to use it. For a better understanding of how to set it up, refer to the video above.
How to mount a drill press table on a drill press stand
- Place the drill press stand on the drill press table making sure the screw holes overlap
- Fix the stand to the table with flat-head screws
- Attach the drill press to a workbench with clamps
- Mount the table fence on the t-tracks using t-bolts
- Place the workpiece on the table against the fence
- Set the stoppers to the desired position and secure the workpiece with hold-down clamps
- Use the necessary protective equipment
- Use the right drill bit for the job
- Slowly make the cut
TIP: Place a sacrificial piece of wood between the workpiece and the drill press table. The sacrificial block will protect the table and the drill bit from wear.

📌 Found this post useful and inspiring?
Ready to build it? Save THIS PIN to your Board on Pinterest!

I hope the information shared in this blog post inspired you and now you are adding this router jig to your next builds. 😉
