
If you don’t have access to a planer or CNC machine, you can still get perfectly flat surfaces using a simple jig called a slab flattening jig (also known as a router sled). I’ve been using this setup for everything from cutting boards to larger slabs, and it works surprisingly well.
It’s especially useful when working with pieces that don’t fit into a benchtop planer or drum sander. Instead of struggling with uneven surfaces, you can flatten them accurately using just a router and a simple jig.
The great thing is that this build is easy, affordable, and fully customizable. You can size it exactly for your projects — whether that’s small cutting boards or larger table slabs — and it can be taken apart and stored when not in use.
👉 If you’re working on cutting boards, this is one of those essential jigs. You can check out more builds like this in my Best Jigs for Making Cutting Boards guide. I also now offer premium woodworking plans for selected cutting board jigs and bundles if you want the more complete version of the builds.
In this article, I’ll walk you through the step-by-step process of building your own router sled for flattening slabs and cutting boards. Let’s get started and turn those uneven surfaces into smooth, flat results.
RELATED:
- Multi-Purpose Router Base – The base is attached to the trim router and slides over the flattening jig’s guide rails.
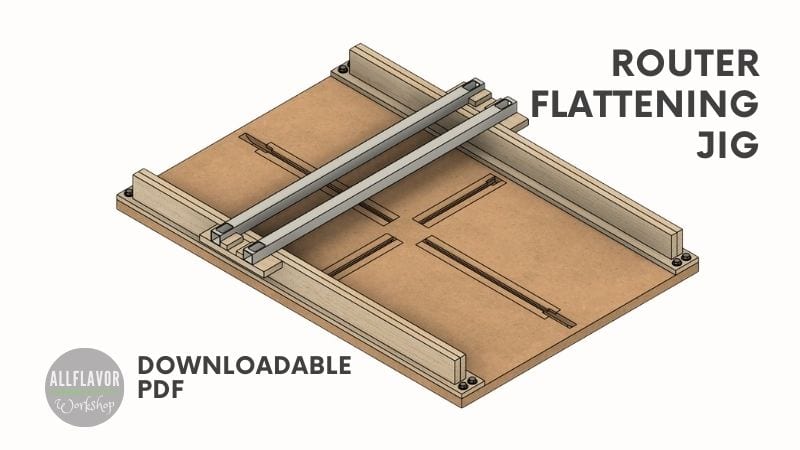
DIY Router Sled for Flattening Slabs
If you want to see how it is done, watch the video below for a step-by-step guide on how to make a simple router sled.
I appreciate every YouTube subscriber. It’s free and easy to subscribe to — just Click Here To Subscribe. Thank you!
Table of Contents
- DIY Flattening Jig Video
- Router Flattening Jig Plans
- The Material you will need
- General Questions
- Benefits of a Router Sled
- Slab Flattening Router Bit
- How to Build a Router Slab Flattening Jig (Step-by-Step)
- Step 1: Make the Base
- Step 2: Make the Side Rails
- Step 3: Attach the Rails to the Base
- Step 4: Build the Router Carriage
- How to Use a Router Sled for Flattening Surfaces
- Conclusion
- FAQ
- Woodworking Jigs I used to build it
*Safety is your responsibility. Make sure you know what you’re doing and take all necessary safety precautions while working with power tools. Safety comes first!
Router Flattening Jig Plans
If you want the more complete version of the plans, I also now offer premium woodworking plans and bundles for selected cutting board jigs. This flattening jig is also part of my larger cutting board workflow, so if you’re building cutting boards regularly, that’s a good place to start too.
The material you will need to build it
Router Sled
Sheet of plywood for the rails (stands) – 12 mm, 9 mm – https://amzn.to/3TPULp2
MDF/HDF Base Board – 760 mm x 515 mm x 16 mm (29.92″ x 20.28″ x 0.63″)
HDF Strips for T-slots
Aluminum Square Tube (20 x 20mm) – https://amzn.to/3NUKELW
Other:
Slab Flattening Router Bit – https://amzn.to/4aMQp8v
Forstner Bits – https://amzn.to/3Hd1aDb
Wood Glue – https://amzn.to/48ltKhJ
Sandpaper Sheets – https://amzn.to/41OMx2p
Sanding Discs – https://amzn.to/4aGaY6r
M6 Bolts, Washers, T-Nuts, Wood Screws – https://amzn.to/41PodgQ
DIY Tools:
DIY Multi-Purpose Router Base
DIY T-track Bolts
DIY T-track Clamps
Tools:
Trim Router – https://amzn.to/3HbQcOg
Circular Saw – https://amzn.to/4aMD0xg
Cordless Hand Drill – https://amzn.to/3HqLEnH
Table Saw – https://amzn.to/47mWiGf
Orbital Sander – https://amzn.to/48G9cjL
Guide Rail Clamps – https://amzn.to/3tEKaCW
One Hand Clamps – https://amzn.to/48jGxkZ
F-Clamps – https://amzn.to/48ArzY1
Hold Down Clamps – https://amzn.to/3RJPEEf
Narex Chisels – https://amzn.to/3tHNJrT
Tape Measure – https://amzn.to/3TN0SKM
Check all the Tools I Use
We may earn an affiliate commission when you buy something through our retail links. As an Amazon Associate AllFlavor Workshop earns from qualifying purchases.
PIN THIS TO PINTEREST
📌 Pin this to your woodworking board so you can build it later:

Benefits of a Router Sled
A router sled is one of the most practical ways to flatten wood when you don’t have access to large machines. I use it regularly for both cutting boards and larger slabs, and it’s one of those jigs that quickly proves its value in the workshop.
Here are the main advantages:
- Cost-Effective Solution: Building your own slab flattening jig is much cheaper than buying a planer or CNC setup, while still delivering great results.
- Minimal Materials Required: You only need a few basic materials like MDF and plywood to build a solid and reliable jig.
- Works for Any Size: From small cutting boards to large slabs — you can scale the jig to match your project.
- Great for Difficult Pieces: Warped, twisted, or uneven boards can be flattened accurately, even when machines struggle.
- Portable and Easy to Store: The modular design allows you to disassemble the jig and store it when not in use.
| Tool | Best For | Max Size | Cost | Flexibility |
|---|---|---|---|---|
| Router Sled | Slabs, cutting boards, irregular shapes | Virtually unlimited | Low | ★★★★★ |
| Thickness Planer | Straight boards, batch work | Limited by machine width | Medium–High | ★★★☆☆ |
| CNC Machine | Precision surfacing, production | Machine-dependent | Very High | ★★★★☆ |
A router sled is one of the most flexible and affordable ways to flatten slabs and cutting boards in a small workshop.
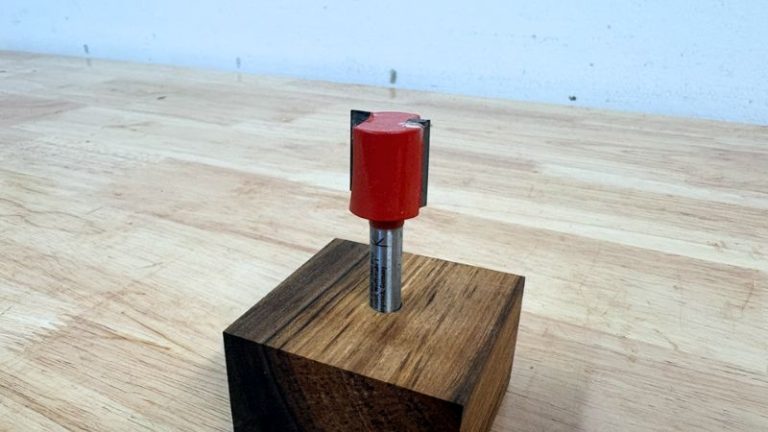
Slab Flattening Router Bit
When flattening wood with a router sled, choosing the right bit makes a big difference. You can use a standard straight bit, but for better results and efficiency, there are bits designed specifically for surfacing.
These are the two most common options:
1. Double Flute Straight Router Bit
- Price: Usually affordable ($20–$40)
- Best For: Rough leveling and general use
- Why use it:
- Removes material quickly
- Works well for both softwood and hardwood
- Can be used for other tasks like dados and mortises
👉 This is a good starting option if you already have one in your shop.
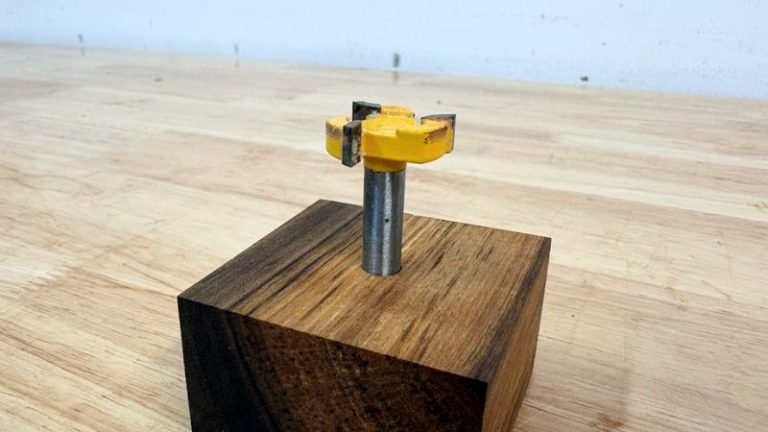
2. Spoilboard Surfacing Router Bit
- Price: Higher ($60–$100)
- Best For: Final surfacing and clean finishes
- Why use it:
- Larger cutting diameter = fewer passes
- Leaves a smoother surface
- Designed specifically for flattening
👉 If you plan to use your slab flattening jig often, this is the better long-term choice.
If you’re just starting, a straight bit will get the job done.
But if you want cleaner results and faster work — especially for cutting boards and larger slabs — a spoilboard surfacing bit is definitely worth it.
Let's start building!
Building a router sled is a straightforward project that consists of three main parts: the base (including T-tracks), the side rails, and the router carriage.
What I like about this design is that it’s modular and easy to adjust. You can assemble it when needed, take it apart for storage, and adapt it to different project sizes — from small cutting boards to larger slabs.
In this build, I’m reusing my multi-purpose router base, which makes the setup quick and compatible with different routers. Once everything is put together, you’ll have a simple but very effective jig that lets you flatten uneven surfaces accurately and consistently.
Router Sled Properties:
- Material: Baltic birch plywood, MDF/HDF
- Total dimensions: 760 mm × 515 mm × 80 mm (29.92″ × 20.28″ × 3.15″)
- Clamping: DIY T-track clamps
NOTE: When flattening wood, a plunge router is usually the better option — it gives you better control, stability, and safer depth adjustments. I use this jig a lot when flattening cutting boards before sanding and finishing.
How to Build a Router Flattening Jig (Step-by-Step)
Step 1: Make the Base
Start by cutting the base to size. I used a 16 mm MDF (HDF) panel, which provides a flat, stable surface that won’t warp easily — this is important for accurate flattening.
You can cut the panel on a table saw, but a circular saw with a straight guide works just as well (like I did). The key is to get clean, straight edges, as the base defines the overall accuracy of the jig.
Next, mark out the T-tracks on the base. These will be used for clamping your workpiece and adjusting the setup. Cut the slots using a trim router and a straight edge or a dado-cutting jig.
NOTE: Do not cut the slots all the way to the edge. Stop slightly before the ends and create wider access openings — this makes it easier to insert clamps from the top.


After routing the slots, sand them smooth and square the ends using a chisel.
To create the T-track shape, glue thin HDF strips along the outer edges of the slots. Use a small amount of glue and make sure it doesn’t squeeze into the center track.
TIP: Reinforce the strips with screws. Make sure all screw heads sit flush with the surface, so they don’t interfere with the router movement.


RELATED: This jig uses my homemade T-track system to hold the workpiece in place. If you want to build the tracks the same way, check out my guide on How to Make Homemade DIY T-tracks.
Step 2: Make the Side Rails
Start by cutting four plywood strips (45 mm wide, 12 mm thick) and glue them together in pairs. This creates two thicker rails that will provide enough rigidity for the sled.
Reinforce the glue joints with screws to make sure the rails stay straight and stable over time.
Next, cut two additional plywood strips (55 mm wide, 9 mm thick). These will serve as the base supports that attach the rails to the main board.
Before assembling everything, drill 6 mm holes into the base support strips — two holes on each side. This step is important for aligning the rails correctly with the base later on.
TIP: It’s best to drill these holes before gluing the rails. You can place the strips on the base and drill through them to ensure the holes line up perfectly.
💡NOTE: Make sure both rails are the same height — this is critical for keeping the router level during flattening.


Once the holes are prepared, glue and attach the rails vertically onto the base support strips. This creates a rigid rail structure that will later guide the router carriage.
Find This Blog Post Useful?
Join my newsletter to receive the latest news, tutorials, and project plans sent directly to your inbox!
Step 3: Attach the Rails to the Base
Turn the base upside down and prepare the mounting holes for the rails. Using a Forstner bit, enlarge the holes slightly so the T-nuts can sit flush with the surface.
Insert the T-nuts into the base, then position the side rails and attach them using M6 bolts.
Before tightening everything fully, check that both rails are perfectly level. This is a critical step — the router carriage will ride on these rails, so any difference in height will directly affect the flatness of your workpiece. This is similar to using a jointer sled, where proper alignment is key to getting straight and accurate results.
TIP: If the rails are not perfectly even, use thin shims (paper, tape, or veneer) under one side to fine-tune the height. Take your time with this step — getting the rails level is what makes the difference between a good jig and a great one.
Once everything is aligned and level, tighten the bolts securely.


Step 4: Build the Router Carriage
The router carriage is what allows the router to move smoothly across the workpiece. There are different ways to build it — you can either create a box that holds the router, or use a rail-based design.
In this build, I’m using a rail-based carriage, which works well with my multi-purpose router base and keeps the setup simple and flexible.
Start by cutting two aluminum square tubes to length. The tubes should be longer than the width of the sled, so they can rest securely on the side rails.
Drill a 6 mm hole on each end of both tubes. It helps to slightly widen the holes to allow for easier adjustment during assembly.


Next, cut two plywood runners. These will sit on the side rails and support the aluminum tubes.
Decide on the spacing between the tubes (I used 50 mm) and drill matching holes in the runners. Insert T-nuts into the runners so you can attach the tubes with bolts.
💡NOTE: The spacing between the tubes should be wide enough to support the router securely and allow room for the router bit.


Attach the aluminum tubes to the runners using bolts and align them so they are perfectly perpendicular to the rails.
Once aligned, tighten everything securely. Take a moment to test the movement before tightening everything — smooth sliding is key for consistent flattening. You can also add small stop blocks if you want to easily disassemble and reassemble the carriage later. So once you assemble it again, the rails stay perpendicular.
TIP: The carriage should fit snugly over the rails with no side-to-side movement, but still slide smoothly without resistance. You can lighty sand the fences for a better slide.


And this is what the finished slab flattening sled looks like.

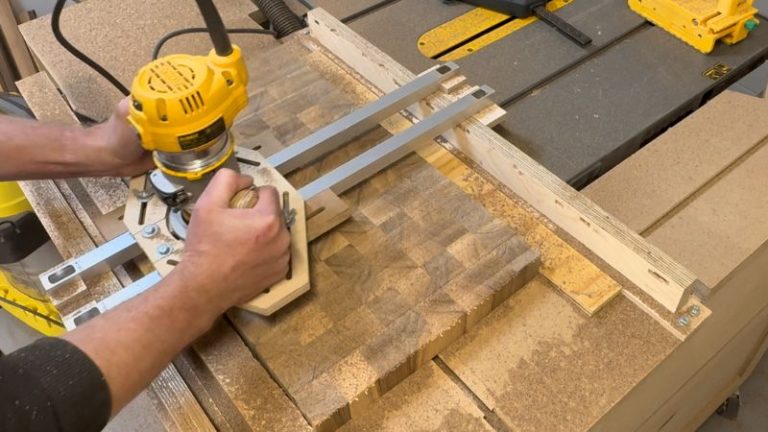
How to Use a Router Sled for Flattening Surfaces
Once the sled is built, using it is straightforward. The key is to work slowly and remove material in thin layers to get a smooth and consistent result. I use this setup all the time when flattening cutting boards before sanding and finishing.
- Secure the Router
Attach the router firmly to the carriage. Make sure everything is tight and there is no wobble. - Fix the Workpiece in Place
Place your slab or cutting board on the base and secure it using clamps or stop blocks. The piece must not move during the process. - Set the Cutting Depth
Lower the router so the bit just touches the highest point of the surface. Then set a shallow cutting depth — it’s better to remove a small amount of material per pass. - Start Flattening
Move the router back and forth across the surface while gradually shifting side to side. Work in overlapping passes to ensure the entire surface is evenly flattened. - Flip and Repeat
Once one side is flat, flip the workpiece and repeat the process on the other side. - Finish the Surface
After flattening, I usually sand the surface using a sanding block to remove tool marks and prepare it for finishing.
TIP: Use a router with variable speed for better control, especially when working with larger bits or hardwood.
NOTE: Take your time — removing too much material at once can cause tear-out, burn marks, or uneven results.


Conclusion
A slab flattening jig is one of those tools that really expands what you can do in a small workshop. You don’t need a large planer or CNC machine — with a simple router sled, you can achieve flat and smooth surfaces on almost any piece of wood.
What I like most about this setup is its flexibility. You can build it to any size, adjust it to your needs, and use it for everything from small cutting boards to large slabs. Once you have it, you’ll find yourself reaching for it more often than you might expect.
I use this jig regularly when working on cutting boards, especially when flattening glued panels before sanding and finishing. It’s a simple solution, but it makes a big difference in the final result.
👉 If you’re building cutting boards, this is one of the essential jigs to have. You can check out more tools like this in my Best Jigs for Making Cutting Boards guide, and if you want the more complete version of the builds, you can also browse my woodworking plans page.
FAQ
Do I need a router sled to flatten wood?
Not necessarily. If you have access to a planer or CNC machine, you can use those instead. But a router sled is one of the most affordable and flexible ways to flatten slabs and cutting boards, especially in a small workshop.
Can I flatten a cutting board with a router sled?
Yes, absolutely. A router sled works very well for flattening cutting boards, especially glued panels that are slightly uneven. It’s a reliable way to get a flat surface before sanding and finishing.
What router bit should I use for flattening?
You can use a straight router bit, but a spoilboard surfacing bit is the better option. It removes material faster and leaves a smoother surface, which is especially helpful for larger slabs and cutting boards.
How deep should each pass be when flattening?
Keep each pass shallow — usually around 1–2 mm. Taking off too much material at once can lead to tear-out, burn marks, or uneven results.
Can I build a slab flattening jig without a table saw?
Yes. You can build the entire jig using a circular saw with a straight guide, or even hand tools for some parts. Precision is important, but you don’t need a full workshop setup.
Woodworking Jigs I used in this project:
These are the tools and jigs I have used to build it. Not all of them are necessary but they make life easier:
