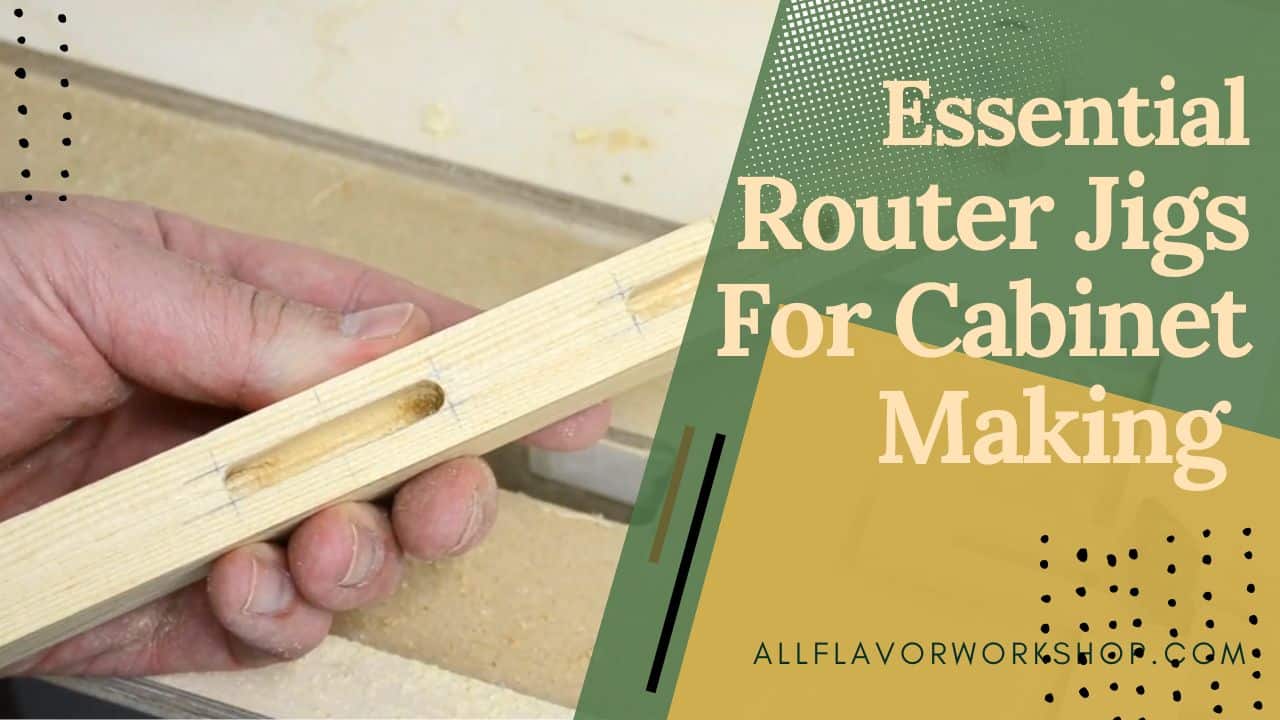
Cabinet making is one of those woodworking areas where precision really matters — and routers are some of the best tools for getting clean, accurate cuts. Whether I’m adding shelves, routing dados, or fitting face frames, I always turn to a few reliable jigs to make things easier and more repeatable.
Over the years, I’ve built quite a few router jigs in my workshop — some simple, others more complex — but a handful have stuck with me. I use them all the time when building cabinets, drawers, or shelving units. Router jigs are a great way to get more precise results without taking up a lot of space — perfect for any workshop setup, especially if you’re working in a smaller garage like I do.
In this post, I’m walking through the router jigs I use the most for cabinet projects, what they’re good for, and how you can build them too. All of them were built with space and practicality in mind — I wanted tools that are easy to set up, give repeatable results, and don’t take up a ton of room.
📌 I’ll link to the downloadable plans throughout the post if you want to build your own versions — they include measurements, a list of materials and tools, a step-by-step video guide, and more.
Table of Contents
- Why Use Router Jigs for Cabinet Making?
- Essential Router Jigs for Cabinet Making
- Adjustable Router Dado Jig
- Shelf Pin Jig
- Router Mortising Jig
- Router Circle Jig
- Router Template Jig
- Benchtop Router Table
- Router Table Box Joint Jig
- Router Table Spline Jig
- Comparison Table: Router Jigs for Cabinet Making
- Final Thoughts
- FAQ: Router Jigs for Cabinet Making
Why Use Router Jigs for Cabinet Making?
When you’re building cabinets — whether it’s full kitchen units, shop storage, or utility drawers — accuracy matters. You need clean dados, perfectly aligned shelf pins, tight-fitting mortises, and straight cuts. A router alone can do a lot, but when paired with the right jigs, it becomes a whole different tool.
Router jigs let you:
- Speed up repetitive cuts – Like shelf pins or dados for side panels.
- Keep things aligned – Essential when you’re joining multiple parts together.
- Avoid measuring errors – The jig sets the path; you just follow it.
- Work cleaner and safer – Especially when routing small parts or delicate edges.
Most of the cabinet jigs I use are easy to build and work with both a plunge router and a compact handheld router. No matter the material, the right jig helps keep things accurate and consistent every time.
That said, not all router jigs are created equal. Below are the ones I rely on the most when building cabinets — from dadoes and rabbets to shelf pin holes and perfect mortises.
PIN THIS TO PINTEREST
📌 Save THIS PIN to your Board on Pinterest!

Essential Router Jigs for Cabinet Making
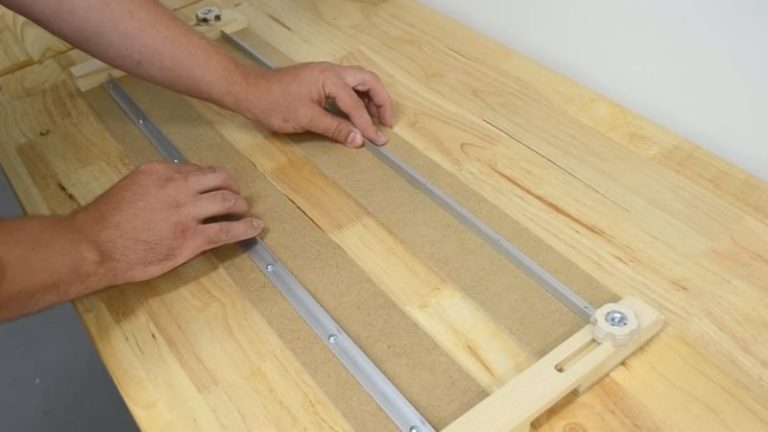
1. Adjustable Router Dado Jig
For precise dadoes and rabbets every time
This is one of my go-to router jigs when building cabinets. Dados and rabbets are the backbone of strong cabinet construction — they help align pieces, add strength, and create a clean look. And this jig makes cutting them quick, accurate, and repeatable.
What sets this jig apart is its adjustability. You can dial it in to match the exact width of your material, lock it in place, and cut a snug-fitting dado in a single pass. No messing around with multiple test cuts or fine-tuning router fences. It’s especially useful when working with plywood, which often varies slightly in thickness.
🛠 My Setup:
I built this jig to work with a 6mm straight router bit and a plunge router. The base is made from thin MDF to maximize plunge depth. The guide rails are aluminum, and the adjustable mechanism is locked in place with wooden knobs. It’s compact, quick to set up, and gives great results every time.
📌 You can check out the full build and plans here: Router Dado Jig
2. Shelf Pin Jig
For evenly spaced adjustable shelves
When building cabinets or bookcases, shelf pins let you add adjustable shelves without complicating the design. But getting those holes evenly spaced and perfectly aligned on both sides of the panel? That’s where a shelf pin jig makes all the difference.
This jig helps you drill clean, consistent holes for shelf pins using a plunge router and a guide bushing. It ensures that every shelf sits level and you can repeat the same layout across multiple panels. Great for kitchen cabinets, closet storage, or shop furniture.
🛠 My Setup:
My shelf pin jig is made from MDF/ Plywood with evenly spaced holes that guide a 6mm router bit using a bushing. I use it with my plunge router, clamped to the cabinet side panels. You can scale the jig to fit your most common cabinet sizes or add stop blocks for consistent hole spacing.
Note: I don’t currently have plans for this jig — but if there’s interest, I might make some soon.
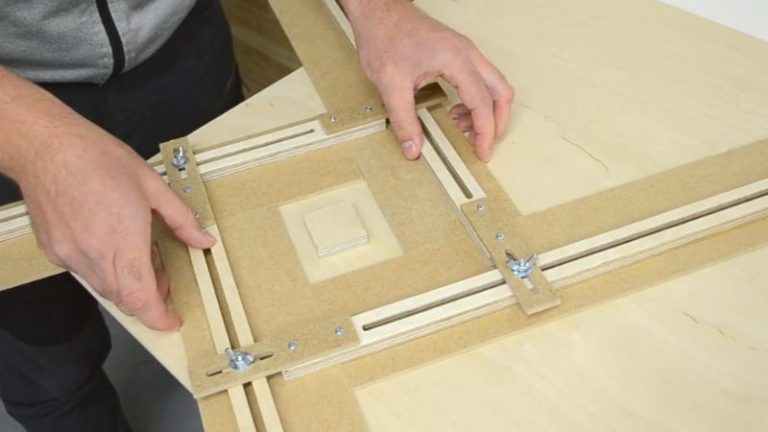
3. Router Mortising Jig
For strong, clean mortise joints in frames and panels
When it comes to cabinet doors, face frames, or structural panels, mortise-and-tenon joinery is one of the strongest options you can use — and this jig helps you get perfect mortises every time. It holds the workpiece both vertically and horizontally and allows you to plunge straight down into the exact position you need.
The jig is adjustable for different workpiece sizes and mortise lengths, so it works for everything from small drawer fronts to full cabinet frames. Once set, you can repeat the cut across multiple parts quickly and accurately.
🛠 My Setup:
This jig mounts to my workbench and holds the workpiece securely against an adjustable fence. The plunge router rides on a top-mounted platform between two guide rails and can move left to right. Two wooden knobs on the back adjust the front-to-back travel of the router table, and side stops set the mortise length. I used Baltic birch plywood, MDF, and HDF in the build, with wooden knobs and wing nuts for adjustments.
📌 You can check out the full build and plans here: Router Mortising Jig

4. Router Circle Jig
For cutting perfect circles, round tabletops, and arcs
Whether you’re making lazy Susans, speaker cutouts, or round cabinet tops, a circle jig makes the job smooth and accurate. It lets you cut clean, consistent circles with a handheld router and a simple pivot arm.
This jig is quite simple, but very effective. You fix the center point, set the radius, and guide the router around in a perfect arc. I’ve used mine to cut circles as small as 3 cm and as large as 80 cm — just depends on the length of the arm.
🛠 My Setup:
I built this for a handheld router (my DeWalt D26200). The arm is mounted to a 6mm plywood base, which allows full plunge depth of the bit. You can modify the jig for other router brands by drilling the appropriate mounting holes. It’s easy to scale up or down depending on your needs.
📌 You can check out the full build and plans here: Router Circle Jig

5. Router Template Jig
For inlays, hardware recesses, and precise cutouts
If you need repeatable shapes, tight-fitting inlays, or clean hardware cutouts — this is the jig for the job. I use it for routing everything from handle recesses and hinge cutouts to decorative inlay patterns. It saves tons of setup time and gives a pro-level finish.
What makes it effective is its adjustability. The jig has four sliding arms that create a custom-sized template opening. You can use all four arms for rectangles or just two or three to shape trapezoids or angled recesses.
🛠 My Setup:
This version is built for a 6mm straight bit and a handheld router. The base is thin MDF for better plunge depth, and the adjustable arms are made from plywood with integrated T-tracks. Once the shape is dialed in, I lock the arms with wing nuts and clamp the jig to the workpiece. The router follows the inside of the template for a clean, repeatable result every time.
🔗 Step-by-step guide and Plans available if you want to build one: Router Template Jig
6. Benchtop Router Table
Why it’s perfect for precise and repeatable cabinet joinery
A router table is one of those tools that just makes joinery easier. It gives you solid support, better control over your cuts, and it’s great for getting repeatable results — especially when you’re working on joints that need to line up perfectly every time.
In my workshop, I built a compact portable router table that serves as a base for multiple jig add-ons. That modular setup lets me switch between a box joint jig, spline jig, and tenon jig (and more) depending on the project — without building a new jig from scratch every time.
🔗 Step-by-step guide and Plans available if you want to build one: Benchtop Router Table
Next up are two of my favorite router table jigs for cabinet joinery — the Box Joint Jig and the Spline Jig. Let’s start with the box joints.
📌 Want to learn how modular jig systems work? Check out How to Build Modular Woodworking Jigs for Versatility to see how a single base can serve multiple purposes.
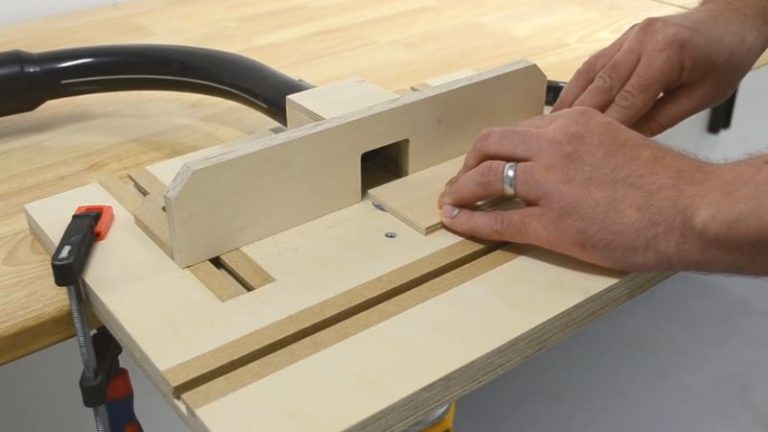
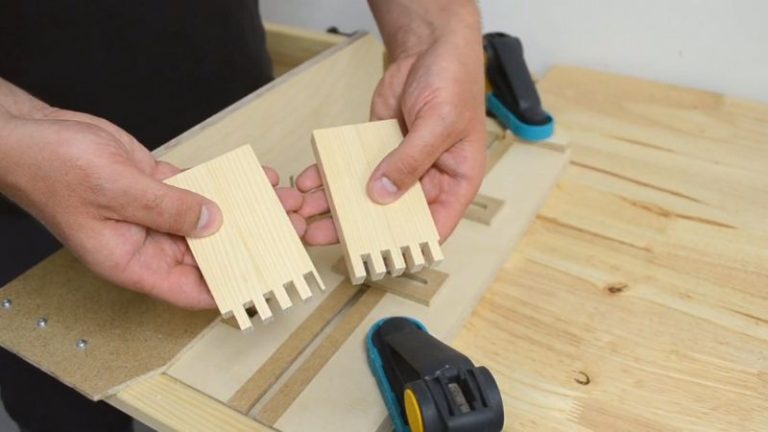
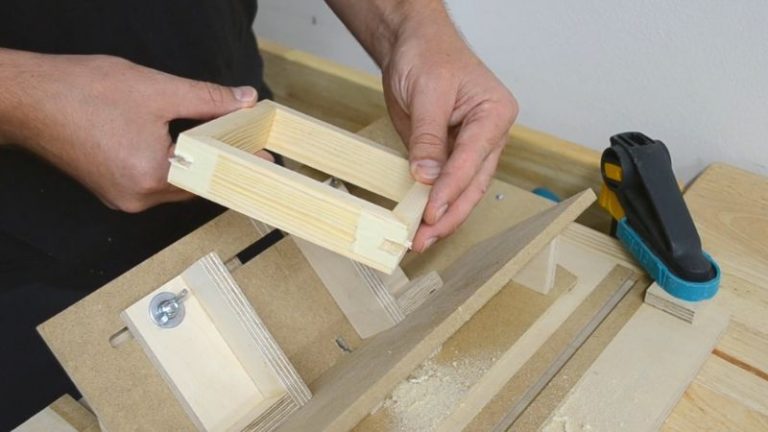
7. Router Table Box Joint Jig
Perfect for making strong, repeatable joints in drawers and cabinet boxes
This jig is my go-to for making clean, tight box joints. I mainly use it when building drawers or open cabinet boxes — anywhere I need a strong mechanical joint that also looks good. It’s one of those jigs that, once it’s dialed in, saves a lot of time and gives consistent results.
The jig is designed to fit my router table setup. It locks into position on the table and holds the workpiece vertically. The cutting position is guided by a pin that matches the width of the bit, so the spacing stays accurate the whole way through. I’m using a 6mm bit for this one, but you can easily modify it for other sizes.
What I like most is that it’s reliable. You clamp the piece, run the cut, shift over, and repeat. And because it’s mounted to the table, everything stays square and stable.
📌 You can check out the full build and the plans here: Router Table Box Joint Jig
8. Router Table Spline Jig
Adds strength and a clean look to miters in cabinet frames and boxes
I use this jig mostly when I’m reinforcing mitered corners — for example, in cabinet frames, decorative boxes, or even angled drawer fronts. A spline not only makes the joint stronger, it also adds a nice visual detail that can stand out if you use contrasting wood.
The jig is built to slide over my router table and lock around the tabletop. It holds the workpiece at a 45° angle, letting the router bit cut clean spline slots right through the joint. The key here is keeping everything aligned — and this jig makes that easy.
Like the box joint jig, it’s designed for a 6mm bit and built to match the dimensions of my router table. You can tweak it for your setup with different fences or bit sizes.
📌 Full build and plans here: Router Table Spline Jig
Comparison Table: Router Jigs for Cabinet Making
Router jigs can do a lot of the heavy lifting in cabinet making — from joinery to shaping to shelf construction. Below is a quick comparison to help you pick the right one for your build. Most of these jigs have plans available for download if you want to build them yourself.
| Jig | Best For | Router Type | Adjustable |
|---|---|---|---|
| Adjustable Dado Jig | Cutting dados and rabbets | Plunge router | ✅ Yes |
| Shelf Pin Jig | Drilling evenly spaced shelf holes | Handheld or plunge router | ✅ Yes |
| Adjustable Template Guide | Cutouts, inlays, corners | Handheld router | ✅ Yes |
| Router Mortising Jig | Horizontal and vertical mortises | Plunge router | ✅ Yes |
| Router Circle Jig | Round cabinet panels, bases | Handheld router | ✅ Yes |
| Router Table | General joinery and shaping | Table-mounted router with fence | ⚠️ Base and fence |
| Box Joint Jig (for router table) | Finger joints in cabinets/boxes | Router table addon | ✅ Yes |
| Spline Jig (for router table) | Strengthening miter joints | Router table addon | ✅ Yes |
Final Thoughts
A good set of router jigs can seriously level up your cabinet making. I use these jigs all the time — not just because they save time, but because they make the process more accurate and repeatable. That’s important whether you’re building a one-off cabinet or a full kitchen setup.
Routers are incredibly versatile, and with the right jigs, you can get pro-level results in a small workshop. You don’t need a big shop to get precise, repeatable cuts — just the right tools and a bit of setup. Modular jig setups let you do more with less space, which is exactly what I go for in my builds.
If you want to build any of these jigs, plans are available with step-by-step instructions, cutting lists, and both metric and imperial measurements.
🔗 Download woodworking jig plans
FAQ: Cabinet Jigs
What router do I need for cabinet making?
You can get great results with either a plunge router or a compact handheld router. For jigs like the mortising jig or dado jig, I use the DeWalt D26200. If you’re working with a router table, make sure your router can be mounted securely to a plate or base.
Can I build these jigs with basic tools?
Yes — most of these jigs can be built using a table saw, drill, and a router. Some jigs benefit from a bit more precision, but if you take your time and follow the plans, you’ll get there even without a full workshop.
Are these router jigs beginner-friendly?
Definitely. A few of them, like the dado jig and circle jig, are perfect starter projects. They’re simple to build and give you a big return in functionality. Others, like the mortising jig or box joint jig, require more setup but are very doable with guidance.
What materials do you recommend for building these jigs?
I mostly use Baltic birch plywood, MDF, and HDF. They’re flat, stable, and easy to work with. You want your jigs to be accurate and consistent — materials like construction-grade plywood or softwood boards often warp and throw things off.
Do I need all of these jigs for cabinet making?
Not at all. Start with one or two based on what you’re building. For example, if you’re adding adjustable shelves, go for the shelf pin jig. Building drawers? You’ll love the box joint jig. Once you see what you use the most, you can always add more later.
