
When making a wooden box or a picture frame, reinforcing the mitered corners with splines is a great way how to strengthen the joint and ensure a tight bond. Not only the miter joint provides a firm connection but also makes the joint stand out aesthetically.
There are a few ways how to cut a spline joint. You can use hand tools such as a hand saw and a chisel, or you can make a spline joint on a table saw in combination with a table saw spline jig or on a router table using a router table spline jig.
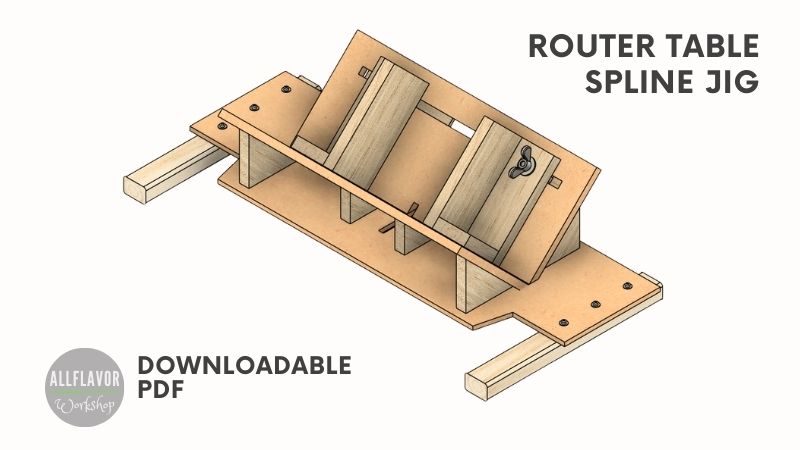
In this article we will be making a spline joint jig for a benchtop router table I built some time ago.

One of the main advantages of a spline joint jig is the simplicity and repeatability with which you will be able to cut and make spline joints.
The spline joint jig is an add-on to the benchtop router table. The jig is mounted on top of the router table and slides around it with the help of wooden guide rails. Although router tables can vary in type and size, by following this build process you will be able to create a spline jig for almost any router table.
The build is made of MDF and Baltic birch plywood. All the materials are easily available.
Read on to find out how to build a spline joint jig for a router table, how to set it up, and how to make a spline miter joint.
DIY Router Table Spline Jig Video
If you want to see how it is done, watch the video below for a step-by-step guide on how to make a spline jig for a router table.
I appreciate every YouTube subscriber. It’s free and easy to subscribe to — just Click Here To Subscribe. Thank you!
Table of Contents
- Router Table Spline Jig Plans
- The Material you will need
- General Questions
- What is a spline in woodworking?
- What are the different ways of cutting a miter spline?
- What router bit for cutting spline grooves?
- How to Make a Router Table Spline Jig
- Step 1: Build the Sliding Base
- Step 2: Make the Back Part of the Spline Jig
- Step 3: Make the Front Part of the Spline Jig
- Step 4: Glue Both Parts to the Sliding Base
- Step 5: Cut a Kerf in the Base
- Step 6: Build the Stoppers
- How to Set up and Use a Spline Jig for a Router Table
- Woodworking Jigs used for the project
*Safety is your responsibility. Make sure you know what you’re doing and take all necessary safety precautions while working with power tools. Safety comes first!
What you'll need to make a Router Table Spline Jig
Router Spline Jig Base
MDF baseboard – 470 mm x 160 mm x 5 mm
Spruce wood strips – 2x (220 mm x 28 mm x 18 mm)
Beechwood Strip – 260 mm x 7 mm x 6 mm
Spline Jig
MDF – 2x (300 mm x 120 mm x 8 mm)
Plywood – 250 mm x 35 mm x 6 mm
Plywood triangles – 2x (60 mm x 60 mm x 12 mm)
Plywood triangles – 2x (35 mm x 35 mm x 12 mm)
DIY T-track bolts
Spline Jig Stoppers
Plywood – 4x (40 mm x 100 mm x 12 mm) – https://amzn.to/3TPULp2
Plywood – 2x (28 mm x 40 mm x 12 mm)
Tools:
Trim Router – https://amzn.to/3HbQcOg
Table Saw / Proxxon Mini table – https://amzn.to/47mWiGf
Ryoba Japanese Saw – https://amzn.to/48if4Qz
Cordless Hand Drill – https://amzn.to/3HqLEnH
Corded Hand Drill / Drill Press – https://amzn.to/3NSA3Bo
Machinist Square / Speed Square
One Hand Clamps – https://amzn.to/48jGxkZ
Spring Clamps – https://amzn.to/41Nuh9D
F-Clamps – https://amzn.to/48ArzY1
Other:
Wood Glue – https://amzn.to/48ltKhJ
Forstner bits – https://amzn.to/3Hd1aDb
Drill Bits – https://amzn.to/48Kaaf7
Straight router bit – https://amzn.to/47prNQi
Spiral bit – https://amzn.to/48pJJv9
M6 Bolts, Washers, Wing nuts, Wood Screws – https://amzn.to/41PodgQ
Check all the Tools I Use
We may earn an affiliate commission when you buy something through our retail links. As an Amazon Associate AllFlavor Workshop earns from qualifying purchases.

What is a spline in woodworking?
A spline in woodworking represents a strip of wood inserted in and glued into a matching slot or groove, typically between/along the edges of two boards. The main purpose of a spline in woodworking is to strengthen and reinforce an end-grain joint.
What are the different ways of cutting a miter spline?
There are a few ways how to cut miter splines and spline joints. Traditionally, the spline joint can be cut by using hand tools such as a hand saw (preferably a Japanese saw) and a wood chisel. Using electric tools, it is also possible to cut the joint using a table saw or a trim router in combination with the right saw blade and router bit. The equipment of the tools with woodworking jigs will allow for repeatability, and thus enable faster cutting of joints with the same quality.
What router bit for cutting spline grooves?
When cutting spline grooves on a router table, the best router bits for cutting slots and grooves are a double straight router bit and a double edge spiral bit. They provide excellent results, the cuts are clean and precise and they leave a smooth finish.
The main difference between a straight router bit and a spiral router bit is in the quality of the resulting cut and the price. They both provide great results, although a spiral bit leaves a smoother finish, cleaner cuts, and reduces tear-out. On the other hand, better quality comes at the expense of the price.
For woodworking beginners, straight router bits in combination with painters’ tape is a good option.
Read the following article for more information regarding straight and spiral router bits:
Let's start building!
The router spline jig consists of 2 main parts – the sliding base, and the spline jig itself.
The sliding base is made of MDF and spruce wood strips, and the spline jig is from MDF and Baltic birch plywood. The overall dimensions of the spline jig are 47cm x 22cm x 11m.
Router Spline Jig properties:
- Material: MDF, Plywood, Spruce wood
- Total dimensions: 47cm x 22cm x 11m.
- Spline Jig with a T-track for additional accessories
NOTE: The spline jig built in this article is designed for a clamp-on benchtop router table and uses 6mm router bits. Similarly, the jig can also be made for other types of router tables.
This is a project for a beginner/advanced woodworker. Many areas require increased attention to ensure accurate and clean cuts.
How to Make a Router Table Spline Jig
Step 1: Build the Sliding Base
Before you start building the spline jig measure the dimensions of your router table first. Mine is 40x30cm.
Cut the MDF board slightly longer than the length of the router table leaving a few centimeter-overhang on each side (47cm x 16cm x 0,5cm). To make the main crosscut I am using a mini table saw crosscut sled.
Then, make two cutouts on each side of the board (7,5cm x 4cm). They allow the board to get more forward.

Cut two spruce wood strips to size (22cm x 2,8cm x 1,8cm) and glue them to the board. Make sure the strips fit snugly against the router table so the entire spline jig board can easily slide over it.
Use the router table as a reference. Turn it upside down, align the edges with the board, and clamp it to the workbench. Apply glue on the spruce strips and glue them to the MDF board. Wait until the glue dries and secure the strips with screws.

Cut a 2cm hole in the center of the board with a Forstner bit. The hole needs to be aligned with the router bit.

NOTE: When you mount the spline jig on the router table it should slide easily, yet there shouldn’t be any wobble. If you have tight grip sand the inside of the spruce strips a bit. If the spline jig wobbles add painter’s tape to the strips.
Step 2: Make the Back Part of the Spline Jig
Cut an MDF board to size (30cm x 12cm x 0,8cm) and cut one of the longer sides at a 45-degree angle. To make all the cuts I am using a mini table saw crosscut sled.
Draw the design on the board and use a router dado jig to cut a t-track slot. Make sure the slot is cut on the correct side of the board.


Cut a plywood strip (25cm x 3,5cm x 0,6cm), cut a shallow rabbet on one side, cut out the center part and glue the strip to the MDF board. Additionally, you can fix it with screws.
NOTE: The strip serves as a barrier against the t-track bolt falling out. The center cutout makes it easy to put on and take out the bolts when needed.


Cut 4 isosceles right triangles (2x 6cm x 6cm; 2x 3,5cm x 3,5cm) and glue them to the MDF board right above the miter cut. Make sure the supporting triangles line up flush with the bottom of the miter cut.
NOTE: Do not glue the supporting triangles in the router cut path.


Find This Blog Post Useful?
Join my newsletter to receive the latest news, tutorials, and project plans sent directly to your inbox!
Step 3: Make the Front Part of the Spline Jig
Follow the same steps as above and create the front part of the spline jig. (The front part does not have a t-track)

Step 4: Glue Both Parts to the Sliding Base
Apply glue on the bottom of the front and back parts and glue the pieces over the cut hole on the sliding base. To make sure the pieces are perpendicular to the router bit you can either draw a line on the sliding base or you can use a square.


Step 5: Cut a Kerf in the Base
Mount the Spline Jig on the router table and cut a kerf in using a router bit (I am using a 6mm router bit). Optionally, for better visibility when cutting, you can mark each side of the kerf to know where the cut would be.


Step 6: Build the Stoppers
Cut all the pieces for the plywood stoppers and glue them together. Drill a 6mm hole for attachment and mount the stoppers on the spline jig with t-track bolts and wing nuts.
NOTE: The stoppers are adjustable and will make sure that all the cuts will be made in the same place.

Below is a picture of a finished router spline jig. A spline joint is a great corner joint. It is strong, looks beautiful and is easy to make with this spline jig.

How to Set up and Use a Spline Jig for a Router Table
The steps provided below describe how to set up a spline jig for a router table and how to use it. Use all the necessary protective equipment. Especially safety glasses. Chips are flying away at high speeds, which can cause serious injury.
For a better understanding of how to set up and use the jig, refer to the included video.
How to use a spline jig for a router table
- Mount the spline jig on the router table
- Apply painters’ tape on the workpiece to prevent blowout
- Place the workpiece in the spline jig and position it where you want to make the cut
- Set the stoppers and tighten the wing nuts
- Secure the workpiece with a hold-down clamp
- Use the right router bit for the job
- Slowly make the cut
- Repeat the process and make all the other cuts
TIP: Use painter’s tape in order to achieve the best result when cutting splines on a router table. Place the tape on the edge of the workpiece right where want to make the cut. The tape will help to prevent blowout at the other side of the corner and will help to keep the cuts clean.


📌 Found this post useful and inspiring?
Ready to build it? Save THIS PIN to your Board on Pinterest!

