
If you use a router often, having the right jigs in your workshop can make a huge difference. Whether you’re cutting dados, routing clean circles, or working on joinery, the right jig helps you do it faster, safer, and with way more accuracy.
Routers are compact, powerful, and incredibly versatile — they don’t take up nearly as much space as a table saw, which makes them perfect for smaller workshops. With the right bits and a few good jigs, you can do everything from cutting precise joinery to shaping complex patterns. It’s honestly one of my favorite tools in the shop.
Over time, I’ve built and tested all kinds of router jigs. Some were simple, others more complex—but a handful of them stuck with me and became part of nearly every project. In this post, I’m sharing the router jigs I rely on most in my own workshop, and why I think every woodworker should consider building them too.
The list includes a mix of jigs for handheld routers and plunge routers with a base. Most of them also have detailed plans available for download if you want to build them yourself.
Table of Contents
- What Makes a Great Router Jig?
- Adjustable Router Dado Jig
- Adjustable Router Template Guide
- Router Circle Jig
- Router Table
- Router Table Spline Jig (Add-on)
- Router Table Box Joint Jig (Add-on)
- Router Mortising Jig
- Router Jigs Comparison Table
- Final Thoughts
- FAQ: Router Jigs and Usage
PIN THIS TO PINTEREST
📌 Save THIS PIN to your Board on Pinterest!

What Makes a Great Router Jig?
A great router jig isn’t just about precision — it should actually make your workflow smoother. The best ones are the jigs you keep reaching for because they’re fast to set up, easy to adjust, and help you get repeatable results with less hassle.
I look for jigs that:
- Are easy to set up and adjust
- Make repeat cuts consistent
- Fit both handheld and table-mounted routers when possible
- Work with multiple bit sizes and materials
Routers are incredibly flexible tools, and a well-designed jig should match that flexibility. Whether I’m building furniture or working on something smaller like a cutting board, I rely on router jigs to do clean joinery, shape patterns, and even cut grooves or recesses.
If you’re especially interested in using router jigs for cutting boards, check out this guide on the best jigs for making cutting boards — it covers a few of my go-to builds for those types of projects.
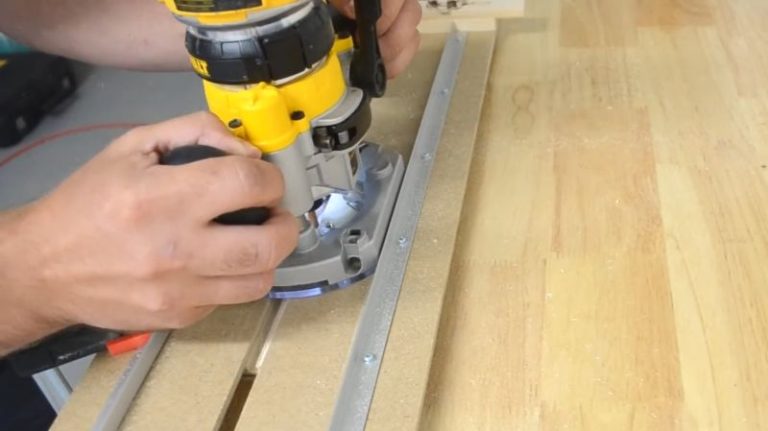
1. Adjustable Router Dado Jig
This is hands down one of the most useful router jigs in my workshop — and also one of the most used. If you’re building cabinets, drawers, shelves, T-tracks, or boxes, you’ll likely need to cut dados or rabbets. I use this jig specifically for making clean and precise dadoes and rabbets, and occasionally even for mortises or clean cutouts.
My Setup
What makes this jig different is that it’s adjustable. This version is built for a 6mm straight router bit, but you can easily make another one for different bit sizes. The base is made from a thin MDF sheet to maximize the plunge depth of the router bit. The guide rails are aluminum, and the width is adjusted using simple wooden knobs.
You just set the jig to the exact width of your workpiece, lock it in place, and route the dado in a single clean pass. No test cuts, no bit swapping, no fiddling around.
I use it with a plunge router that slides smoothly along the guide rail. It’s quick to set up and delivers clean, repeatable results.
🔗 Plans available if you want to build your own — Adjustable Router Dado Jig Plans
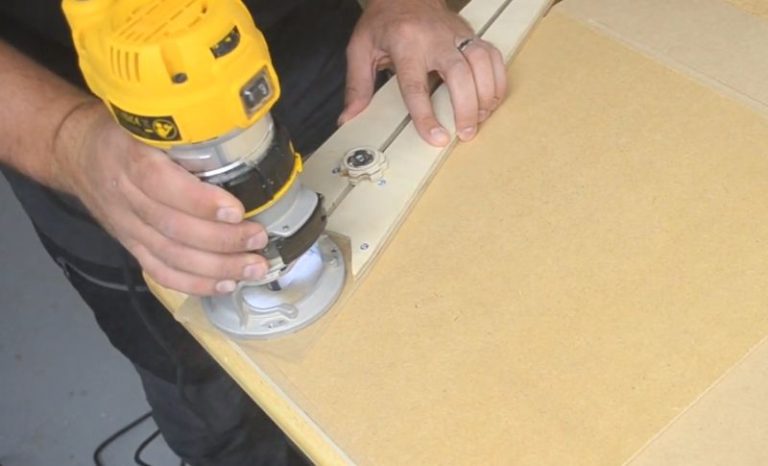
2. Adjustable Router Template Guide
This is one of the most versatile router jigs I’ve built — and I use it a lot. Mainly for cutting out specific shapes, recessing hardware, cutting handles, shaping corners, or routing shallow pockets, this jig gives me the precision I need.
The key feature here is its adjustability. You can set the inner cutout to just about any shape within the jig’s range — typically squares and rectangles, but also trapezoids or even rhombuses depending on how you position the arms. The jig usually includes four adjustable arms, but you can detach one or two and use only what’s needed for a specific shape.
My Setup
This one is built for a 6mm straight router bit, but you can make another version for any bit size you use frequently. The base is made from thinner MDF to let you take full advantage of the bit’s plunge depth. The rails are made from plywood with cut T-Tracks for smooth adjustment, and you lock everything in place using wing nuts.
I mainly use it for precise cutouts, inlays, and small pieces where I want perfect consistency. Once the jig is clamped down, the router follows the template cleanly every time.
This jig saves a lot of setup time and removes the need to make a custom template for every shape.
🔗 Plans available if you want to build one — Adjustable Router Template Guide Plans

3. Router Circle Jig
This jig is my go-to whenever I need to cut clean, precise circles with a router. Whether I’m making round tabletops, bases, trays, or even smaller curved details, this one handles the job with ease.
It’s a simple design — just a pivoting arm mounted to a router base. Once the center point is fixed and the radius is set, the router follows the path smoothly for a perfect circle. You can also flip the jig over and use it as a compass to mark out circles before cutting.
My Setup
This version is designed for a handheld router and can handle a wide range of sizes depending on the arm length. I’ve used it for circles as small as 4 cm in diameter and as large as 80 cm without any issues. If you build a longer arm or a wider base, you can easily scale it up. The base is made from 6mm plywood to make the most of the bit’s plunge depth, and you can mount different-sized router bits depending on your needs.
I’m currently using it with my DeWalt router. But if you adjust the base (by drilling the correct hole pattern), you can easily use this jig with any router brand.
🔗 Plans available if you want to build one — Router Circle Jig Plans
4. Router Table
A router table is one of those workshop staples that opens up a whole new level of precision. It’s great for edge profiling, repeat cuts, joinery, and working with smaller parts more safely. I use mine constantly — it’s a key part of my setup, especially when paired with other jigs like the box joint, spline jig, or tenoning jig.
My Setup
My version is a compact benchtop router table that fits well even in a smaller shop. It’s built from plywood, and includes an adjustable fence, dust collection port, and MDF T-Tracks for attaching fences, featherboards, or stop blocks. The design keeps things stable but still easy to move around if needed.
- Router: DeWalt-D26204k
- Tabletop: 21mm plywood (2 layers)
- Fence: Adjustable with T-tracks
- Add-ons: Compatible with box joint, tenont,a nd spline jigs
- Dust collection: Rear port behind the fence
What I really like about this build is that it’s modular. You can upgrade it later with various jigs and accessories — I use mine with both the box joint jig and spline jig, which attach around the table and slide across the surface.
🔗 Plans available if you want to build this router table — Router Table Plans

5. Router Table Spline Jig (Add-on)
This spline jig is a simple but powerful add-on to the router table. I use it for reinforcing miter joints on picture frames, boxes, and small cases — not just for strength, but also to add a nice visual detail with contrasting wood splines.
My Setup
This one was built specifically to fit my benchtop router table, so it locks around the table and slides back and forth. The base is made from MDF, so it glides smoothly across the router table surface, while the runners are made from spruce wood. The upright construction that holds the workpiece — along with the adjustable stoppers — is made from Baltic birch plywood.
The jig is designed for a 6mm straight router bit, but you can easily adapt it for different sizes. You can also adjust the cut depth and position depending on your project, and even repeat the cut multiple times to create decorative spline patterns.
It doesn’t take long to build, and once you have it, it makes angled joinery faster, cleaner, and more consistent — especially on smaller pieces that aren’t safe to run on the table saw.
🔗 Plans available if you want to build one — Router Table Spline Jig Plans
6. Router Table Box Joint Jig (Add-on)
This box joint jig is another add-on for the router table that sees regular use in my shop. It’s perfect for making clean, repeatable box joints — great for drawers, small boxes, trays, or even shop storage bins.
My Setup
The jig slides across the router table and uses a simple indexing system to create evenly spaced fingers. This one is designed for a 6mm straight router bit, which matches the width of the indexing pin made from oak. The pin guides the spacing, and once it’s set up, you can quickly go through your cuts.
Like the spline jig, this one is built to fit my benchtop router table. The base is MDF, so it slides easily across the plywood surface, and the runners are spruce wood. The vertical fence is a combination of MDF for the back and plywood for the front — sturdy enough to support the piece but light enough to handle.
It’s a great jig to have on hand if you do box work often, and it’s safer and more controlled than using a dado blade on the table saw — especially for smaller parts.
🔗 Plans available if you want to build one — Router Table Box Joint Jig

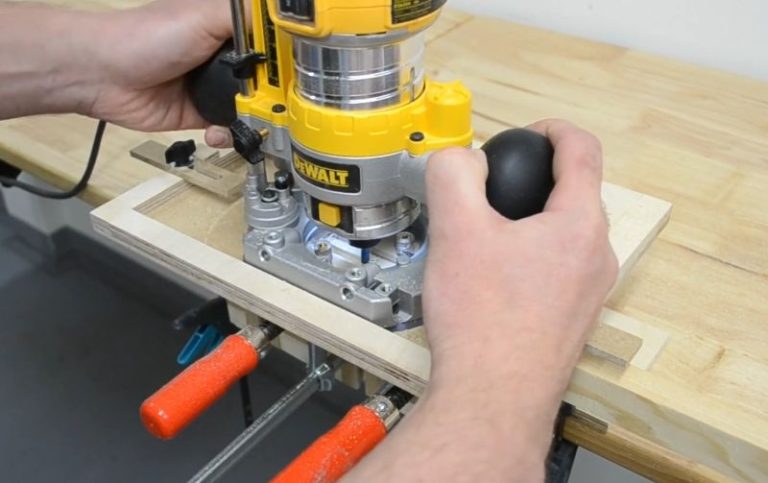
7. Router Mortising Jig
When I need clean, repeatable mortises, this is the jig I reach for. It’s designed to hold the workpiece securely at any angle and guide the router through smooth, controlled cuts — perfect for building frames, furniture, or leg-and-rail joints.
My Setup
The jig mounts to the workbench and is clamped down for stability. The workpiece is attached to a vertical T-track fence that can hold it horizontally, vertically, or anywhere in between. Track clamps make it easy to lock the piece at the right angle.
The plunge router is mounted on a small table that sits between two side rails. These guide rails allow the router to move side-to-side smoothly. Two wooden knobs at the back let me shift the router table front-to-back and lock it in place — giving me control over the width of the mortise.
To adjust the length, I use two stop blocks positioned along the side rails. With both adjustments in place, I can dial in the exact size of the mortise and repeat the cut as many times as needed.
This jig combines Baltic birch plywood, MDF/HDF for the router table surface, wooden knobs, and wing nuts. It’s more involved to build than some others, but if you do a lot of joinery, it’s worth it.
🔗 Plans available if you want to build one — Router Mortising Jig Plans
Router Jigs Comparison Table
Below is a quick comparison of all 7 router jigs covered in this article—highlighting their main purpose, what kind of projects they’re best for, and how often I use them.
| Jig | Main Use | Router Type | Build Complexity | Adjustability | Plans Available |
|---|---|---|---|---|---|
| Adjustable Router Dado Jig | Dados, rabbets, occasional mortises | Plunge | Easy | ✔ Yes | ✔ Yes |
| Adjustable Router Template Guide | Cutouts, inlays, hardware recesses | Handheld | Moderate | ✔ Yes | ✔ Yes |
| Router Circle Jig | Circles (4–80 cm), tabletop bases, trays | Handheld | Easy | ✔ Radius | ✔ Yes |
| Router Table | General routing, edge work, joinery | Mounted | Moderate | ✔ Fence | ✔ Yes |
| Router Table Spline Jig | Spline joints on frames and boxes | Mounted | Easy | ✔ Depth/position | ✔ Yes |
| Router Table Box Joint Jig | Box/drawer joints | Mounted | Easy | ✔ Pin system | ✔ Yes |
| Router Mortising Jig | Mortises for furniture and joinery | Plunge (guided) | Advanced | ✔ Width + length | ✔ Yes |
📌 Note: Frequency rating is based on my personal use in a small workshop setting. Your priorities may vary based on the types of projects you build.
💡 Ready to build your own jigs?
Download the exact plans I use in my workshop—most of the jigs listed above are available with full diagrams, materials, and video links.
➜ See All Jig Plans Here
Final Thoughts
I’ve always enjoyed working with a router. It’s one of those tools that gives you clean, precise results without taking up much space — which makes it perfect for a small workshop like mine. With the right jigs and a few good bits, you can do a surprising amount of work: dados, mortises, joinery, shaping, and more.
The router jigs I shared above are the ones I reach for the most. Some are simple builds, others a bit more involved, but each one has earned a spot in my workflow because it actually helps me get better results — faster and more consistently.
If you’re thinking about building one (or more) of these, most have downloadable plans to help you get started. And if you’re new to router jigs, even adding just one to your setup can open up a lot of new possibilities.
FAQ: Router Jigs and Usage
What kind of router do I need for these jigs?
Most of these jigs work with a plunge router or compact handheld router. For router table jigs, you’ll need a router that can be mounted to a table or insert plate. I use the DeWalt D26200.
Can I build these jigs without a router table?
Yes, many of them are made for handheld or plunge routers, like the dado jig, template guide, or circle jig. That said, having a router table opens the door to box joints, splines, and more advanced setups.
What materials should I use to build router jigs?
I typically use a mix of Baltic birch plywood, MDF or HDF, and sometimes spruce or oak for small parts like knobs or pins. You can read more in my guide to the best materials for woodworking jigs.
How do I attach the router to these jigs?
Some jigs require drilling holes to match your router’s base. Others use a universal mounting plate or adjustable clamps. I recommend dedicating a small base plate for jig use if you switch often.
Do I need special router bits for these jigs?
Not necessarily. A good 6mm or 8mm straight bit will work with most of these. But depending on your project, you may also use spiral bits, pattern bits, or guide bushings.
