Adding handles to a cutting board is usually one of the later steps in the build — for me it comes right after the juice groove and edge profiles. It’s not strictly necessary (especially if you’re adding rubber feet), but it has a lot of benefits: the board is more comfortable to pick up and move around, easier to carry to the sink, and it instantly gives the project a more professional, finished look.
Just to keep the naming clear: people call these handles by different names — cutouts, slots, finger grips, finger grooves… and sometimes the same style gets called two different things. In this post I’ll focus on the two styles I actually use: an underside finger grip (my go-to), and a side finger groove/slot as an alternative.
Most of the time I stick to the underside grip because it feels natural and the board is easy to lift and carry. The best way to cut handles is with a router, ideally with a simple handle jig or a router table once you’ve dialed the setup in.
If you want the full cutting board workflow (and the jigs that make it easier), start here:
👉 Best Jigs for Making Cutting Boards (And How to Use Them)
Table of Contents
- The 2 Handle Styles I Use Most
- Why Add Handles to a Cutting Board?
- Tools You Need to Add Handles (Handheld Router vs Router Table)
- Router Bits for Cutting Board Handles (What I Use and Why)
- Handle Type 1 — Underside Finger Grip (Handheld Router + Jig or Router Table)
- Handle Type 2 — Side Finger Groove / “Side Slot” (Round Nose Bit + Router Table)
- Burn Marks on Handles (Causes, Prevention, Fix)
- Wrap-Up: A Simple Upgrade That Makes a Big Difference
- FAQs: How to Add Handles to a Cutting Board
Save THIS PIN to your Board on Pinterest!
The 2 Handle Styles I Use Most
There are a few different handles you can add to a cutting board. In this guide I’ll focus mainly on the two styles I actually use in my shop: the underside finger grip (my go-to) and the side finger groove. And if you want an even simpler “no-routing-jig” option, you can also add small chamfers on the sides — it’s not a full handle, but it definitely makes the board easier to grab.
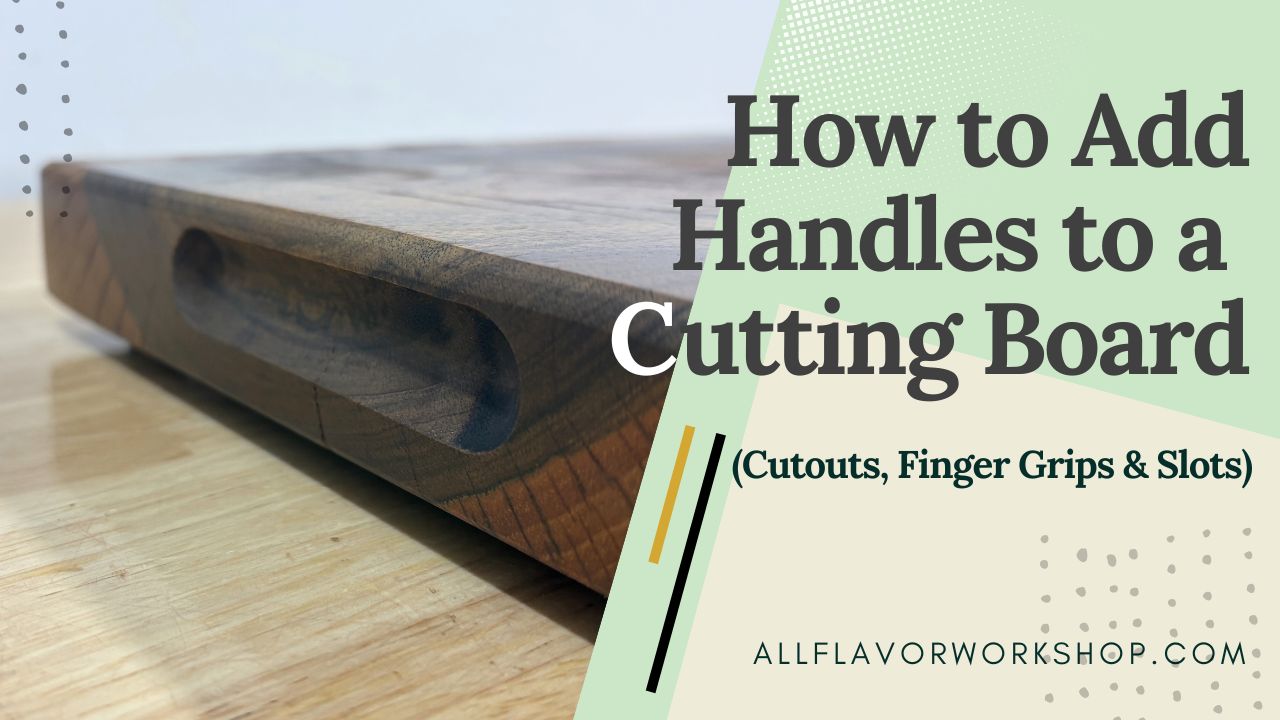
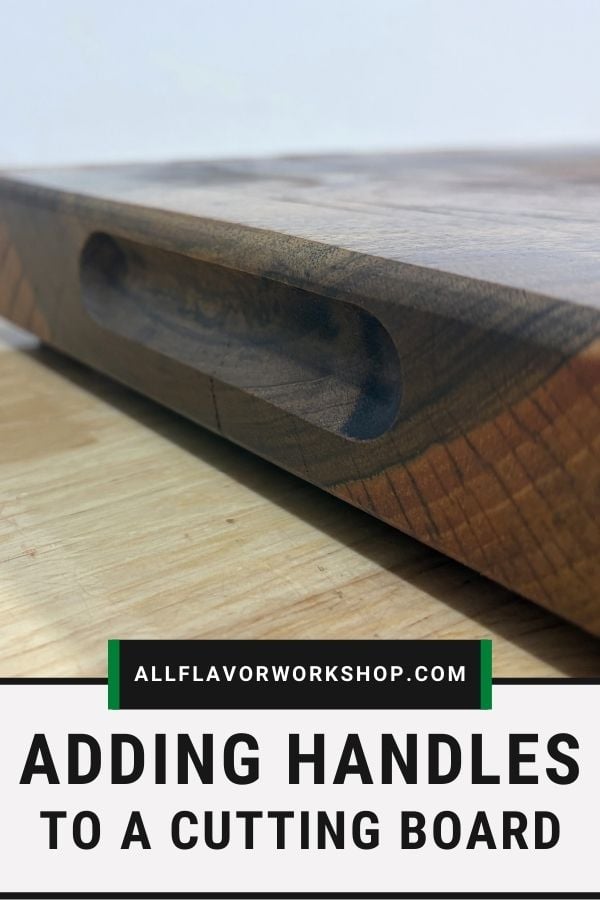
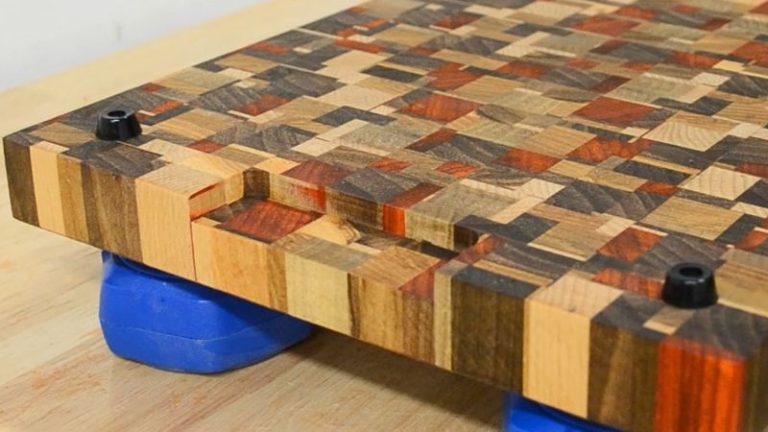
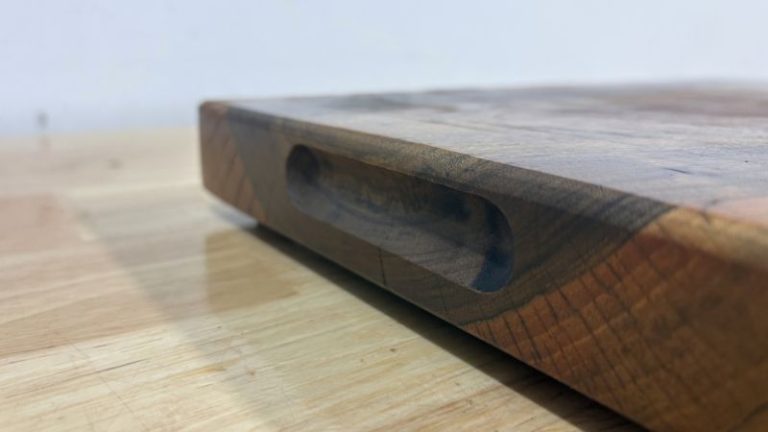
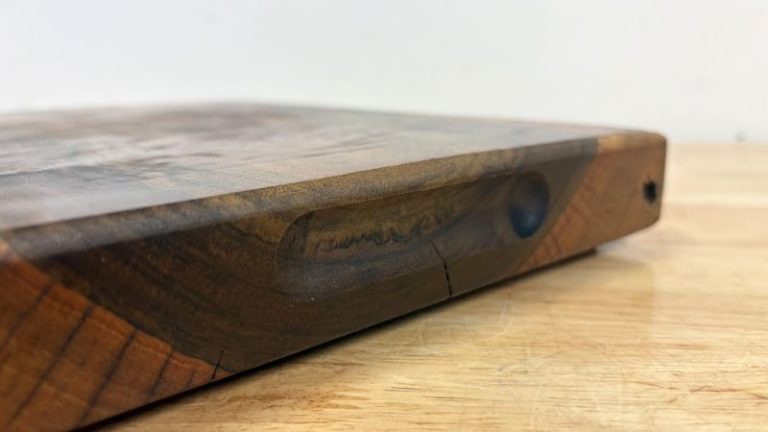
1) Underside finger grip (my go-to)
This is the handle I use the most. It’s routed on the lower part of the side, usually centered and around 100 mm / 4″ long. Your fingers slide underneath the board, so it feels natural to lift and carry — and the handle stays pretty subtle from the top.
Bits I use: straight bit (deeper grip) or cove bit (comfortable shape)
2) Side finger groove / “side slot” (good alternative)
This one is routed into the side face of the board, usually centered. Your fingers grip from the side instead of underneath. I like it as an alternative when I want a clean side detail or I don’t want to remove as much material from the underside.
Bit I use: round nose / ball nose bit
Optional “super simple” handle: small side chamfers
If you don’t want to route a full handle, a small chamfer on the side edges can still improve grip and comfort. It’s quick, looks clean, and it’s a nice option on thinner boards or boards with rubber feet.
Why Add Handles to a Cutting Board?
Handles are one of those features that you don’t fully appreciate until you use the board for a while. A bigger cutting board can get surprisingly heavy, and once it’s wet it can feel awkward to lift — especially if the edges are clean and sharp.
What handles improve right away:
Easier handling: you can pick the board up, flip it, and carry it without pinching the edge
More comfort and control: your fingers have a natural grip point, so the board feels more secure (especially at the sink)
Better “finished” look: even a subtle underside grip makes the board feel more designed and professional
Big payoff for little work: it’s a quick routing step that adds function without changing the overall build much
Tools You Need to Add Handles (Handheld Router vs Router Table)
You can cut cutting board handles two ways — handheld router or router table — and honestly, both work great. It’s the same approach as edge profiles: once you have a setup you like, it really pays off. You don’t need to rebuild your whole process every time… most of the time you’re just swapping bits and running the next operation.
Here’s what I use (and what I recommend):
Router (handheld or plunge router)
Works perfectly for both underside grips and side grooves. A plunge router can feel a bit easier for consistent depth, but a standard router works fine too.Router table (optional, but super consistent)
A router table is great when you want repeatable cuts and a stable setup. If your table is already set up, it’s often faster to run multiple boards without fussing around.
👉 DIY Benchtop Router TableHandle jig / guide jig (recommended for repeatability)
A simple handle jig keeps your routing straight, centered, and consistent — especially for underside grips.
👉 DIY Cutting Board Handle JigMulti-purpose router jig (if that’s what you use in your shop)
If you already have a multipurpose jig that can guide the router for grooves/handles, it’s a great “one jig, many jobs” setup.
👉 Multi-Purpose Router JigScrap wood for test cuts
This is underrated. A quick test cut tells you if the grip feels right before you touch the real board.
Quick note: handles are all about comfort — you need enough space to grab the board easily and maneuver it. I usually add rubber feet, so my underside handles can be a bit more shallow. Side grooves can feel slippery if they’re too shallow (that one is personal preference), so I always test the depth on scrap first.
Router Bits for Cutting Board Handles (What I Use and Why)
For cutting board handles, I keep it simple — a few basic bits cover everything I do. Once your router setup is dialed in (handheld or router table), it’s usually just a matter of swapping the bit and routing the same handle length and position.
Straight bit (for deeper underside grips)
This is my go-to when I want the underside finger grip to have a bit more “hook” and space for your fingers. It cuts clean walls and gives you a deeper pocket-style grip.
Affiliate link (my go-to straight bit): STRAIGHT BIT

Cove bit (for shallow underside grips)
I use a cove bit when I want a more rounded, comfortable shape but I don’t want to remove too much material — especially if I’m planning to add rubber feet and the board sits higher anyway.
Affiliate link (cove bit): COVE BIT

Round nose / Ball nose bit / Core box bit (for side finger grooves)
This is my main bit for the side finger groove handle. It gives you a smooth rounded groove that feels good in the hand and looks clean from the side.
Affiliate link: CORE BOX BIT

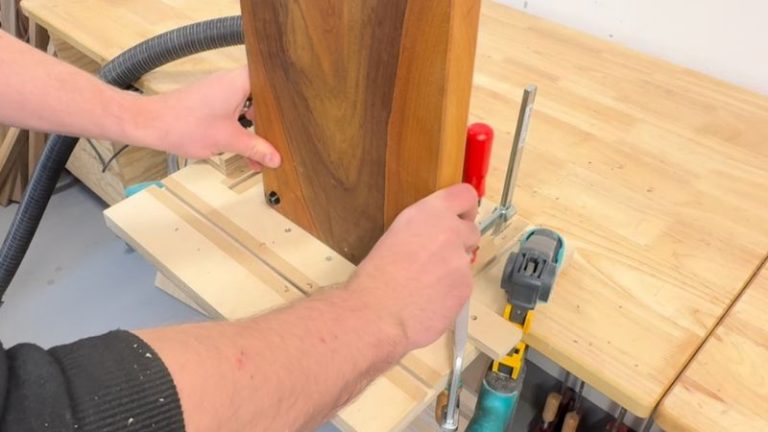
Handle Type 1 — Underside Finger Grip (Handheld Router + Jig or Router Table)
This is my go-to handle style. It’s subtle, comfortable, and it makes the board much easier to lift — especially bigger boards. Below are the two ways I cut it most often, depending on what setup I already have on the bench.
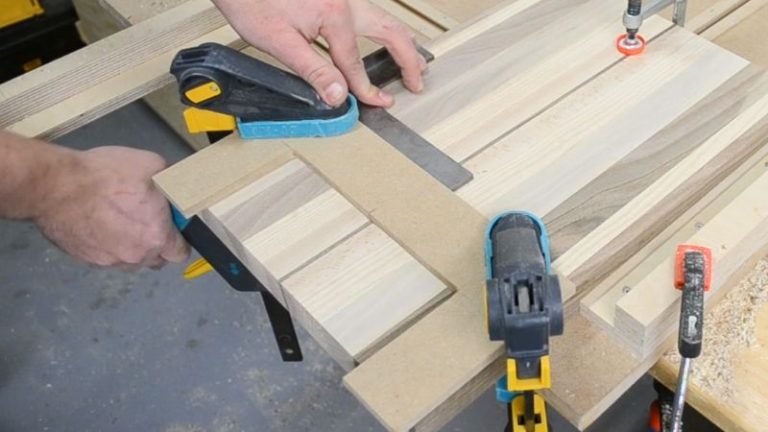
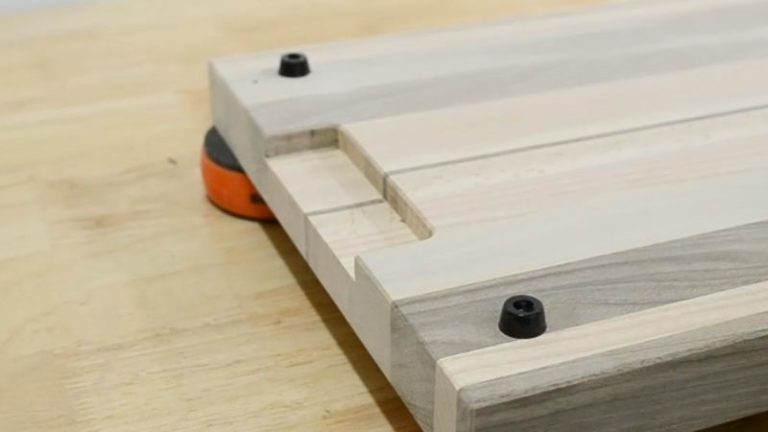
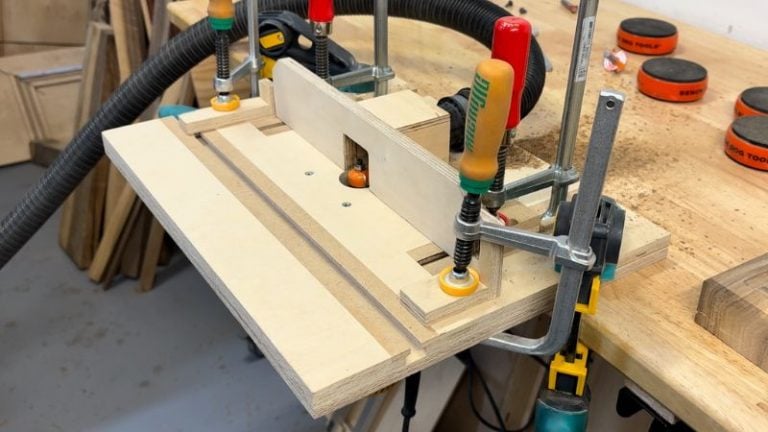
Option 1: Straight Bit + Handle Jig (handheld router)
Turn the board upside down, place it on a workbench, and fix it in place — this part really matters. If the board wobbles or shifts while routing, the handle won’t be clean (and it can get sketchy fast).
Next, place the handle jig on the side of the board, center it, set your depth, and clamp it down. My jig gives me a handle length of 100 mm / 4″. Once everything is locked in, start routing with light passes and repeat until you hit your final depth. If I’m adding rubber feet, I usually go for about 8 mm (~5/16″) deep.
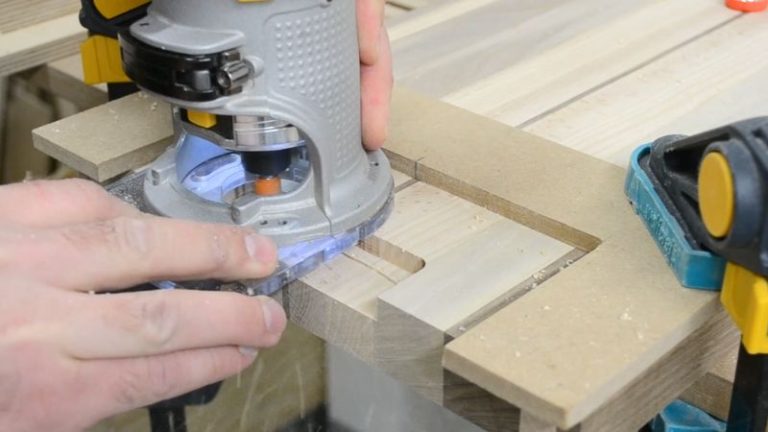
Option 2: Cove Bit + Router Table (with stoppers)
This is a clean and repeatable way to do underside grips if your router table is already set up. Set your stoppers on the left and right to control the handle length. Then make sure the bit is centered so the handle ends up centered on the board as well.
Start with light passes and repeat until you reach your depth. Again, if the board will get rubber feet, I usually stop around 8 mm (~5/16″) deep — enough room to grab the board easily without removing too much material.
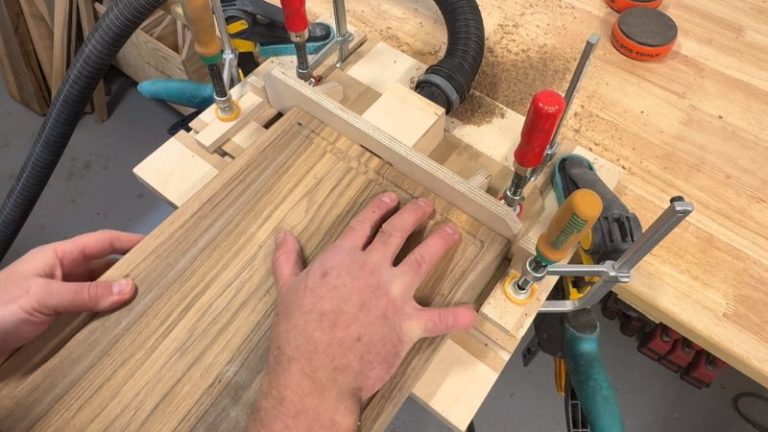
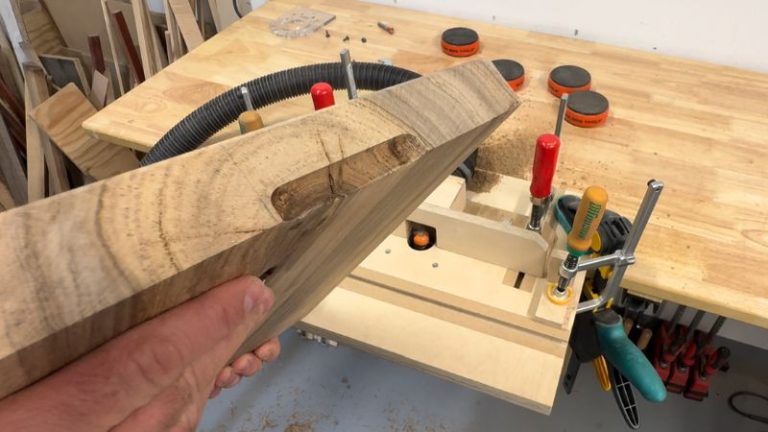
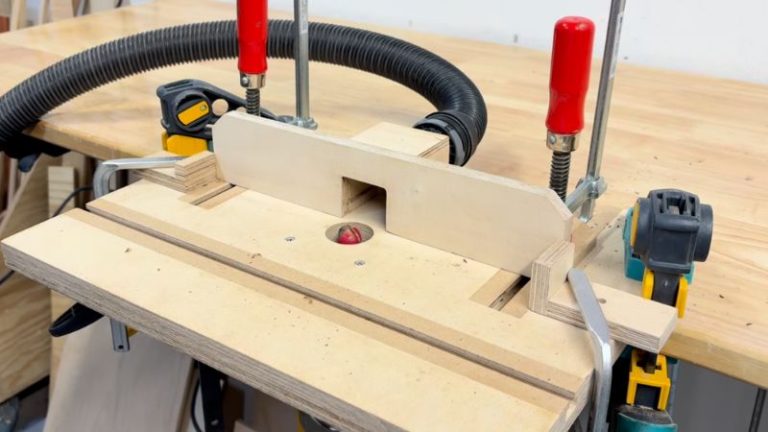
Handle Type 2 — Side Finger Groove / “Side Slot” (Round Nose Bit + Router Table)
This handle style is routed into the side face of the board, centered on the long edge. It’s a clean look, it feels good when it’s deep enough, and the router table makes it very repeatable once you’ve set your stoppers.
Round nose bit + router table (my setup)
Set the stoppers on the router table on both the left and right side to control the handle length. Then make sure the bit is centered so the groove ends up centered on the board — both along the length and vertically on the side face.
To start the cut, I dive in vertically, then make a light pass. Repeat a few times until you reach the depth that feels right. I usually end up around 5–8 mm (~3/16″–5/16″) deep, depending on the board thickness and how “grippy” I want it to feel.
Burn Marks on Handles (Causes, Prevention, Fix)
Burn marks on handle cuts usually come from one thing: too much heat. That happens when the bit is rubbing instead of cutting cleanly — most often because the pass is too heavy, the feed rate is too slow, or the bit is dirty/dull (pitch buildup is a classic).
One more thing that gets overlooked: chips. If chips build up and get trapped between the bit and the wood, they create friction, heat up fast, and burn marks show up out of nowhere — so it really helps to clear chips as you go (especially on deeper grooves).
| What you’re seeing | Main cause | How to prevent it | How to fix it |
|---|---|---|---|
| Dark burn marks along the handle cut | Feed rate too slow or pausing in one spot (bit rubs and heats up) | Keep a steady feed and don’t stop mid-cut; do lighter passes | Take a very light cleanup pass; if needed, sand the handle area to blend |
| Burning mostly on hardwoods (maple/beech/walnut) | Pass is too deep for the bit and setup | Do 2–4 light passes to reach final depth (especially for grooves) | Back off the depth, take a light finish pass, then sand lightly if needed |
| Burning keeps happening even with light passes | Dirty bit (pitch/resin) or dull cutting edges | Clean the bit regularly and use sharp carbide | Clean the bit first; if it still burns, replace/sharpen the bit |
| Burning with larger bits or wide contact area | RPM too high for bit size (more heat) | Lower RPM for larger bits if your router has variable speed | Reduce speed and take a light cleanup pass; sand if marks remain |
Wrap-Up: A Simple Upgrade That Makes a Big Difference
If you ask me, adding handles is one of the best upgrades you can do on a cutting board — especially once you start making bigger boards. It’s a small extra step, but the payoff is huge: the board is easier to pick up, easier to move around, and just feels better to use day-to-day. And visually, a clean handle instantly makes the board look more “designed” and professional.
My personal go-to is still the underside finger grip. It feels natural, it’s comfortable to lift, and it stays pretty subtle from the top. But the side finger groove/slot is a great option too — it looks clean on the side and works really well as long as you give it enough depth so it doesn’t feel slippery.
Either way, the key is comfort: do a quick test cut, sneak up on the depth with light passes, and you’ll land on a handle that feels right in the hand.
If you want to make this step (and the whole cutting board build) easier and more repeatable, jigs help a lot — especially when you’re doing multiple boards. Here’s my full guide to the jigs I use for cutting boards:
👉 Best Jigs for Making Cutting Boards (And How to Use Them)
FAQs: How to Add Handles to a Cutting Board
1) What are the best handle styles for a cutting board?
The most practical handle styles are underside finger grips and side finger grooves/slots. Underside grips are subtle and very comfortable to lift, while side grooves look clean and work well as long as they’re deep enough to feel secure.
2) What router bits do I need to add handles to a cutting board?
For the handle styles in this guide, you only need a few basics: a straight bit for deeper underside grips, a cove bit for a more rounded shallow underside grip, and a round nose/ball nose bit for side finger grooves.
3) How deep should cutting board handles be?
It depends on the board thickness and what feels good in your hand. As a practical starting point, about 5–8 mm (3/16″–5/16″) works well for many boards. If you’re using rubber feet, underside grips are often a bit more shallow because the board sits higher off the counter.
4) How do I avoid burn marks when routing handles?
Burn marks come from heat, usually caused by a dirty/dull bit, too slow of a feed rate, or passes that are too heavy. Take light passes, keep a steady feed, and clear chips as you go so they don’t get trapped between the bit and the wood.
5) Do I need a jig to route handles in a cutting board?
You can do it without a jig, but a simple handle jig or router table setup makes the cut more repeatable and easier to center. If you’re making more than one board, a jig is one of those things that quickly pays off.
