How to Make a Spline Jig for Table Saw (Step-by-Step Guide)
Learn how to make a spline jig for table saw that attaches to a table saw sled for clean, repeatable spline cuts. Great for boxes, picture frames, and mitered corners.
In a small workshop, I like tools and jigs that can do more than one job. That is one of the reasons I designed my table saw sled with a T-track in the fence — it gives me a solid base for different add-ons without having to build a completely separate jig every time.
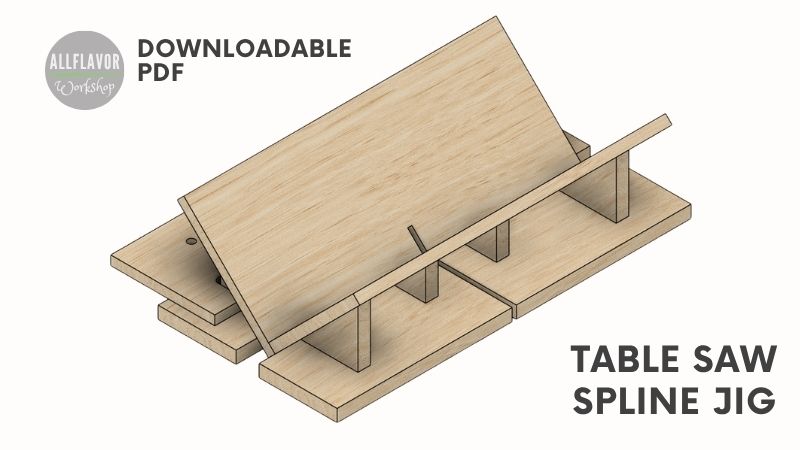
This spline jig for table saw is one of those add-ons. It attaches directly to the sled fence and creates a stable V-shaped cradle for holding boxes, picture frames, and other mitered workpieces while cutting spline slots.
Splines are useful because they do two things at once: they strengthen miter joints and add a decorative detail to the corner. Once the jig is set up, you can also repeat the same spline position on multiple corners without measuring each cut again.
The jig can be attached to the table saw sled using T-track bolts or T-track clamps, and removed again when you are finished. For me, that is the biggest advantage of this setup — the table saw sled stays as the main platform, while the spline jig only goes on when I need it.
In this article, I’ll show you how to build the spline jig step by step, attach it to the sled, cut the blade kerf, and use it to make clean, repeatable splines in boxes and mitered corners.
I also have downloadable plans available if you want the dimensions and part layout organized in one place while building the jig in the workshop.
DIY Table Saw Spline Jig Video
If you want to see the full build and setup, watch the video below. I show how I make the spline jig, attach it to the table saw sled, cut the blade kerf, and use it to add splines to mitered corners.
Seeing the jig in use is especially helpful when setting the workpiece position and making repeatable cuts on boxes and picture frames.
If you enjoy the video, I’d really appreciate it if you subscribed to my YouTube channel. It helps me keep creating more woodworking jigs, table saw sled add-ons, and step-by-step build guides.
*Safety is your responsibility. Make sure you know what you’re doing and take all necessary safety precautions while working with power tools. Safety comes first! Always be cautious and careful when using any power tool.
Table Saw Spline Jig Plans
You can download the free spline jig plans here and use them together with the step-by-step guide below. The plans include the main dimensions and part sizes needed to build the jig and are designed around my Table Saw Sled.
I’m also preparing a more detailed premium version of the plans with additional build information and workshop-ready references. I’ll add that here once it is available.
Disclosure: Some of the links on this page are affiliate links. If you purchase through them, I may earn a small commission at no extra cost to you. Thanks for supporting AllFlavor Workshop.
Before You Start
Before building the jig, it helps to understand what it does, how it works with the table saw sled, and why the workpiece support matters.
What Is a Table Saw Spline Jig?
A table saw spline jig holds a mitered workpiece at a consistent angle while you cut a narrow slot across the joint. A thin strip of wood is then glued into that slot to create the spline.
Splines are commonly used on wooden boxes, picture frames, trays, and other mitered projects. They strengthen the corner and can also become a decorative detail, especially when you use a contrasting wood.
This version is built as an add-on for my Table Saw Sled. The sled controls the movement through the saw blade, while the V-shaped cradle keeps the workpiece supported at the correct angle.
Why Build It as a Table Saw Sled Add-On?
You can build a completely separate spline sled, but I prefer using the table saw sled I already have as the base.
The spline jig attaches to the T-track in the sled fence using bolts or clamps. When I need to cut splines, I install the add-on. When I am finished, I remove it and the sled goes back to normal crosscutting. That means I get a dedicated spline-cutting setup without needing to store another full-size sled.
What Can You Use It For?
I mainly use this jig for:
wooden boxes
picture frames
trays
mitered frames
decorative corner joints
repeated spline cuts on matching parts
The adjustable stops also make it easier to place the spline in the same position on several corners.
Spline Jig vs. Other Table Saw Sled Add-Ons
The spline jig is only one attachment I use with this sled. Different add-ons turn the same base sled into a more specialized jig depending on the cut.
I also use an Any-Angle Sled Add-On when I need adjustable angles instead of a fixed setup.
Quick Build Overview
Here is a quick overview of the spline jig before getting into the step-by-step build.
Item
Details
Project
Table saw spline jig
Main use
Cutting spline slots in boxes, picture frames, trays, and mitered corners
Jig type
Add-on for a table saw sled
Main material
Plywood
Attachment
T-track bolts or T-track clamps
Angle support
Fixed 45° V-shaped cradle
Adjustable stops
Yes
Difficulty
Beginner to intermediate
Best for
Repeatable decorative and reinforcing spline cuts
Let's Start Building!
The spline jig is built from a few simple plywood parts and attaches directly to the fence of my Table Saw Sled.
The two angled supports form a V-shaped cradle that keeps the box or frame positioned consistently over the saw blade. A rear mounting plate connects the jig to the sled, while the adjustable stops help repeat the same spline position on multiple corners.
The exact dimensions can be adjusted to suit your sled and the size of the projects you normally build, but the basic construction stays the same.
💡TIP: Before gluing the angled supports in place, check that both sides form an accurate 90° V. This keeps the mitered corner centered over the saw blade.
NOTE: The jig shown here is designed around my table saw sled and its T-track fence. If your sled uses a different attachment system, adapt the mounting plate before building the rest of the jig.
How to Make a Spline Jig for Table Saw
Step 1: Build the Cradle
Cut two plywood boards to 115 × 300 × 9 mm (4.53″ × 11.81″ × 0.35″).
I use my Table Saw Sled to make the crosscuts and a push block to keep the smaller pieces under control.
Once both pieces are cut, join them at a right angle to create the V-shaped cradle. Apply wood glue along the edge, clamp the pieces together, and check the angle with a square before the glue sets.
This cradle is what supports the box or frame while cutting the spline slot, so the two sides should meet as accurately as possible.
💡TIP: You can bevel the mating edges at 45°, but it isn’t necessary for this table saw version. The saw blade has enough height to cut through the joint even with a simple butt joint.
NOTE: Check the cradle with a square before the glue dries. Any error here will affect how the workpiece sits over the blade.
Cutting the plywood pieces for the V-shaped spline jig cradle.
The two cradle pieces glued together at 90° to support boxes and mitered workpieces during spline cuts.
Step 2: Build the Jig Base
Cut two plywood base pieces to 100 × 320 × 12 mm (3.94″ × 12.60″ × 0.47″).
Then cut eight triangular support pieces: four larger supports from 50 × 50 mm (1.97″ × 1.97″) squares and four smaller supports from 25 × 25 mm (0.98″ × 0.98″) squares. I use my Table Saw Miter Sled for these cuts so the triangles come out at a consistent 45° angle.
Glue the supports to the base pieces. Place the larger supports toward the outside edges and the smaller supports toward the inside. Use a square to keep them perpendicular to the base.
Leave the center area of both base pieces clear. The saw blade will pass through this area later when you cut the kerf.
Once the supports are in place, fit the V-shaped cradle between the two base pieces and glue everything together. Clamp the assembly while the glue dries and check that the cradle remains centered and square.
💡TIP: Apply painter’s tape before cutting the small triangular supports. It can help reduce tear-out and leave cleaner edges.
NOTE: Do not place any support pieces in the blade path. Keep the center of the jig clear for the kerf you will cut in Step 4.
Cutting the 45° triangular supports for the spline jig base.
Gluing the large and small support blocks to the plywood base.
Applying glue on the support triangles to fit the V-cradle.
Fitting the V-shaped cradle between the two spline jig base pieces.
Find This Blog Post Useful?
Join my newsletter to receive the latest news, tutorials, and project plans sent directly to your inbox!
Cut the attachment board to 115 × 300 × 9 mm (4.53″ × 11.81″ × 0.35″).
Route two slots in the board so the larger support blocks can slide into them. This creates an overlap between the attachment board and the jig base, giving you more surface area for both glue and screws.
Next, drill two 8 mm holes in the attachment board and position them so they line up with the T-track in the fence of my Table Saw Sled.
Apply glue to the overlapping areas, align the spline jig with the sled fence, and attach the board to the jig. Let the glue dry, then reinforce the joint with screws. Make sure the screw heads sit flush with the plywood surface.
The attachment board is what connects the entire jig to the sled, so take your time here and make sure everything sits square and tight.
💡TIP: Test-fit the attachment board on the sled before gluing it to the jig. It is much easier to adjust the hole position or slots before everything is permanently fixed.
NOTE: If you use homemade T-track bolts, you can find the build here: DIY T-Track Bolts.
Applying glue to the attachment board that connects the spline jig with the table saw's t-track.
Finished fence attachment board mounted to the spline jig and aligned with the table saw sled fence.
Step 4: Cut the Kerf
Mount the spline jig on the Table Saw Sled using the T-track bolts or T-track clamps.
Raise the saw blade to about 20 mm (0.79″) and slowly push the sled forward to cut the kerf through the center of the jig. This creates the opening the blade will follow when you cut spline slots later.
Take the cut slowly and keep the jig firmly attached to the sled throughout the pass.
💡TIP: Add painter’s tape over the cut line before making the kerf. It can help reduce tear-out around the opening.
NOTE: Make sure the blade path is clear of screws and support blocks before making the cut.
Spline jig mounted to the table saw sled before cutting the blade kerf.
Cutting the center kerf through the spline jig with the table saw blade.
How to Cut Splines on a Table Saw
Once the jig is built and the kerf is cut, using it is straightforward. I mainly use it for boxes and mitered frames, but the same setup works for other mitered projects as well.
For the cleanest fit, use a flat-top saw blade so the bottom of the spline slot stays flat and the wooden spline strip seats properly.
Mount the spline jig on the Table Saw Sled and secure it with T-track bolts or clamps.
Place the box or frame into the V-shaped cradle and make sure the corner sits firmly against both sides.
Set the adjustable side stops so the spline will be cut in the exact position you want.
Adjust the blade height so the cut does not pass completely through the corner.
Turn on the saw and slowly push the sled through the blade.
Rotate the workpiece and repeat the cut on the remaining corners.
If you want multiple splines, move the stops to the next position and repeat the process.
Once all the slots are cut,apply glue and insert thin wooden spline strips. I usually make the strips just slightly thinner than the kerf so they slide in easily even after the glue is applied.
After the glue dries, trim the excess spline material flush with the surface and sand the corners smooth.
Using a contrasting wood for the spline is a simple way to make the joint stand out. A darker spline in a lighter box, or the opposite, can turn the reinforcement into a decorative feature.
💡TIP: Make the first cut on a scrap piece or test corner. It is much easier to adjust the blade height and spline position before cutting the finished project.
NOTE: Keep the workpiece firmly seated in the V-shaped cradle during every cut. Any movement can shift the spline position from one corner to the next.
Positioning a wooden box in the spline jig and setting the adjustable stops.
Cutting a spline slot through a mitered box corner using the table saw sled.
Finished spline slots ready for contrasting wooden inserts (cherry).
Contrasting wooden splines added to the box corners for extra strength and decoration.
My Take
I like this spline jig because it turns my Table Saw Sled into a dedicated spline-cutting setup without taking up much extra space in the workshop.
The V-shaped cradle keeps boxes and frames stable, while the adjustable stops make it easy to repeat the same spline position on every corner. Once the jig is set up, cutting several matching splines is quick and consistent.
I mainly use it for wooden boxes, picture frames, trays, and other mitered projects where I want to strengthen the joint and add a decorative detail at the same time.
What I like most about this setup is that the spline jig is only one add-on for the same sled. I can remove it when I am finished and replace it with my Table Saw Miter Sled, DIY Hexagon Jig, or DIY Table Saw Angle Jig depending on the project.
If you want to build this spline jig yourself, you can download the free plans above and follow the step-by-step guide.
📌 Found this post useful? Save THIS PIN to your Board on Pinterest!
DIY T-Tracks and T-Slots – useful if you want to make your own T-track bolts or attachment system
DIY Corner Clamp – helpful when assembling and gluing right-angle parts
You do not need all of these to build the jig, but they can make the process easier and more repeatable.
Frequently Asked Questions
What is a spline jig used for?
A spline jig holds a mitered workpiece at a consistent angle while you cut a narrow slot across the corner. A wooden spline is then glued into the slot to strengthen the joint and add a decorative detail.
Can I use this spline jig without a table saw sled?
This version is designed specifically as an add-on for my Table Saw Sled. The sled provides the controlled movement through the blade, while the spline jig holds the workpiece at the correct angle.
You could build a standalone spline sled instead, but I prefer this removable setup because it uses the same sled as several of my other table saw jigs.
What projects can I use a table saw spline jig for?
I mainly use it for wooden boxes, picture frames, trays, and other projects with mitered corners. It works especially well when you want several spline cuts positioned consistently around the project.
What saw blade should I use for cutting splines?
A flat-top blade is a good choice because it leaves a flatter bottom in the spline slot. Whatever blade you use, make sure the spline material matches the width of the kerf closely.
How deep should a spline cut be?
The spline should reinforce the joint without cutting completely through the corner. I normally set the blade height based on the size and thickness of the workpiece and make a test cut first.
Can I cut more than one spline in each corner?
Yes. You can reposition the adjustable stops and make multiple spline cuts in the same corner. This works well on larger boxes or when you want the splines to become a stronger decorative feature.
What wood should I use for splines?
You can use the same wood as the project for a subtle look, or choose a contrasting hardwood if you want the splines to stand out. Walnut in a lighter box, for example, creates a very visible decorative detail.
Meet the creator of AllFlavor Workshop! As a passionate DIYer and woodworking enthusiast, Lukas is always looking for ways to make things himself rather than buying them off the shelf. With a keen eye for design and a knack for working with wood, Lukas enjoys sharing his craft with others and helping them discover the joy of building. Whether you're an experienced woodworker or a novice looking to try your hand at a new hobby, you're sure to find plenty of inspiration and tips on AllFlavor Workshop.