How to Make a Table Saw Miter Sled (Perfect 45° Cuts)
Learn how to make a table saw miter sled for accurate, repeatable 45° cuts. This removable sled add-on is ideal for picture frames, boxes, and other mitered projects.
Since I work in a smaller workshop, I try to make my jigs do more than one job whenever possible. That is why I built my Table Saw Sled with a T-track in the fence — it gives me a solid base for different removable add-ons without having to build a completely separate sled every time.
This table saw miter sled is one of those add-ons. It attaches directly to the sled fence and gives me a fixed 45° reference for making accurate, repeatable miter cuts.
I mainly use it for picture frames, boxes, trim pieces, and other projects where two 45° cuts need to come together cleanly at 90°. Instead of setting the angle again for every cut, I can place one workpiece on each side of the jig and keep the setup consistent.
For me, the biggest advantage is the modular setup. When I need the miter jig, I attach it to the sled with T-track bolts or clamps. When I am finished, I remove it and the main sled is ready for normal crosscuts or another add-on.
In this guide, I’ll show you how to build the table saw miter sled step by step, attach it to the main sled, check the angle, and use it to make clean, repeatable 45° cuts.
I also have downloadable plans available if you want the dimensions and part layout organized in one place while building the jig in the workshop.
How to Make a Table Saw Miter Sled Video
If you want to see the full build and setup, watch the video below. I show how I make the miter attachment, reinforce it, mount it to the Table Saw Sled, and check the final angle before making any cuts.
Seeing the setup in action is especially useful when aligning the jig and checking that the two 45° sides come together accurately.
If you enjoy the video, I’d really appreciate it if you subscribed to my YouTube channel. It helps me keep creating more table saw jigs, sled add-ons, and step-by-step woodworking guides.
*Safety is your responsibility. Make sure you know what you’re doing and take all necessary safety precautions while working with power tools. Safety comes first!
Table Saw Miter Sled Plans
You can download the free table saw miter sled plans here and use them together with the step-by-step guide below. The plans include the main dimensions and part sizes needed to build the jig and are designed around my Table Saw Sled.
I’m also preparing a more detailed premium version of the plans with additional build information and workshop-ready references. I’ll add that here once it is available.
Before starting the build, prepare the plywood pieces, hardware, and tools for the miter sled. This version is made from 9 mm and 12 mm Baltic birch plywood and attaches to my Table Saw Sled using T-track bolts.
We may earn an affiliate commission when you buy something through our retail links. As an Amazon Associate AllFlavor Workshop earns from qualifying purchases.
What Is a Table Saw Miter Sled and What Is It Used For?
A table saw miter sled is a jig that helps you make accurate, repeatable angled cuts on a table saw. This version is designed specifically for 45° miters and works as a removable add-on for my Table Saw Sled.
For standard 45° cuts, this is the setup I prefer because it is quick to use and very consistent. If I need a different angle or want to secure an irregular workpiece, I use my Table Saw Angle Jig instead. It attaches to the same table saw sled but gives me much more freedom when setting up custom angles.
The fixed 45° reference removes most of the setup and measuring from repeated cuts. Once the jig is aligned correctly, you can cut matching pieces from either side and bring them together to form a clean 90° corner.
I mainly use it for picture frames, boxes, trim pieces, and other projects with mitered corners.
Benefits of a Table Saw Miter Sled
Repeatable 45° cuts – once aligned, the same angle can be repeated again and again.
Better support – the workpiece stays supported against the jig throughout the cut.
Faster setup – there is no need to reset a miter gauge for every cut.
Removable design – the jig attaches to the main sled only when I need it.
Useful for matching miters – cutting one piece from each side helps the two miters come together accurately.
How to cut a miter on a table saw - using a miter addon
Table Saw Miter Sled vs. Miter Saw
Both tools can make 45° cuts, but I use them for slightly different jobs.
For picture frames, boxes, and smaller parts where accuracy and repeatability matter most, I prefer the table saw miter sled. The workpiece is well supported, and once the jig is set correctly I can repeat the same angle without changing the setup.
A miter saw is usually faster when I am cutting longer boards, trim, or larger construction pieces. It also makes compound miter and bevel adjustments much easier.
So I don’t really see one as a replacement for the other. In my workshop, the miter sled is the more precise setup for smaller woodworking projects, while the miter saw is better when speed, longer stock, or more complex angles are the priority.
Quick Build Overview
Here is a quick overview of the table saw miter sled before getting into the step-by-step build.
Item
Details
Project
Table saw miter sled
Main use
Making accurate, repeatable 45° miter cuts
Jig type
Removable add-on for a table saw sled
Main material
Baltic birch plywood
Attachment
T-track bolts or T-track clamps
Cutting angle
Fixed 45°
Best for
Picture frames, boxes, trim pieces, and mitered corners
Difficulty
Beginner to intermediate
Let’s Start Building!
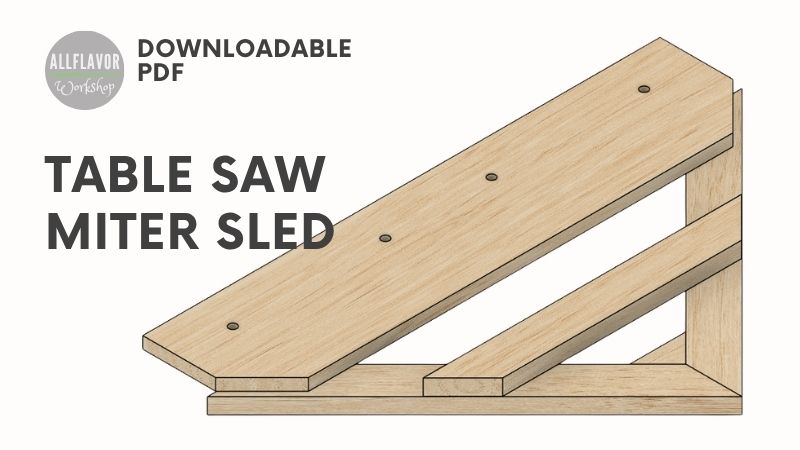
This miter jig is built from a few simple plywood parts and attaches directly to the fence of my Table Saw Sled.
The two 45° fence pieces form the main cutting reference, while the rear attachment board connects the jig to the sled. Once everything is aligned correctly, the jig gives you a fixed setup for making repeatable miters without having to reset the angle for every cut.
I built this version for my DWE7491RS table saw, but the same idea can be adapted to other sleds. The jig is made from 9 mm and 12 mm Baltic birch plywood and attaches with T-track bolts or clamps.
One useful detail of this design is that the right side can handle long workpieces, while the left side is limited to pieces up to about 285 mm (11.22″). That makes the jig especially practical for picture frames and similar projects.
💡TIP: Before gluing anything permanently, dry-fit the parts on the sled and check how the blade will pass between the two 45° fences.
NOTE: You can also build a complete dedicated miter sled from scratch, but I prefer this removable add-on because it keeps the main sled available for other jigs and normal crosscuts.
How to Make a Table Saw Miter Sled
Step 1: Build the Miter Attachment
Cut two plywood strips to 280 × 30 × 12 mm (11.02″ × 1.18″ × 0.47″).
Angle both ends of the strips at 45°. I use a Dozuki saw for these cuts, but you can use another accurate method if you prefer. Try to get the cuts as close to 45° as possible, because these two pieces form the main reference for the jig.
Next, join the two strips together so they form a precise 90° angle. Apply wood glue to the joint and use two squares to keep the pieces aligned while the glue dries.
Place painter’s tape underneath the joint before gluing. It keeps squeeze-out from sticking the jig to the workbench and makes cleanup easier.
💡TIP: If either 45° cut is slightly off, refine it with sandpaper before gluing the two pieces together.
NOTE: The accuracy of this joint matters more than the individual 45° cuts. If the two sides come together at a true 90°, the paired miter cuts will match correctly.
Cutting the plywood strips for the table saw miter sled attachment.
Two 45° plywood strips prepared for the miter sled.
Gluing the miter sled strips together while checking for a precise 90° angle.
Step 2: Reinforce the Structure
To strengthen the 90° joint, cut a small triangular plywood piece and glue it over the top corner of the miter attachment. This helps keep the two 45° fence pieces locked together and reduces the chance of the joint shifting over time.
Next, cut the plywood connector to 240 × 30 × 9 mm (9.45″ × 1.18″ × 0.35″) and trim both ends at 45°.
Position the connector across the two fence pieces, apply wood glue, and clamp it in place. Once the glue has dried, reinforce the connection with a few screws.
This extra support makes the miter attachment much more rigid, which is important because the jig needs to keep its 90° reference accurately while cutting.
💡TIP: Check the 90° angle again before the glue dries. Reinforcing the jig only helps if the main angle is already correct.
NOTE: Keep the screws away from the future blade path. The saw blade should only pass through plywood when you make the final kerf.
Adding a triangular reinforcement to strengthen the 90° miter sled joint.
Gluing and securing the plywood connector across the table saw miter sled attachment.
Find This Blog Post Useful?
Join my newsletter to receive the latest news, tutorials, and project plans sent directly to your inbox!
Cut the plywood attachment board to 390 × 88 × 9 mm (15.35″ × 3.46″ × 0.35″).
Drill a series of 8 mm holes along the board so they line up with the T-track in the fence of the Table Saw Sled. I drilled four holes, although two are enough to secure the jig. You can also trim the outer edges of the board at 45° if you want a cleaner shape.
Temporarily fix the miter attachment to the sled with double-sided tape. Then use a square and a digital angle finder to position the jig so each side sits at about 45° to the blade.
Once you are happy with the alignment, glue the attachment board to the miter jig and reinforce the connection with screws.
The most important thing here is that the two miter fences together form a true 90° angle. If that reference is square, the two matching 45° cuts will come together correctly even if the jig is not positioned at an absolutely perfect 135° relative to the blade.
💡TIP: Use double-sided tape for the initial setup so you can still fine-tune the jig position before committing with glue and screws.
NOTE: Keep all screws clear of the blade path. The center section of the jig needs to remain free for the test kerf in the next step.
Drilling the attachment holes that line up with the T-track in the table saw sled fence.
Trimming the edges of the plywood attachment board for a cleaner fit.
Aligning the miter jig on the table saw sled before fixing it permanently.
Gluing the attachment board to the back of the miter jig.
Securing the miter jig attachment board with screws after the alignment is set.
Step 4: Check for Squareness
Mount the miter jig on the Table Saw Sled using T-track bolts or clamps.
Apply a strip of painter’s tape over the tip of the jig, then raise the blade and make a shallow test kerf into the center. Do not cut all the way through the jig yet.
Remove the remaining tape and check the two reference sides with a square. The goal is for the two sides of the jig to form a true 90° angle around the blade path.
If the angle is slightly off, loosen the attachment and fine-tune the jig position before making the final cut. Once the setup is square, the two opposing 45° cuts will come together accurately.
💡TIP: Make a test cut in scrap wood after checking the jig with a square. Two matching offcuts placed together will quickly show whether the setup is accurate enough.
NOTE: The exact angle of each side relative to the blade is less important than the two sides forming a true 90° reference together.
Cutting a shallow test kerf into the table saw miter sled to check the setup.
Checking the miter sled for a precise 90° angle before making the final cuts.
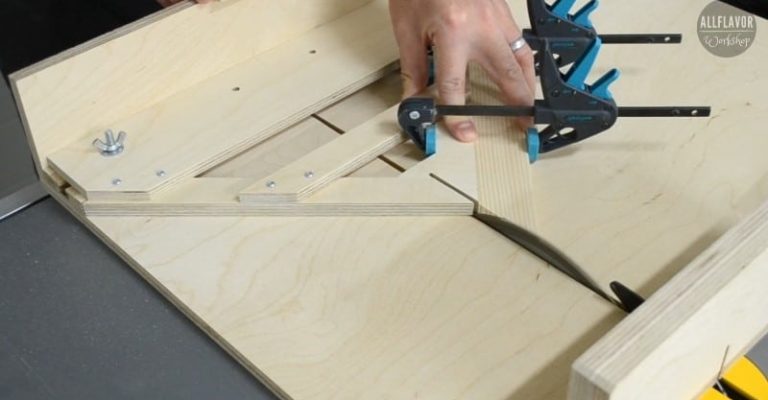
Finished table saw miter sled mounted on the crosscut sled and ready for use.
How to Make Miter Cuts on a Table Saw
Once the miter sled is built and aligned, using it is straightforward. The main advantage of this setup is that the two sides of the jig work together — one cut is made from the left side and the matching cut from the right side.
Attach the miter jig to the Table Saw Sled using T-track bolts or clamps and make sure it is secured firmly before cutting.
Place the first workpiece against one side of the jig and align the cut line with the saw blade. Clamp the piece in place if needed, then make the cut.
Next, place the matching workpiece on the opposite side of the jig and make the second cut. Because the two fence sides form a true 90° reference, the two miters should come together to create a clean square corner.
For picture frames and boxes, I always make a test pair first before cutting all the finished pieces. It only takes a minute and quickly shows whether the jig still needs a small adjustment.
When assembling the final joint, you can use a DIY Corner Clamp or a picture frame clamping jig to keep the parts aligned while the glue dries.
💡TIP: Cut matching parts from opposite sides of the jig instead of making all cuts from only one side. Small angle errors will cancel each other out and give you a more accurate 90° corner.
NOTE: Keep the workpiece firmly against the fence throughout the cut. Even a small amount of movement can change the final miter angle.
Positioning the first workpiece against one side of the table saw miter sled.
Making the matching 45° cut from the opposite side of the miter jig.
Two matching miter cuts joined together to form a clean 90° corner.
My Take
I like this miter sled because it gives me a simple, repeatable 45° setup without taking over the whole table saw. Since it mounts to my Table Saw Sled, I can attach it only when I need it and remove it again when I am done.
For me, it is especially useful for picture frames, boxes, trim pieces, and other smaller projects where matching miters matter more than speed.
The biggest advantage is that the two sides of the jig work together. By cutting one piece on the left and the matching piece on the right, small angle errors cancel each other out, and the two parts come together as a clean 90° corner.
Build a table saw miter sled for accurate, repeatable 45° cuts in picture frames, boxes, and other mitered projects.
Woodworking Jigs I Used for This Build
A few other workshop jigs make this build easier, especially when preparing the attachment board and mounting the miter jig to the sled.
Table Saw Sled – the main base for this removable miter attachment
Drill Press Stand – useful for drilling clean, straight attachment holes
Drill Press Table – gives better support when drilling smaller parts
You do not need all of these to build the jig, but they can make the process easier and more repeatable.
Frequently Asked Questions
What is a table saw miter sled used for?
A table saw miter sled is used to make accurate, repeatable angled cuts, especially 45° miters for picture frames, boxes, trim pieces, and other projects with mitered corners.
Why use a miter sled instead of a miter gauge?
A miter sled gives the workpiece more support and keeps the cutting angle fixed. Once the sled is aligned correctly, you can repeat the same 45° cut without resetting the angle each time.
Can I use this miter sled for picture frames?
Yes. This jig is especially useful for picture frames because you can cut matching pieces from opposite sides of the sled. That helps the two miters come together as a clean 90° corner.
Does the table saw miter sled have to be exactly 45°?
The two sides of the jig should together form a true 90° reference. That is more important than each individual side being absolutely perfect on its own. Cutting matching parts from opposite sides helps small errors cancel each other out.
Can I use this jig without a table saw sled?
This version is designed as a removable add-on for my Table Saw Sled. You could build a dedicated standalone miter sled, but I prefer using the same base sled for multiple attachments.
Meet the creator of AllFlavor Workshop! As a passionate DIYer and woodworking enthusiast, Lukas is always looking for ways to make things himself rather than buying them off the shelf. With a keen eye for design and a knack for working with wood, Lukas enjoys sharing his craft with others and helping them discover the joy of building. Whether you're an experienced woodworker or a novice looking to try your hand at a new hobby, you're sure to find plenty of inspiration and tips on AllFlavor Workshop.