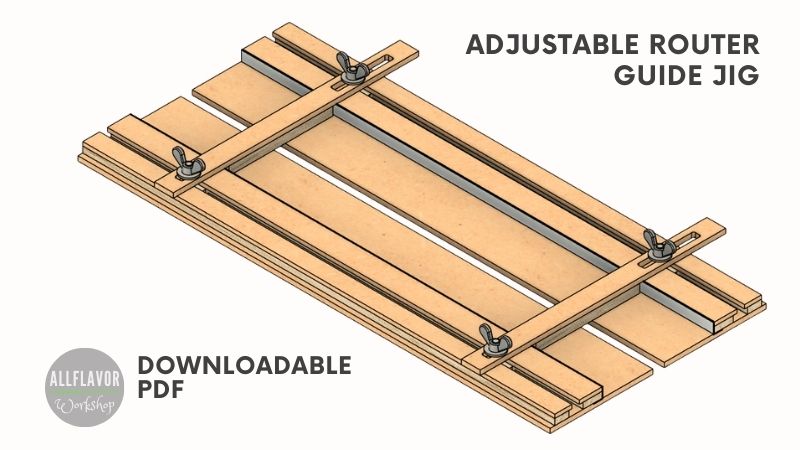
A router dado jig is a perfect tool for cutting dados, rabbets, and grooves. It is a huge helper when it comes to making t-joints or when cutting t-slots in wood. Ultimately it can be used as a mortising jig as well. The tool offers many options and that is mainly what makes it so useful.
I have already built a similar dado jig for a router. I have used it for countless projects. It is easy to set up and really simple to cut an exact-width dado with. It has been one of the most used jigs in the workshop and it is definitely one of the top 3 jigs for a router.
During the time I figured out one thing the jig is missing – an adjustable stopper. And that is exactly what I added to this new dado jig.
An adjustable stopper makes it easy to cut dados, rabbets, or mortises of precise length and width. Also, the stopper acts as a parallel guide so cutting squares or rectangles is an easy job.

Although making joints and cutting mortises with this jig is simple, I use it most for cutting slots and making t-tracks. Once the dado jig is set up you can easily make repeated cuts.
I built the router jig in a weekend. The material is easily available, the only thing you really need is an MDF and a plywood desk, possibly aluminum slats.
This is quite an easy project for any beginning woodworker and a must-have jig for a router. The tool offers many options, you may be surprised yourself.
RELATED: Check out these router jigs that may come in handy in your workshop.
DIY Adjustable Router Dado Jig Video
If you want to build a dado jig for a router and want to see how it is done, watch the video below for a detailed step-by-step guide.
I appreciate every YouTube subscriber. It’s free and easy to subscribe to — just Click Here To Subscribe. Thank you!
Table of Contents
- The Material you will need
- General Questions
- What router bit should I use to cut dados?
- How to make a Router Dado Jig for Perfect Dados and Grooves
- Step 1: Build the Front Baseplate
- Step 2: Make a T-track
- Step 3: Build the Back Baseplate
- Step 4: Make T-track Bolts
- Step 5: Make Adjustable Stoppers
- Multiple Ways How to Use an Adjustable Router Dado Jig
- Using both parts of the dado jig together
- Using one part of the dado jig
*Safety is your responsibility. Make sure you know what you’re doing and take all necessary safety precautions while working with power tools. Safety comes first!
Always be cautious and careful when using any power tool.
What you'll need to make an Adjustable Router Dado Jig
Router jig base
MDF – 2x – 50cm x11cm x 0,5cm
Aluminum L angles – 2x – 50cm x 1,2cm x 1,4cm
Router jig t-tracks
Plywood Strips – 2x – 50cm x 2cm x 0,65cm; 2x – 50cm x 1,5cm x 0,65cm
MDF Strips – 4x – 50cm x 2,4cm x 0,4cm; 2x – 50cm x 1,9 x 0,4cm
Router Jig stoppers
Plywood – 2x -11cm x 2cm x 0,9cm
MDF – 2x 26cm x 2cm x 0,4cm
Other:
6mm router bit
M6 Wing nut, M6 Bolts
Wood Glue, Epoxy
Tools:
Makita Circular Saw
Dewalt Trim Router
Proxxon Mini Table Saw
Bosch Cord Drill
Narex Chisels
What router bit should I use to cut dados?
The two best router bits for cutting dados, grooves, and rabbets are a double flute straight router bit and an upcut/downcut spiral bit.
A straight router bit cuts the material along its entire length, so more pressure is exerted on the bit blade. When using a straight bit, it is better to make shallow cuts with more passes. Thus, the resulting cut will be cleaner and there is less chance the router bit would get burnt or break.
A spiral router bit cuts the material only when the blade touches the stock. There is less contact between the router bit and the material, which is gentler on the blade. Unlike the straight bit that chops the material, the spiral router bit peels the material off leading to a cleaner cut.
Let's start building!
The dado jig has 2 main parts – the base and the guide rail with t-tracks.
- For the base, I am using a thin MDF desk. The thinner the base, the greater the depth of the cut. Although the desk needs to be strong enough to support the weight of the trim router.
- The guide rail is made of aluminum L angles glued with epoxy to the base and is followed by t-tracks.
The overall dimensions of the dado jig are 50cm x 22cm, which gives roughly 30 cm to cut dados and grooves. Both parts of the jig can be used together or independently.
NOTE: The route dado jig is built and can be used with one router bit size only. If you use a 6mm router bit to build the jig then it can be used only with a 6mm router bit.
Also, take into account the type of your router and the router base. The distance between the front of the router base and the router bit might be different than the distance between the back of the base and the router bit – that would determine the width of the dado jig base plates and precisely defines which base plate is the front and which is the back.
How to make a Router Dado Jig for Perfect Dados and Grooves
Step 1: Build the Front Baseplate
First, measure and cut the MDF baseboard (final dimensions after cutoffs – 24cm x 6cm x 1,2cm). Cut the baseboard slightly wider, though. The wood excess will be cut off later.
To cut both the baseboards I was using a circular saw with a circular saw straight edge guide and circular saw track, though a table saw would work just.

Mark the position of the aluminum L angle (5cm from the bottom of the MDF strip). Cut a shallow dado to make the angle flush with the surface. Apply epoxy and glue the angle to the baseboard.


NOTE: Since the MDF baseboard is too thin, I am using epoxy to glue the aluminum angle to the MDF. Screws would not work here.
Step 2: Make a T-track
Cut all the wood strips necessary for the t-tracks. Start gluing the individual wood layers on top of each other and make a t-track. The first layer is the MDF baseboard, then the plywood strips 0,65cm, and then the MDF strips 0,4cm.
Make sure the glue does not get in the track, otherwise it is quite complicated to clean it.
TIP: Use t-track bolts as separators when measuring the distance between the t-track layers (Step 4).


Once the glue dries, cut off the MFD excess from the base using a router. The router bit size you will use for that will determine the size of the bit you will need to use together with this router jig. If necessary, make a mark on the baseboard to know that this is the front piece and needs to be used together with the front part of the router base.

Find This Blog Post Useful?
Join my newsletter to receive the latest news, tutorials, and project plans sent directly to your inbox!
Step 3: Build the Back Baseplate
Repeat Step 1 and Step 2 to make the back baseplate of the router jig. When cutting the wood excess turn your router and use the back side of the router to make the cut.
Now you have the front and the back baseboards.


Step 4: Make T-track Bolts
Cut 4 plywood pieces for the t-track bolts (3cm x 1,5cm x 0,65cm) and round the edges. Drill a 6mm hole in the center of the piece and carve a hexagon around the hole to fit in the bolt’s head. Use epoxy to fix it permanently.


NOTE: You can grind the bolt’s head to make it thinner. The carved hexagon wouldn’t have to be that deep.
Step 5: Make Adjustable Stoppers
Cut the wooden strips for the stoppers (Plywood, MDF). Route slots at the ends of the MDF strips for adjustments and glue the strips with the Plywood pieces.
When gluing the plywood pieces, note, that they should fit between the baseboards entirely when the router dado jig is in its minimum position.


Improvement to the stoppers
Add perpendicular wooden strips to the stoppers. This is especially useful when cutting a precise shape such as a square or rectangle.
The width of the strips is at most equal to the bit thickness (in my case a little less than 6mm). Make the strips longer, the excess will be cut off with the router.
When installing the stoppers on the t-tracks, make sure the perpendicular strips are right between the baseboards.
TIP: Use epoxy to glue the strips

Below is a picture of a finished dado jig for a router. I love this jig. There are so many things that can be done with this router jig. I have been using it for multiple projects and it is for sure one of the most practical and useful jigs for a trim router.

Multiple Ways How to Use an Adjustable Router Dado Jig
There are a few ways how to use an adjustable router dado jig. The versatility of the tool is great. It has a wide range of uses which are described more in detail below.
All methods require that the jig be attached to the material being cut, or to the table. The base and the stoppers are not firmly fixed to each other so all parts can be used independently.
1. Using both parts of the dado jig together
Cut dados and grooves – the router jig can be used to cut precise exact-width dados and grooves.
- Insert a reference piece in the dado jig, adjust both the base plates and the stoppers around the piece and lock the jig down. Remove the material from the jig, insert the router and make a cut. Thus, you will get an exact width-dado. This method is suitable for making t-joints.


- Place the dado jig on a workpiece with the drawn lines. Align the inner edges of the jig with the lines and lock the jig down. Then, make the cut. This is my preferred method of creating t-tracks.

Cut Mortises – set the length and the width of the tenon on the dado jig and lock it down. Place it on a drawn/marked mortise and make a cut.
2. Using one part of the dado jig
The dado jig can be used separately since the two base plates are not firmly fixed to each other.
Cut rabbets – place the jig on the edge of a workpiece. Align the inner edge of the base plate with the drawn line, clamp the jig down, and make a cut.
Cut straight long cuts – the aluminum rail on the base plate can also serve as a guide for making straight long cuts. Place the base on the workpiece, clamp it down and make a cut.
📌 Found this post useful and inspiring?
Ready to build it? Save THIS PIN to your Board on Pinterest!

I hope the information shared in this blog post inspired and now you are adding this router jig to your next builds. 😉