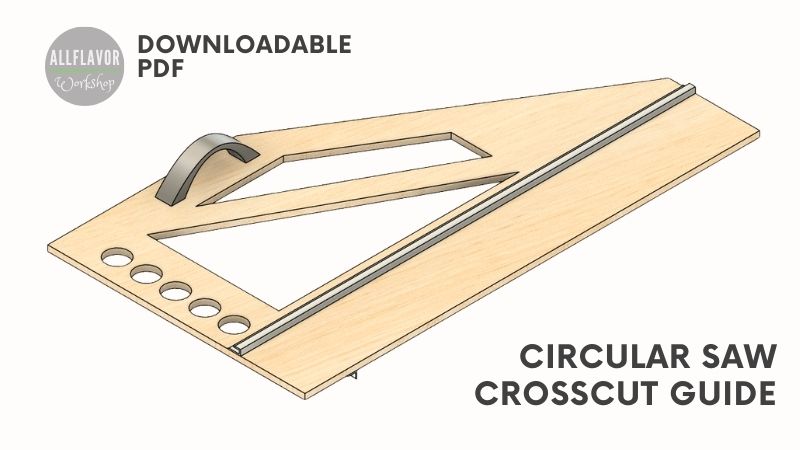
Build a circular saw guide and crosscut jig for straight cuts and 90-degree crosscuts. This step-by-step tutorial includes measurements, pictures, video, and downloadable plans.
A circular saw guide is one of the most useful jigs you can have in a small workshop. It helps you make straighter, cleaner, and more controlled cuts with a regular circular saw.
Using a circular saw freehand works for rough cuts, but it is not the best option when you need a clean straight edge or a repeatable 90-degree cut. The saw can easily wander away from the line, especially on longer cuts.
I already built a smaller circular saw guide rail before, and I still use it in my workshop. It works great for short straight cuts, but it has one limitation — it does not help with crosscuts.
So I decided to build a different version. This circular saw guide works as a straight-edge guide, but it also has a crosscut fence for making 90-degree cuts. The overall size is 700 mm × 400 mm, which gives me around 500 mm of usable cutting length.
In this article, I’ll show you how to make a circular saw guide and crosscut jig step by step. I’ll also share the measurements, video, downloadable plans, and setup tips so you can adjust the jig for your own circular saw.
Circular Saw Guide and Crosscut Jig Video
If you want to see the full build process, watch the video below. I show how I make the circular saw guide base, attach the straight-edge guide rail, set up the crosscut fence, and add the final touches.
This jig is a little different from a simple circular saw guide rail because it can help with both straight cuts and 90-degree crosscuts.
If you enjoy the video, I’d really appreciate it if you subscribed to my YouTube channel. It helps me keep creating more woodworking jigs, workshop projects, and step-by-step build guides.
*Safety is your responsibility. Make sure you know what you’re doing and take all necessary safety precautions while working with power tools. Safety comes first!
Always be cautious and careful when using any power tool. If you are not feeling comfortable with a certain technique look for other options on how to do it.
Circular Saw Crosscut Jig Plans
I also offer a premium version of the circular saw crosscut jig plans, which includes:
✔ Metric and imperial measurements ✔ Detailed materials and hardware lists ✔ Exploded views and assembly drawings ✔ Additional build information and workshop tips ✔ Improvements and other resources
This jig is built for my circular saw, so make sure to check the size and shape of your own saw base before cutting the parts. You may need to adjust the guide position to match your saw.
Download the free Circular Saw Crosscut Jig Plans here
Before starting the build, prepare the materials and tools for the circular saw guide and crosscut jig. This jig is mainly made from a plywood base, one aluminum guide rail for straight cuts, and one aluminum fence for crosscuts.
The dimensions below are based on my circular saw. Before cutting the parts, check the size and shape of your own circular saw base and adjust the guide position if needed.
Disclosure: Some of the links above are affiliate links. If you purchase through them, I may earn a small commission at no extra cost to you. Thanks for supporting AllFlavor Workshop.
DIY circular saw guide and crosscut jig for straight cuts and accurate 90-degree crosscuts.
Quick Build Overview
Here is a quick overview of the circular saw guide and crosscut jig before we get into the build. The jig works as both a straight-edge guide and a 90-degree crosscut guide, which makes it more versatile than a simple circular saw track.
Item
Details
Project
Circular saw guide and crosscut jig
Main use
Straight cuts and 90-degree crosscuts with a circular saw
Overall size
700 mm × 400 mm
Usable cutting length
About 500 mm, depending on your circular saw setup
Main material
Baltic birch plywood base with aluminum guide rail and aluminum crosscut fence
Straight guide
Aluminum J-channel used as the straight-edge guide rail
Crosscut fence
Aluminum L-channel set square to the cutting edge for 90-degree cuts
Difficulty
Beginner to intermediate
Best for
Short straight cuts, crosscuts, plywood pieces, boards, and small workshop projects
Before You Start: Circular Saw Guides and Crosscuts
Before building the jig, it helps to understand what this circular saw guide is made for and how it is different from a simple straight-edge guide.
This jig has two main functions. You can use it as a straight-edge guide for straight cuts, and you can also use the crosscut fence for 90-degree cuts. That makes it more versatile than a basic circular saw track.
Is It Difficult to Make a Circular Saw Guide?
No, this circular saw guide is not difficult to make. I would call it a beginner to intermediate woodworking project.
The build itself is straightforward, but there are a few parts where accuracy matters. The most important part is setting the crosscut fence square to the cut line. Take your time there, because that will determine how accurate your 90-degree cuts will be.
You can build the jig in a day using simple materials and basic tools. A circular saw, hand drill, jigsaw, clamps, and square are enough for most of the work.
How Do You Cut Straight with a Circular Saw?
A circular saw can make straight cuts, but it is difficult to cut perfectly straight freehand. The blade can wander away from the pencil line, especially on longer cuts.
The easiest way to improve accuracy is to use a guide. This can be a straight board, a square, a commercial guide rail, or a DIY circular saw guide like this one.
When using the guide, press the circular saw firmly against the guide rail and push it forward slowly and steadily. For the best results, clamp the guide in place before making the cut.
Is a Higher Tooth Count Better for a Circular Saw Blade?
It depends on the material and the type of cut.
A blade with more teeth usually gives a cleaner cut, but it cuts more slowly. A blade with fewer teeth cuts faster, but the finish is rougher.
For rough rip cuts, a blade with fewer teeth works well because it removes material quickly. For cleaner crosscuts or plywood cuts, a blade with more teeth is usually better.
As a simple rule, try to keep around 2 to 4 teeth in the material while cutting. Too few teeth can leave a rough cut, and too many teeth can slow the cut down or burn the wood.
Let’s Build It
This circular saw guide and crosscut jig is built around two main parts: the straight-edge guide rail and the crosscut fence.
The straight-edge guide rail helps keep the circular saw moving in a straight line. This is useful for trimming plywood, cutting boards, and making cleaner straight cuts.
The crosscut fence is added at 90 degrees to the cutting edge. This lets you press a board against the fence and make more accurate crosscuts with a circular saw.
The jig is not designed for miter cuts. It is mainly made for straight cuts and 90-degree crosscuts.
The overall size of my guide is 700 mm × 400 mm, and it gives me around 500 mm of usable cutting length. This size works well for small workshop projects without making the jig too large or uncomfortable to use.
As with most circular saw jigs, the final setup depends on your saw. I built this guide for my Makita circular saw, but you can adjust the dimensions and guide rail position to fit your own circular saw.
How to Make a Circular Saw Guide and Crosscut Jig
Step 1: Make the Circular Saw Guide Base
Start by cutting the main base from 9 mm Baltic birch plywood. My base is 700 mm long and 400 mm wide.
You can use a circular saw with a straight edge to cut the outside shape. A spirit level, straight board, or another guide rail works well for this.
Next, draw the cutout areas on the plywood base. Removing some of the extra material makes the jig lighter, easier to handle, and more comfortable to use.
For the inside cutouts, drill holes in the corners first. This gives the jigsaw blade a place to enter and makes the corners easier to cut. Then use a jigsaw to remove the extra material.
It is better to make these cutouts now, before installing the aluminum guide rail and crosscut fence. Once the aluminum parts are attached, the base is harder to cut and handle.
After cutting the base, sand all the edges and corners smooth. At this point, the plywood base is ready for the straight-edge guide rail.
💡 TIP: Make the cutouts before attaching the aluminum parts. It is much easier to cut and sand the plywood base while it is still flat and empty.
NOTE: The base does not need to be overly complicated. The goal is to keep it flat, stable, and light enough to move around easily.
Cut the base from 9 mm Baltic birch plywood using a circular saw and straight edge.
Mark the plywood base layout before cutting the outside shape.
Mark the plywood base layout before cutting the outside shape.
Drill the corners first so the jigsaw blade can enter the cutout area cleanly.
Use a jigsaw to remove the extra material and make the guide lighter.
Step 2: Attach the Straight Edge Guide Rail
Now attach the straight-edge guide rail to the plywood base. This rail guides the circular saw when making straight cuts.
I used an aluminum J-channel for this part. The rail is 700 mm long, 20 mm wide, and 9 mm high.
Before attaching it, check that the aluminum rail is not too high for your circular saw. The saw still needs enough clearance when the blade is set to its lowest cutting position.
Measure the distance from the edge of your circular saw base to the saw blade. This measurement tells you where the guide rail needs to sit.
In my case, the distance from the saw base edge to the blade is 100 mm, so I positioned the guide rail 105 mm from the plywood edge. This left about 5 mm of extra plywood, which I cut off later to create the final zero-clearance cutting edge.
First, mark the position of the guide rail on the plywood base. Then drill the holes in the aluminum rail using a metal drill bit. A center punch helps keep the drill bit from wandering on the aluminum.
Use double-sided tape to hold the guide rail in position temporarily. Once it is aligned, secure it with screws and washers.
After the guide rail is attached, clamp the base to the workbench. Place the circular saw against the guide rail and cut off the extra plywood edge. This creates a clean reference edge that shows exactly where the saw blade will cut.
💡 TIP: Leave a small amount of extra plywood at the cutting edge before making the final cut. Once you trim it with the circular saw, the edge becomes matched to your saw and blade.
NOTE: The guide rail position depends on your circular saw. Measure your own saw base and blade offset before drilling or attaching the aluminum rail.
Mark the length of the rail.
Cut the rail to size.
Mark the guide rail position based on your saw’s blade offset.
Drill the mounting holes in the aluminum rail before attaching it to the plywood base.
Use double-sided tape to hold the rail in place, then secure it with screws and washers.
Attach the rail with screws and washers.
Measure the distance from the saw base edge to the blade before positioning the straight-edge guide rail.
ut off the extra plywood to create a clean reference edge matched to your circular saw.
Find This Blog Post Useful?
Join my newsletter to receive the latest news, tutorials, and project plans sent directly to your inbox!
Once the straight-edge guide rail is attached and the reference edge is cut, you can add the crosscut fence.
This fence is what turns the guide into a circular saw crosscut jig. When it is set square to the cutting edge, you can press a board against the fence and make cleaner 90-degree cuts with a circular saw.
Take your time with this step. The crosscut fence needs to be as square as possible, because any small error here will show up in the final cut.
I used an aluminum L-channel for the crosscut fence. The fence is 395 mm long, 15 mm wide, and 11.5 mm high.
Turn the guide upside down and place a large square or L-angle against the freshly cut reference edge. Use it to position the crosscut fence at 90 degrees.
The attachment process is similar to the straight-edge guide rail. First, drill the mounting holes in the aluminum fence. Then use double-sided tape to hold it in place temporarily while you check the alignment.
Once the fence is square, secure it with screws and washers. Check the angle again before fully tightening everything.
💡 TIP: Check the crosscut fence with a square from both sides before fixing it permanently. This is the part that determines how accurate your 90-degree cuts will be.
NOTE: The crosscut fence can be taller than the straight-edge guide rail. A slightly taller fence makes it easier to register boards against the jig when making crosscuts.
Use the freshly cut reference edge to set the crosscut fence at 90 degrees.
Position the aluminum L-channel carefully before attaching it permanently. Double-sided tape helps hold the fence in place.
Secure the crosscut fence with screws and washers once it is square.
Step 4: Add the Final Touches
At this point, the main circular saw guide and crosscut jig is built. The straight-edge guide rail is attached, the crosscut fence is square, and the cutting edge is matched to the saw.
Now you can add a few final details that make the jig easier to use: clamping holes, a handle, and anti-slip tape.
💡 TIP: Drill the clamping holes before adding anti-slip tape. It is easier to sand and clean the holes while the bottom of the jig is still plain plywood.
NOTE: Anti-slip tape helps, but it does not replace clamps. For the cleanest and safest cuts, clamp the jig whenever the workpiece size allows it.
1. Add Clamping Holes
Drill several clamping holes below the crosscut fence. I used a 35 mm Forstner bit for these holes.
The holes make it easier to clamp the jig to the workpiece or hold narrower boards in place when making crosscuts. They also give you better access when positioning the jig.
Drill clamping holes below the crosscut fence to make the jig easier to secure.
The clamping holes help when securing the jig or holding narrow pieces.
2. Attach the Handle
Next, attach a handle to the plywood base. I used a 140 mm × 30 mm handle and raised it slightly with small plywood spacer pieces.
The handle makes the jig easier to move around and position on the workpiece. You can also use it to apply light pressure while setting up a cut.
Still, I recommend clamping the jig whenever possible. The handle helps with positioning, but clamps give you better control and accuracy.
Small plywood spacers raise the handle and make it more comfortable to grip.
Glue the spacers to the base.
The handle makes the jig easier to move and position before cutting.
3. Add Anti-Slip Tape
Finally, add anti-slip tape to the bottom of the jig. I used adhesive grip tape, similar to what is used on stair steps.
The tape helps reduce movement while cutting and gives the jig more grip on the workpiece. It is a small detail, but it makes the guide feel more stable in use.
Anti-slip tape gives the jig more grip and helps reduce movement during cuts.
How to Use a Circular Saw Guide and Crosscut Jig
This jig can be used in two ways. You can use the straight-edge side for longer straight cuts, or you can use the crosscut fence for 90-degree cuts. The setup is slightly different for each type of cut.
💡 TIP: For the best results, clamp the jig whenever possible. Anti-slip tape helps reduce movement, but clamps give you better accuracy.
NOTE: This jig is made for straight cuts and 90-degree crosscuts. It is not designed for miter cuts.
1. How to Make Straight Cuts
Use the straight-edge guide when you want to cut along a line, trim plywood, or make a straight cut across a wider board.
Mark the cut line Draw a clear pencil line on the piece of wood you want to cut.
Align the guide edge Place the cutting edge of the circular saw guide directly on the marked line.
Clamp the guide and workpiece Clamp the guide and the workpiece to the bench so nothing can move during the cut.
Place the saw against the guide rail Set the circular saw on the jig and press the saw base gently against the straight-edge guide rail.
Make the cut Start the saw, let it reach full speed, and push it forward slowly and steadily.
Align the cutting edge of the guide with your pencil line before clamping.
Keep the circular saw pressed gently against the guide rail while making the cut.
Straight clean cut with a circular saw guide.
2. How to Make Crosscuts
Use the crosscut fence when you want to make a 90-degree cut across a board.
Place the board against the fence Press the piece of wood firmly against the crosscut fence.
Align the cut Position the board so the cut line lines up with the cutting edge of the guide.
Secure the piece Depending on the size of the board, clamp it in place or hold it securely using the clamping holes.
Set the saw on the guide Place the circular saw against the straight-edge guide rail.
Make the crosscut Push the saw slowly through the cut while keeping the board tight against the fence.
Press the cut piece firmly against the crosscut fence for 90-degree cuts.
The crosscut fence helps make cleaner and more repeatable 90-degree cuts.
Tips for Better Cuts
A circular saw guide and crosscut jig makes cutting easier, but the final result still depends on how well you set up the cut. These small details help a lot.
Use a Good Circular Saw Blade The guide helps with accuracy, but the blade affects the cut quality. A sharp blade with the right tooth count will leave a cleaner edge and reduce tear-out. For plywood and cleaner crosscuts, I prefer using a blade with more teeth.
Clamp the Jig When Possible Anti-slip tape helps reduce movement, but clamps are still the better option when the workpiece size allows it. If the jig shifts during the cut, the cut will no longer be straight or square.
Keep the Saw Against the Guide Rail When making a straight cut, keep the circular saw base pressed gently against the straight-edge guide rail. Do not force it too hard against the guide. Just keep steady pressure and move the saw slowly forward.
Support the Workpiece Make sure the board or plywood is supported on both sides of the cut. This helps prevent the offcut from dropping, pinching the blade, or breaking away at the end. A foam board, MDF sheet, or scrap support pieces work well under the workpiece.
Check the Crosscut Fence Before making crosscuts, check that the board is pressed firmly against the fence. If you need very accurate 90-degree cuts, make a test cut first and check it with a square. Small fence errors can show up in the final cut.
My Take
This circular saw guide and crosscut jig is one of those workshop jigs that makes a regular circular saw much more useful.
I like it because it combines two functions in one jig. You can use it as a straight-edge guide for straight cuts, and you can also use the crosscut fence for quick 90-degree cuts. That makes it especially useful in a small workshop where every jig needs to earn its place.
Over time, I found myself using this guide mainly for ripping plywood pieces and making shorter crosscuts, including cuts on 2x4s. For very precise straight cuts, I still prefer my dedicated circular saw guide rail because the side rails hold the saw in place better.
What I like about this jig is how easy it is to move around and set up. You place it on the workpiece, align it, clamp it if needed, and make the cut. The anti-slip tape helps reduce movement, but I still recommend using clamps whenever possible.
The 700 mm length works well for me. It gives enough cutting capacity for many workshop projects without making the guide too long or awkward to use. If you need longer cuts, a longer straight-edge guide or dedicated circular saw track is a better option.
You can also check out my other circular saw jigs and woodworking plans if you want to build more practical workshop guides and cutting jigs.
More Circular Saw Jigs and Guides
This circular saw guide and crosscut jig is useful for straight cuts and 90-degree crosscuts, but it is not the only circular saw guide worth building.
Depending on the type of cuts you make most often, another circular saw jig may be a better fit.
Easy Circular Saw Guide Rail
If you want a simple guide for short straight cuts, check out my easy circular saw guide rail. It is compact, easy to set up, and works well when you want the circular saw to slide between two guide rails.
The crosscut fence helps make cleaner and more repeatable 90-degree cuts.
For longer straight cuts, a straight edge guide is a better option. It is simple to build and useful for cutting plywood sheets, panels, and longer boards.
The crosscut fence helps make cleaner and more repeatable 90-degree cuts.
Circular Saw Rip Fence Guide
A circular saw rip fence guide is useful when you want to make repeatable rip cuts with a circular saw. It is a good beginner-friendly jig and a practical upgrade for small workshop projects.
The crosscut fence helps make cleaner and more repeatable 90-degree cuts.
Related Jigs Used in This Build
A few other workshop jigs helped me while making this circular saw guide and crosscut jig. They are not required, but they can make the build easier, especially when cutting the base and holding parts securely.
Meet the creator of AllFlavor Workshop! As a passionate DIYer and woodworking enthusiast, Lukas is always looking for ways to make things himself rather than buying them off the shelf. With a keen eye for design and a knack for working with wood, Lukas enjoys sharing his craft with others and helping them discover the joy of building. Whether you're an experienced woodworker or a novice looking to try your hand at a new hobby, you're sure to find plenty of inspiration and tips on AllFlavor Workshop.