How to Make an Adjustable Router Template Guide

Make an adjustable router template guide for cutting squares, rectangles, slots, mortises, dados, and rabbets. Follow the step-by-step tutorial and video to build this versatile router jig.

An adjustable router template guide is one of those jigs that makes the router much more versatile. You can use it to cut squares, rectangles, slots, mortises, dados, rabbets, and other clean shapes in wood.

Some time ago, I built a router guide for exact-width dados and grooves. I still use that jig often, but it has one limitation — it is mainly made for straight cuts and smaller widths. This adjustable router template guide takes the idea further because all four sides can move and lock in place.

That means you can set the template to the size you need, clamp it to the workpiece, and use the router to follow the inside shape. It works well for cutting square holes, rectangular recesses, and other routed openings where accuracy matters.

You can buy aluminum router templates, and they work well, but they can also be quite expensive. This version is made from MDF, Baltic birch plywood, and HDF, so it is much cheaper to build and easy to adjust for your own workshop.

In this article, I’ll show you how to make an adjustable router template guide step by step, how the jig works, and how to use it to cut a square hole in wood. I also have downloadable plans available if you want the dimensions and build details organized in one place while working in the shop.

DIY Adjustable Router Template Guide Video

If you want to see the full build process, watch the video below. I show how I make the template base plates, cut the T-slots, attach the guides, make the router base plate, and connect the template pieces together.

If you enjoy the video, I’d really appreciate it if you subscribed to my YouTube channel. It helps me keep creating more woodworking jigs, router projects, and step-by-step build guides.

Table of Contents

  1. Adjustable Router Template Jig Video
  2. Adjustable Router Template Guide Plans
  3. Materials and Tools
  4. Quick Build Overview
  5. Before You Start: Router Templates, Materials, and Bits
    1. What is the best material for a router template?
    2. How thick should a router template be?
    3. What router bit to use with a router template?
    4. Can you plunge with a straight router bit?
  6. How to Make an Adjustable Router Template Jig
    1. Step 1: Cut the Template Base Plates
    2. Step 2: Make the Template Guide T-Slots
    3. Step 3: Attach the Guides to the Base Plates
    4. Step 4: Make the Router Base Plate
    5. Step 5: Assemble the Adjustable Router Template
  7. How to Use an Adjustable Router Template Guide for Squares and Rectangles
  8. Tips for Using a Router Template Guide
  9. My Take
  10. FAQ
  11. Woodworking jigs used for the project

*Safety is your responsibility. Make sure you know what you’re doing and take all necessary safety precautions while working with power tools. Safety comes first!

Adjustable Router Template Guide Plans

I also offer a premium version of the Adjustable Router Template Jig plans, which includes:

✔ Metric and imperial measurements
✔ Detailed materials and hardware lists
✔ Exploded views and assembly drawings
✔ Additional build information and workshop tips
✔ Improvements and other resources

Browse all my premium woodworking plans.

Download the free Router Template Plans here
Downloadable Adjustable Router Template Plans

Materials and Tools

Before starting the build, prepare the materials and tools for the adjustable router template guide. This jig is mainly made from MDF base plates, Baltic birch plywood guide rails, HDF connectors, and a custom router base plate.

I built this version for my trim router and a 6 mm router bit, but the same idea can be adjusted to your own router setup.

Adjustable Router Template Jig:

  • Template base – MDF 4mm; 1/8 Inch (95 mm x 460 mm x 4 mm)
  • Template Guides – Birch Plywood 12 mm; 1/2 Inch (25 mm x 500 mm x 12 mm) – https://amzn.to/48pjjK0
  • Template Connectors – HDF 5mm; 3/16 Inch (25 mm x 110 mm x 50 mm)
  • Router Base – HDF 6mm, outer ø105 mm, inner ø39 mm

Check all the Tools I Use

Tools:

Other:

Disclosure: Some of the links above are affiliate links. If you purchase through them, I may earn a small commission at no extra cost to you. Thanks for supporting AllFlavor Workshop.

📌 Save THIS PIN to your Board on Pinterest!

Adjustable router template guide for cutting squares, rectangles, slots, dados, and rabbets
Adjustable router template guide for cutting clean squares, rectangles, slots, mortises, dados, and rabbets with a trim router.

Quick Build Overview

Here is a quick overview of the adjustable router template guide before we get into the build. The jig is useful because all four sides can be adjusted, so you can set it up for squares, rectangles, slots, mortises, dados, rabbets, and other routed openings.

Item Details
Project Adjustable router template guide
Main use Cutting squares, rectangles, slots, mortises, dados, rabbets, and routed openings
Template size Based on 460 mm long template sides
Usable router cutting length About 360 mm, depending on router base and setup
Main material MDF base plates, Baltic birch plywood guide rails, HDF connectors
Router setup Can be used with a router base plate or guide bushings
Router bit This build uses a 6 mm router bit; keep the same bit size for matching cuts
Difficulty Beginner to intermediate
Best for Template routing, square holes, rectangular cutouts, mortises, slots, dados, and rabbets

Before You Start: Router Templates, Materials, and Bits

Before building the jig, it helps to understand what makes a good router template. The material, thickness, router bit, and router setup all affect how accurate and easy the template will be to use.

What Is the Best Material for a Router Template?

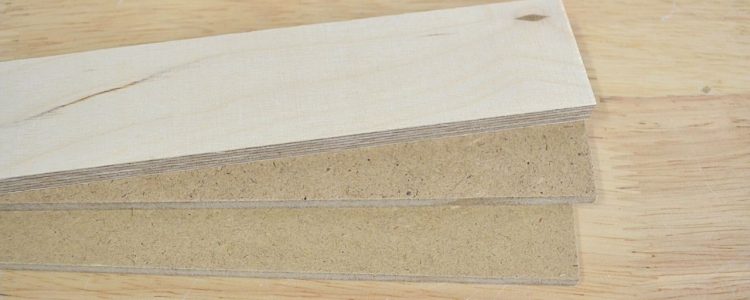
A router template can be made from several materials. The most common options are MDF, HDF, acrylic, and Baltic birch plywood.

  • MDF is flat, easy to shape, affordable, and easy to find. It works well for simple templates, but it can wear out over time and can react to humidity.
  • HDF is similar to MDF, but denser and usually a bit more durable. It is a good option for workshop-made templates.
  • Acrylic is more expensive, but it lets you see the workpiece through the template, which can be very helpful for accurate positioning.
  • Baltic birch plywood is strong, stable, and lasts longer than MDF or HDF. It is a good choice when you want a more durable template.

For this jig, I used MDF for the base plates, Baltic birch plywood for the guide rails, and HDF for the connectors and router base plate.

RELATED: Different types of wooden boards and their use

MDF HDF Plywood - best material for a router template
HDF MDF Baltic Birch

How Thick Should a Router Template Be?

A router template should be thick enough to guide the router safely, but not so thick that it takes away too much cutting depth from the router bit.

A good range is usually around 6 mm to 12 mm (1/4” –  1/2”). Thinner templates give you more router bit depth, while thicker templates provide more bearing surface and stiffness.

For this build, the main template base plates are only 4 mm MDF, because the plywood guide rails provide the strength and guiding surface.

What Router Bit Should I Use with a Router Template?

You can use a router template with a flush trim bit, a pattern bit, or a guide bushing, depending on your setup.

A flush trim or pattern bit follows the template with a bearing. The bearing position determines whether the template goes above or below the workpiece.

A guide bushing works differently. The bushing is mounted in the router base and follows the template opening. This gives you more flexibility with different router bits, but you need to account for the offset between the bushing and the bit.

For this jig, I use the router base itself as the guide, without a guide bushing. That makes the setup simple, but it also means the template is matched to the router base and router bit size I used.

Can you plunge with a straight router bit?

Yes, you can plunge with a straight router bit, but you need to be careful. The bit should be long enough, sharp enough, and you should cut in shallow passes.

A straight bit does not usually clear chips as well as a spiral bit, and if you cut too deep at once, it can burn the wood or leave a rougher cut.

For cleaner plunge cuts, an upcut or downcut spiral bit is usually a better choice. But if you only have a straight bit, it can still work well — just take your time and remove material gradually.

Straight router bit for making DIY T Tracks
Double flute straight router bit

Let’s Start Building

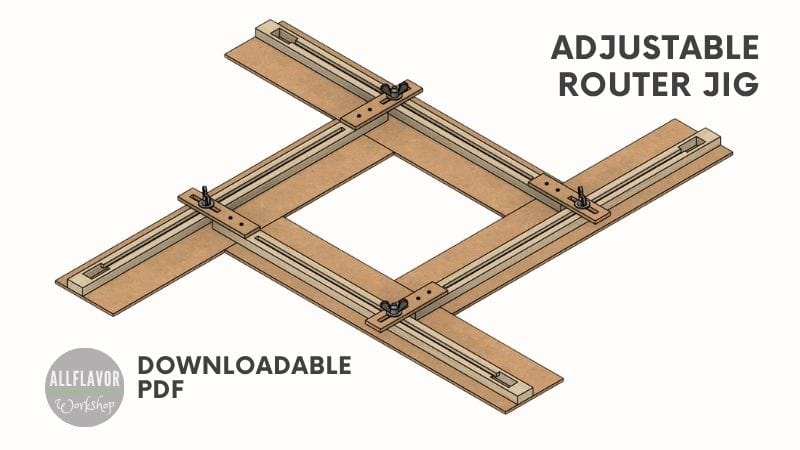
The adjustable router template guide is made from four template arms that connect together and slide to different sizes. Once assembled, you can adjust the opening to match the square, rectangle, slot, or recess you want to cut.

The template arms are made from thin MDF base plates with Baltic birch plywood guide rails attached on top. The guide rails also work as T-slots, so the arms can be connected with bolts, washers, and wing nuts.

This jig can be used in two ways:

  • Without a guide bushing — the router base rides against the inside of the template. This is how I use it in this build.
  • With a guide bushing — the bushing follows the template opening, but you need to account for the offset between the bushing and the router bit.

I built this version around my trim router and a 6 mm router bit. If you use it without a guide bushing, keep the same router base and bit setup for matching cuts.

The most important part of the build is accuracy. Keep the base plates square, attach the guide rails straight, and make sure the template pieces can slide and lock properly.

How to Make an Adjustable Router Template Guide

Step 1: Cut the Template Base Plates

Start by cutting the four MDF base plates for the adjustable template. These are the flat arms that will later connect together and form the adjustable square or rectangle.

The final size of each base plate is 95 mm × 460 mm × 4 mm, but I first cut them slightly wider — about 105 mm × 460 mm. The extra width will be trimmed off later with the router after the guide rails are attached.

Try to keep the cuts as straight and square as possible. When all four pieces are connected, they should form clean 90-degree corners, so accuracy here matters.

A table saw is the best tool for this, but a circular saw with a straight guide works well too. If you use a circular saw, take your time with the setup and make sure each strip is consistent.

💡TIP: Cut the MDF strips slightly wider first. This gives you room to trim them later and create a cleaner router-matched edge.

NOTE: The base plates need to be straight and square. If the strips are off, the assembled template will be harder to adjust accurately.

Tenon joinery is one of the tightest and most versatile methods of joining wood parts. Once the mortise jig is set up you can make mortises easily and repeatedly. Learn step by step how to make a loose tenon mortise jig
Mark the MDF carefully before cutting the four template base plates.
Tenon joinery is one of the tightest and most versatile methods of joining wood parts. Once the mortise jig is set up you can make mortises easily and repeatedly. Learn step by step how to make a loose tenon mortise jig
Cut the MDF strips slightly wider first so they can be trimmed cleanly later.
Tenon joinery is one of the tightest and most versatile methods of joining wood parts. Once the mortise jig is set up you can make mortises easily and repeatedly. Learn step by step how to make a loose tenon mortise jig
Check that the ends are square so the finished template can form clean corners.

Step 2: Make the Template Guide T-Slots

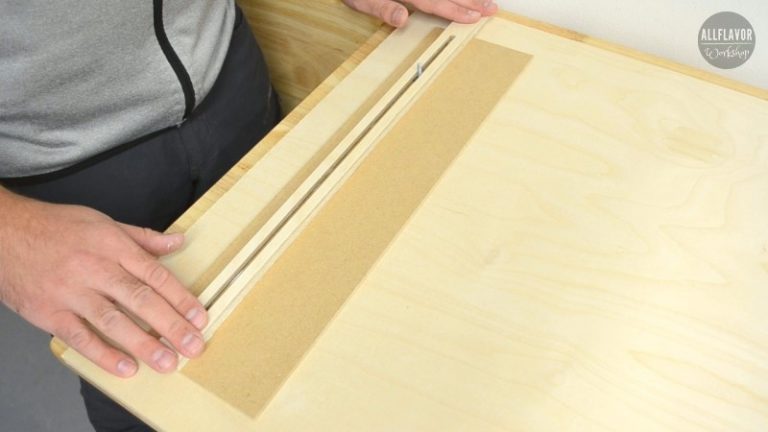
Now cut the four plywood guide strips. These strips have two jobs: they guide the router base and also work as T-slots for connecting the template arms together.

Each plywood strip is 25 mm × 500 mm × 12 mm. I make them slightly longer than the MDF base plates so there is enough room for the connectors and adjustment.

In each strip, cut a wider groove and a narrow slot in the middle. The groove is about 15 mm wide and 7 mm deep, and the center slot is 6 mm wide. This creates the T-slot shape for the bolts.

The groove starts about 20 mm from one end and stops about 60 mm from the other end. This gives enough material at the ends and keeps the track strong.

I cut the strips to width with a circular saw rip guide and then used a trim router with a 6 mm straight bit and a router guide jig to cut the slots (and the openings for the T-track bolts).

Take your time with this step. The T-slots need to be straight so the bolts can slide smoothly and the template pieces can adjust properly.

💡TIP: Test the bolt in the T-slot before gluing anything together. It should slide smoothly, but without too much side-to-side play.

NOTE: You can also make a homemade T-track by gluing wood strips together instead of routing the slot from one solid piece. This is a good alternative if you don’t want to cut the groove directly into plywood.

Tenon joinery is one of the tightest and most versatile methods of joining wood parts. Once the mortise jig is set up you can make mortises easily and repeatedly. Learn step by step how to make a loose tenon mortise jig
Cut four plywood strips that will become both the router guide rails and the adjustable T-slots.
Tenon joinery is one of the tightest and most versatile methods of joining wood parts. Once the mortise jig is set up you can make mortises easily and repeatedly. Learn step by step how to make a loose tenon mortise jig
Mark the groove and center slot carefully before routing the T-slot.
Tenon joinery is one of the tightest and most versatile methods of joining wood parts. Once the mortise jig is set up you can make mortises easily and repeatedly. Learn step by step how to make a loose tenon mortise jig
The wider groove creates space for the bolt head or washer to slide inside the T-slot.
Tenon joinery is one of the tightest and most versatile methods of joining wood parts. Once the mortise jig is set up you can make mortises easily and repeatedly. Learn step by step how to make a loose tenon mortise jig
Test the bolt before assembly to make sure it slides smoothly in the T-slot.

Find This Blog Post Useful?

Join my newsletter to receive the latest news, tutorials, and project plans sent directly to your inbox!

Step 3: Attach the Guides to the Base Plates

Now attach the plywood guide rails to the MDF base plates. These guide rails are important because they become the reference edges for the router and also allow the template arms to connect and adjust.

Apply a small amount of glue to the bottom of each T-slot guide and place it on the MDF base plate. Keep the guide rail straight and aligned with the long edge of the base plate.

Leave about 20 mm of space at the back of the guide rail. This gives you room for clamping the template later when using the jig.

I also insert the T-track bolt before gluing the guide in place. This makes sure the track works and the bolt can slide properly. Just be careful with the glue — use only enough to hold the guide rail down, and make sure no glue gets into the T-slot.

Once the guide rail is aligned, clamp it in place and let the glue dry. You can also secure it with small screws for extra strength.

Repeat the same process for all four template arms.

💡TIP: Use less glue than you think. If glue gets into the T-slot, it is difficult to remove later and the bolt may not slide smoothly.

NOTE: Keep checking for square and straight alignment while gluing the guide rails. The more accurate the guide rails are, the easier it will be to assemble and adjust the final template.

Tenon joinery is one of the tightest and most versatile methods of joining wood parts. Once the mortise jig is set up you can make mortises easily and repeatedly. Learn step by step how to make a loose tenon mortise jig
Apply a small amount of glue to the guide rail, but keep glue away from the T-slot.
Tenon joinery is one of the tightest and most versatile methods of joining wood parts. Once the mortise jig is set up you can make mortises easily and repeatedly. Learn step by step how to make a loose tenon mortise jig
Clamp the guide rail in place and let the glue dry fully.

Step 4: Make the Router Base Plate

This step is optional, but I decided to make a custom round router base plate for this jig. The goal is to have a simple, consistent router base with only a small overlap, so the router can move smoothly inside the template from any direction.

For the base plate, I used 6 mm HDF. The outside diameter is 105 mm, and the center hole is 39 mm. You can also use plastic or another stable sheet material if you prefer.

To cut the base plate, I used my router circle cutting jig. First, cut the outside circle, then cut the center opening for the router bit.

Next, mark the mounting holes for your router, drill them, and attach the new base plate to the router. Try to center the base plate as accurately as possible. A router centering cone is useful here because it helps align the base around the bit opening.

Once attached, this base plate becomes part of the setup. If you use this template without guide bushings, keep using the same router base and bit combination so the template matches the cut accurately.

💡TIP: Center the router base plate carefully. If the base plate is off-center, the cut may change slightly depending on how you rotate the router inside the template.

NOTE: You do not have to make a custom base plate if your existing router base works well. Just remember that the template setup will match the router base you use.

Tenon joinery is one of the tightest and most versatile methods of joining wood parts. Once the mortise jig is set up you can make mortises easily and repeatedly. Learn step by step how to make a loose tenon mortise jig
A router circle cutting jig makes it easy to cut a clean round base plate.
Tenon joinery is one of the tightest and most versatile methods of joining wood parts. Once the mortise jig is set up you can make mortises easily and repeatedly. Learn step by step how to make a loose tenon mortise jig
Drill the mounting holes to match your router base.
Tenon joinery is one of the tightest and most versatile methods of joining wood parts. Once the mortise jig is set up you can make mortises easily and repeatedly. Learn step by step how to make a loose tenon mortise jig
Center the base plate carefully so the router follows the template consistently.

Step 5: Assemble the Adjustable Router Template

Now it’s time to connect all four template arms together and turn them into an adjustable router template guide.

Before assembly, trim the extra MDF from the base plates using the router and the router bit you plan to use with this template. I used a 6 mm router bit. Once you choose the bit size, keep using the same bit for this setup so the routed shape matches the template correctly.

Next, make the HDF connector strips. These sit on top of the T-slots and connect the template arms together. I used 110 mm long HDF strips with about 60 mm of overlap on each template arm.

Before attaching the connectors, route a short adjustment slot in each strip. The slot gives you a little extra movement when setting up the template and helps fine-tune the corners if needed.

Attach the connector strips with wood glue and screws. Then connect all four template arms together using the bolts, washers, and wing nuts.

Once assembled, check that the template opens, closes, and adjusts smoothly. The corners should stay as square as possible, but the slotted connectors give you some room for small adjustments if needed.

💡TIP: Check the template for square before tightening the wing nuts. A small error in one corner can affect the final routed opening.

NOTE: The adjustment slots in the connector strips are useful. Even if the template is not perfectly square after assembly, you still have room to fine-tune the shape before routing.

Tenon joinery is one of the tightest and most versatile methods of joining wood parts. Once the mortise jig is set up you can make mortises easily and repeatedly. Learn step by step how to make a loose tenon mortise jig
Trim the extra MDF after attaching the guide rails to create a clean router-matched edge.
Tenon joinery is one of the tightest and most versatile methods of joining wood parts. Once the mortise jig is set up you can make mortises easily and repeatedly. Learn step by step how to make a loose tenon mortise jig
Make sure the MDF base is perpendicular.
Tenon joinery is one of the tightest and most versatile methods of joining wood parts. Once the mortise jig is set up you can make mortises easily and repeatedly. Learn step by step how to make a loose tenon mortise jig
The connector strips join the template arms and let them slide into position.
Tenon joinery is one of the tightest and most versatile methods of joining wood parts. Once the mortise jig is set up you can make mortises easily and repeatedly. Learn step by step how to make a loose tenon mortise jig
Connect all four template arms using bolts, washers, and wing nuts.

And this is what the finished DIY router template guide looks like.

Adjustable router template guide
The finished adjustable router template guide can be set for squares, rectangles, slots, mortises, dados, and rabbets.
Adjustable router template jig

How to Use an Adjustable Router Template Guide

Once the template is assembled, using it is quite simple. Loosen the wing nuts, slide the four template arms to the size you need, square the corners, and tighten everything in place.

You can use this adjustable router template guide for different routing tasks, such as square holes, rectangular cutouts, mortises, cavities, slots, dados, and rabbets.

The biggest benefit is that you do not need to make a new fixed template for every size. You can adjust the opening, clamp the jig to the workpiece, and route the shape directly.

Cutting a Square or Rectangular Opening

  • First, mark the shape you want to cut on the workpiece. Then place the template over the layout lines and adjust the four sides until the inside opening matches your desired cut.
  • Check the corners with a square and tighten the wing nuts. Make sure the template is secure and does not move.
  • Clamp the workpiece to your bench, then clamp the router template guide on top of the workpiece. The jig needs to stay firmly in place while routing.
  • Attach the router base plate, set the cutting depth, and start routing in shallow passes. Remove the material gradually instead of trying to cut the full depth at once.
  • When the routed opening is finished, clean up the corners with a chisel if needed. Since the router bit leaves rounded inside corners, a chisel is useful when you need a sharper square corner.
Adjustable router template guide
Adjust the template opening to match the square or rectangular shape you want to route.
Adjustable router template jig
Route the opening in shallow passes while keeping the router base against the template.
Tenon joinery is one of the tightest and most versatile methods of joining wood parts. Once the mortise jig is set up you can make mortises easily and repeatedly. Learn step by step how to make a loose tenon mortise jig
Use a chisel to clean the rounded inside corners if you need a sharper square opening.

Using the Template with a Guide Bushing

You can also use this template with a router guide bushing. In that case, remember that the final cut will not be exactly the same size as the template opening.

You need to account for the offset between the guide bushing and the router bit. The larger the difference between the bushing and the bit, the larger the offset will be.

For my setup, I use the router base itself as the guide, without a guide bushing. This keeps the setup simple, but it also means I need to use the same router base and bit combination for accurate results.

Tips for Using a Router Template Guide

A router template guide works best when the setup is accurate and the jig is clamped securely. Here are a few tips that help get cleaner and more repeatable results.

1. Keep the Template Square

Before routing, check the template with a square. This is especially important when cutting square holes, rectangular openings, or recesses where the corners need to line up cleanly.

Loosen the wing nuts, adjust the sides, check for square, and then tighten everything again.

2. Clamp Everything Securely

Clamp both the workpiece and the router template guide. The jig should not move at all while routing.

If the template shifts during the cut, the opening will be larger, uneven, or out of square.

3. Take Shallow Passes

Do not try to cut the full depth in one pass. Take several shallow passes instead.

This gives you a cleaner cut, reduces burning, and puts less stress on the router bit and the router.

4. Watch the Router Base

If you are using the router base itself as the guide, keep the base pressed gently against the inside edge of the template while routing.

Try to move smoothly and avoid twisting the router as you go around the template.

5. Account for Guide Bushing Offset

If you use a guide bushing, remember that the final cut will be offset from the template opening.

The offset depends on the difference between the guide bushing diameter and the router bit diameter. Make a test cut first so you know exactly how much material the router removes.

6. Use the Same Router Setup

For this jig, I use the same trim router, router base plate, and router bit setup. This keeps the template predictable.

If you change the router base, bit size, or guide bushing, make a test cut before using the jig on your final workpiece.
My Take

I like this adjustable router template guide because it solves a simple problem in a very flexible way. Instead of making a separate fixed template every time I need a different square, rectangle, slot, or recess, I can adjust this jig to the size I need and clamp it in place.

It is not a complicated jig, but it does need to be made accurately. The template arms should be straight, the corners should stay square, and the router setup should stay consistent. Once that is done, the jig becomes very useful for repeatable template routing in the workshop.

You can use it for cutting square holes, rectangular cutouts, mortises, slots, dados, rabbets, and other routed openings. And because the four arms are adjustable, it gives you much more flexibility than a single fixed template.

If you want to build this jig, you can download the adjustable router template guide plans here. The plans make it easier to follow the dimensions, prepare the parts, and build the jig in the shop.

You can also check out my other woodworking plans if you want to build more practical router jigs, workshop tools, and DIY woodworking projects.

📌 Save THIS PIN to your Board on Pinterest!

DIY adjustable router template guide for accurate template routing in wood
DIY adjustable router template guide for accurate template routing, square holes, rectangular cutouts, slots, mortises, dados, and rabbets.

FAQ

What is a router template jig used for?

A router template jig is used to guide the router while cutting a specific shape in wood. You can use it for squares, rectangles, slots, mortises, dados, rabbets, recesses, and other routed openings.

Can I use this jig to cut a square hole in wood?

Yes, this adjustable router template guide works well for cutting square or rectangular openings. The router bit will leave rounded inside corners, so if you need sharp square corners, clean them up with a chisel after routing.

Can I use this router template with a guide bushing?

Yes, you can use the template with a router guide bushing. Just remember to account for the offset between the guide bushing and the router bit. The final cut will be different from the exact template opening unless you calculate the offset.

What is the best material for a router template?

MDF, HDF, Baltic birch plywood, and acrylic can all work. MDF is affordable and easy to shape, HDF is denser, Baltic birch plywood is stronger and more durable, and acrylic lets you see the workpiece through the template.

Share this post with your friends
About the author, Lukas

Meet the creator of AllFlavor Workshop! As a passionate DIYer and woodworking enthusiast, Lukas is always looking for ways to make things himself rather than buying them off the shelf. With a keen eye for design and a knack for working with wood, Lukas enjoys sharing his craft with others and helping them discover the joy of building. Whether you're an experienced woodworker or a novice looking to try your hand at a new hobby, you're sure to find plenty of inspiration and tips on AllFlavor Workshop.

3 Comments

  1. Such precision. Almost surgical. Excellent demonstrations and easy to follow instructions with the tools required as well. I love your work and dedication. Thank you

Comments are closed.