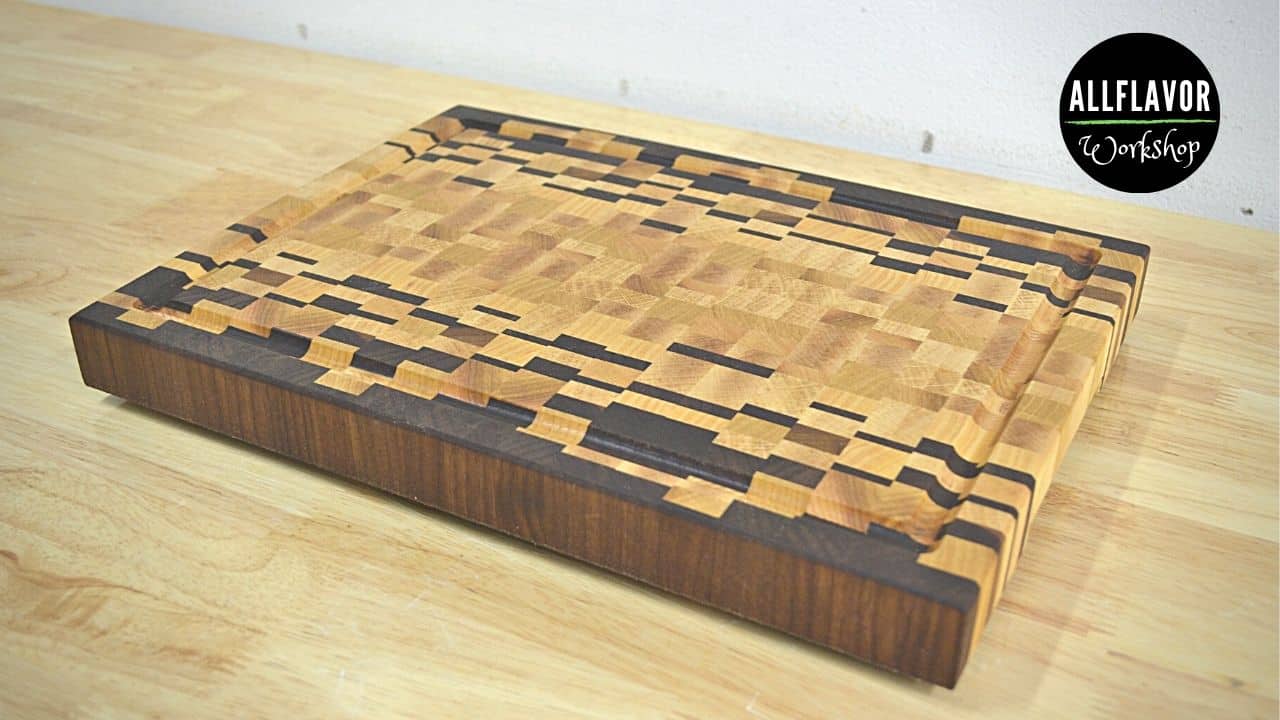
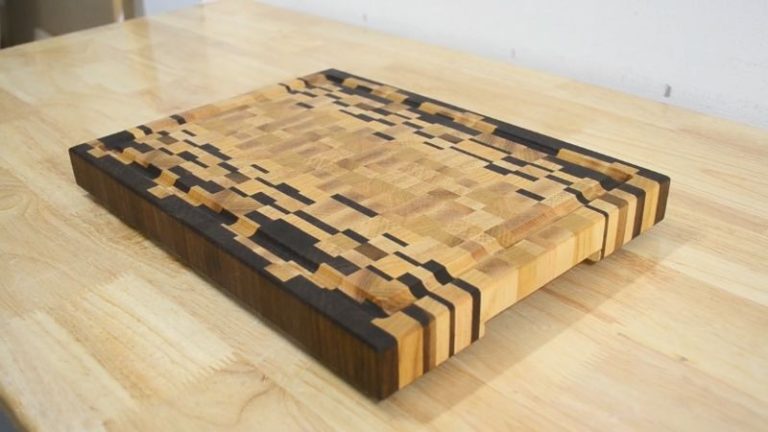
There’s something special about building an end grain cutting board — it’s durable, looks great, and feels solid under the knife. In this project, I’ll show you how to make an ombré end grain cutting board that gradually fades from dark walnut through warm ash to light beech — creating a beautiful gradient across the surface.
This board is a bit more advanced than the typical end grain design. The key lies in how you cut and glue the strips together to achieve that smooth ombré transition. It takes a little more planning, but the result is totally worth it.
Throughout the build, I’ll be using a few of my favorite homemade jigs — a table saw sled, router flattening jig, juice groove jig, and handle jig — to make everything more accurate and easier to repeat. (Check out my post on the best jigs for making cutting boards for more details.)
The finished board measures about 40 cm long and 3.4 cm thick, with two routed handles, a juice groove, and rubber feet for stability. I finish it with Belinka Cutting Board Oil, which is food-safe and highlights the natural tones perfectly. If you’ve built a face or edge grain board before, this is the perfect next step.
Video: How to Make an Ombré End Grain Cutting Board
If you’d like to see the full build in action, check out the video below. I go through every step — from cutting and glue-ups to flattening, routing, and finishing — so you can follow along easily in your own shop.
🎬 Watch the video and don’t forget to subscribe to my YouTube channel for more woodworking builds and jig projects.
Table of Contents
- Video: How to Make an Ombré End Grain Cutting Board
- Materials and Tools
- Why Choose an Ombré End Grain Cutting Board?
- Let’s Start Building!
Step 1: Cutting and Planing the Wood Strips
Step 2: Gluing Up the Edge Grain Panels
Step 3: Crosscutting the Panels and Gluing the Final Board
Step 4: Flattening and Trimming the Cutting Board
Step 5: Cutting the Juice Groove
Step 6: Routing the Handles and Beveling the Edges
Step 7: Sanding, Oiling, and Adding Rubber Feet - Care Tips for Your Cutting Board
- Wrap-Up
- FAQs
Materials and Tools
Here’s everything I used to build the ombré end grain cutting board — from raw wood to finish. The mix of dark walnut, warm ash, and light beech gives the board its smooth gradient look.
Wood
- Walnut, Ash, Beech
Tools
- Table Saw – Table Saw
- Planer – Planer
- Router – Router
- Orbit Sander – Orbit Sander
- Hand Drill – Hand Drill
- Table Saw Blade – Table Saw Blade
- Router Flattening Bit – Router Flattening Bit
- Router Juice Groove Bit – Router Juice Groove Bit
- Router Straight Bit – Router Straight Bit
- Chamfer Router Bit – Chamfer Router Bit
- Grr-Ripper Push Block – Grr-Ripper Push Block
- Large Square – Large Square
- Speed Square – Speed Square
- Wood Scraper – Wood Scraper
- Silicon Glue Brush – Silicon Glue Brush
Clamps and Accessories
- Parallel Clamps – Parallel Clamps
- F-Clamps – F-Clamps
- Piher One Hand Clamps – Piher One Hand Clamps
- Wolfcraft One Hand Clamps – Wolfcraft One Hand Clamps
- Bench Cookies – Bench Cookies
💡 Tip: Bench cookies are great for sanding and oiling — they keep the board steady and accessible from all sides.
Finishing & Supplies
- Cutting Board Oil (Belinka) – Cutting Board Oil
- Cutting Board Rubber Feet – Cutting Board Rubber Feet
- Painters Tape – Painters Tape
- Sanding Discs – Sanding Discs
- Sandpaper Sheets – Sandpaper Sheets
- Wood Glue – Wood Glue
Affiliate Disclosure: Some of the links above are affiliate links. As an Amazon Associate, I earn from qualifying purchases at no extra cost to you.
Why Choose an Ombré End Grain Cutting Board?
End grain cutting boards are strong, durable, and easy on your knives — but the ombré pattern adds something extra. It’s that smooth fade from dark walnut through warm ash to light beech that really makes the board stand out. It’s not just another cutting board — it’s a piece that catches your eye every time you walk into the kitchen.
What I like about end grain boards is how tough they are. The wood fibers face up, so the board can “heal” itself after use and hold up for years. And when you combine that strength with the creative ombré design, you get a cutting board that’s both practical and artistic — something you’ll actually enjoy making and showing off.
If you’ve already built a face or edge grain board, this is the perfect next step. It takes a bit more planning and precision, but it’s a fun project that really lets you experiment with color, contrast, and pattern.
📌 Want to build this cutting board?
Save THIS PIN to your Board on Pinterest!

Let’s Start Building!
To make this ombré end grain cutting board, we’ll start by gluing up three separate edge grain boards from walnut, ash, and beech. Each of these panels will have a slightly different mix and pattern of these woods — that variation is what helps create the smooth ombré fade once everything is glued together later.
Before cutting anything into strips, all three boards are already planed, straight, and roughly the same width (around 3 cm). That’s my starting point. Having clean, flat stock makes the whole process easier and ensures tight joints later during the final glue-up.
Once the edge grain panels are glued, we’ll cut them into strips, flip them so the end grain faces up, and arrange them in a way that fades naturally from dark walnut to light beech. It’s a bit of extra work, but that’s where the real magic of the ombré pattern happens.
Before diving in, make sure you’ve got enough clamps for multiple glue-ups — you’ll be using them a lot in this build.
How to Make an Ombré End Grain Cutting Board
Step 1: Cutting and Planing the Wood Strips
The first thing we’ll do is prepare the strips for the three edge-grain boards that will form the base of our ombré design.
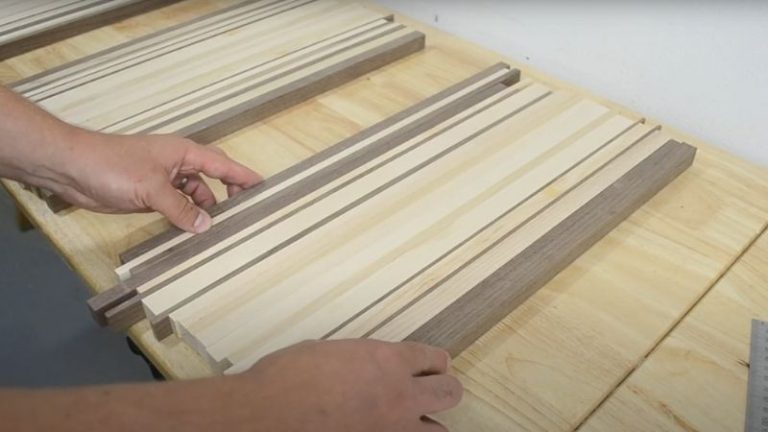
Start by ripping your walnut, ash, and beech boards into strips between 0.5 cm and 2 cm wide. The more variety you have, the smoother and more natural the color transition will look in the final pattern. Keep your fingers safe while cutting — I always use a Grr-Ripper push block for this part.
Once all strips are cut, run them through the planer on both sides so every piece is straight, flat, and uniform in thickness. This step is crucial for a tight glue-up later.
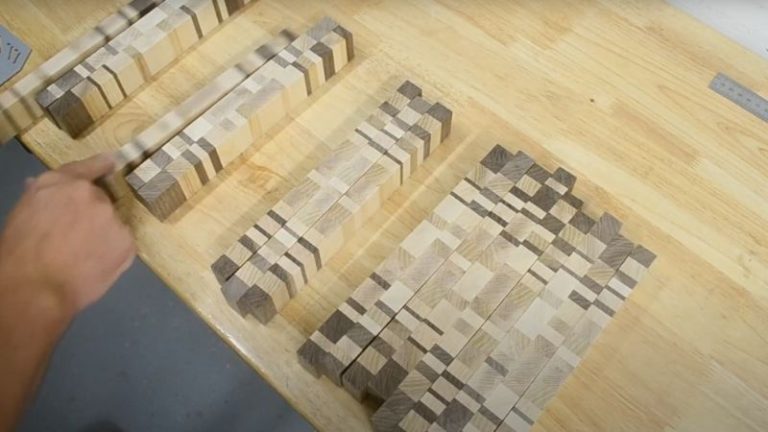
Now, arrange the strips into your desired pattern. For this build, I’m going from dark walnut on the edges, through ash in the middle, to light beech at the center — then back through ash to walnut again. That layout creates the nice fade from dark to light and back again once the end grain is revealed.
Note: When planing, the very ends of the boards often get slightly thinner. Trim a few millimeters off each side before glue-up so there are no small gaps between strips once everything is clamped.


Step 2: Gluing Up the Edge Grain Panels
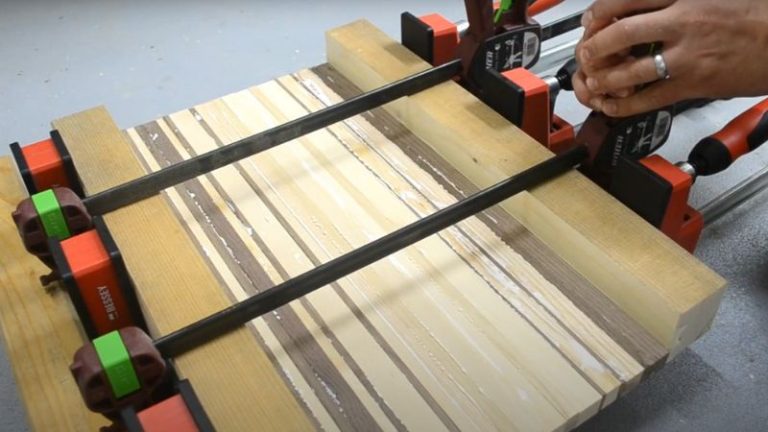
Now that we’ve got all the strips cut and arranged into our pattern, it’s time to glue them up and create the three edge grain panels that will form the base for our ombré board.
Get your clamps ready — I’m using Bessey parallel clamps, and I can’t recommend them enough. They’re solid, hold the pressure evenly, and keep the panels perfectly square.
💡 Here’s a little trick I always use: before placing the strips, add masking tape on the clamp bars. When the excess glue squeezes out, it’ll land on the tape instead of the metal. Once you’re done, just peel the tape off, and cleanup is effortless.
Place the strips in the same order you arranged them earlier, apply wood glue, spread it evenly, and clamp the panel tight. Tighten firmly but not excessively — too much pressure can squeeze out too much glue and cause weak joints.
After the glue fully cures, remove the panel from the clamps and use a scraper to remove any dried glue. Then, run the entire panel through the planer on both sides to make it smooth and even.
Finally, use a table saw sled to trim the panel ends square. Repeat the same process for the other two panels — by the end, you’ll have three edge grain boards, each with a slightly different pattern, ready for the next stage.
🔗 See how I built my DIY Table Saw Sled — it’s one of the most useful jigs in my shop for projects like this.


Step 3: Crosscutting the Panels and Gluing the Final Board
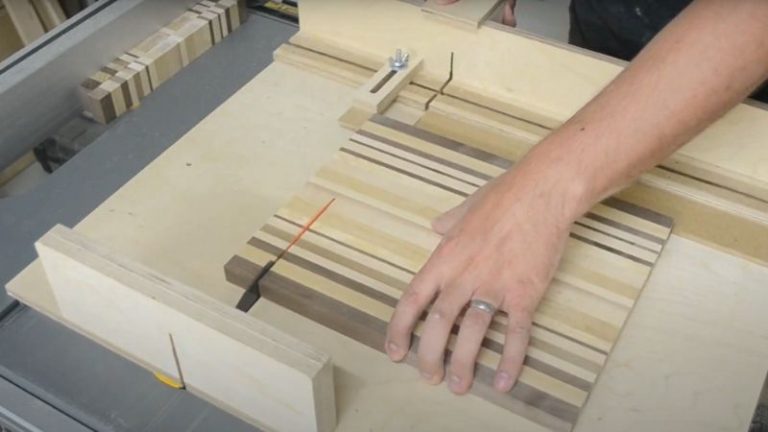
Now that our three edge-grain panels are ready, it’s time to turn them into strips and build the final end grain cutting board.
Using a table saw sled, cut each panel into 3.4 cm wide strips — this will be the final thickness. (Actually, a little bit less once everything is flattened.) Take your time and make consistent, precise cuts across all panels.
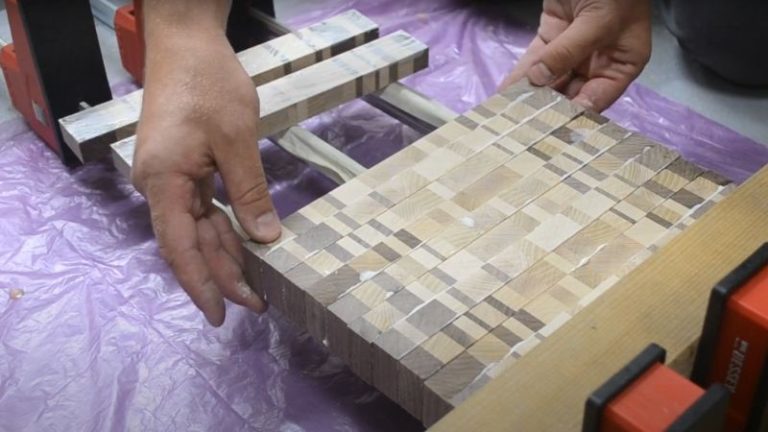
Once you have all the strips, start arranging the final design. This is where the fun begins. You can rotate each strip 180°, flip it upside down, or do both — every variation creates a slightly different ombré fade. By experimenting with the orientation and order of the strips, you can come up with many unique patterns and tones across the board.
When you’re happy with the layout, glue up the final panel just like in Step 2. Apply glue evenly, clamp the strips tightly (but not excessively), and let it fully cure.
Note: When aligning the strips during the final glue-up, make sure they’re as level and straight as possible. The better your alignment here, the less material you’ll need to remove later during flattening.
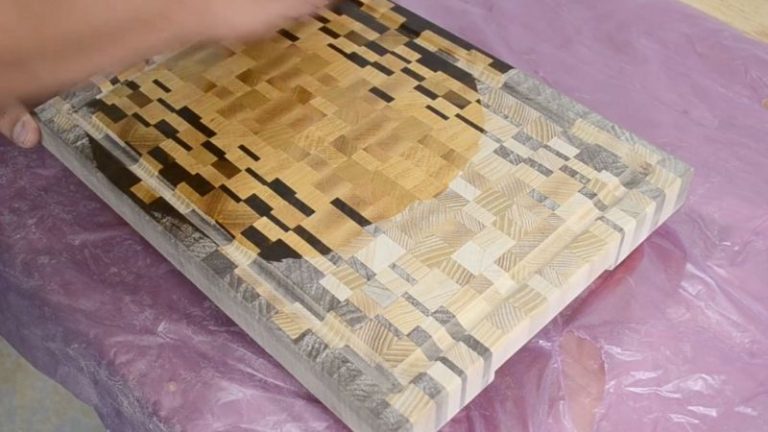
Once the glue has dried, you’ll have your complete end grain panel with a beautiful ombré fade — ready for flattening and finishing.
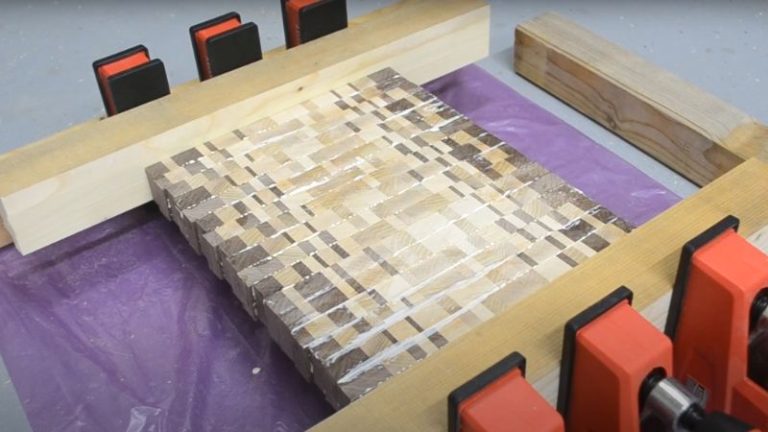
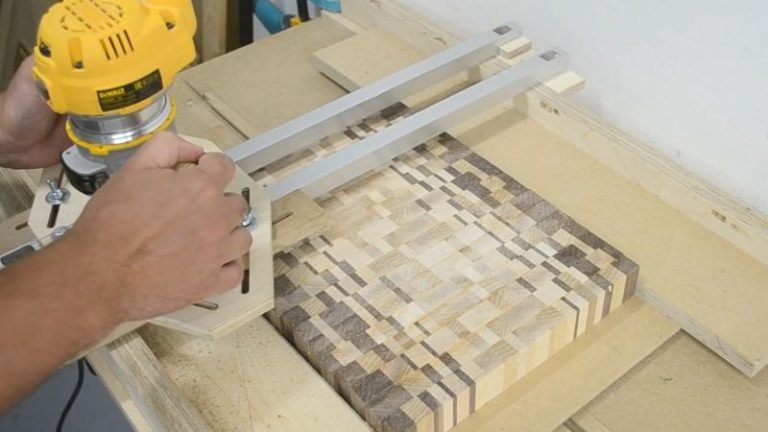
Step 4: Flattening and Trimming the Cutting Board
Once the glue is fully cured, it’s time to flatten the board and bring everything into shape.
I place the cutting board in my router flattening jig and use a flattening router bit together with a trim router to level the surface. Take light, even passes and move slowly — I prefer to make multiple shallow passes rather than one deep one. Once the first side is perfectly flat, flip the board over and do the same on the other side.
TIP: From experience, I strongly recommend using a flattening jig instead of running an end grain board through a planer. End grain is tough on planer blades and can easily cause tear-out or even damage the board if the blades catch the fibers. The router jig takes more time, but it’s much safer and gives you complete control over the surface.
After flattening, it’s time to trim the edges. You can use either a jointer sled or a table saw sled for this. I usually make the first straight cut using the jointer sled and then use the table saw sled to square off the remaining sides. This gives you a perfectly rectangular, clean board with straight edges all around.
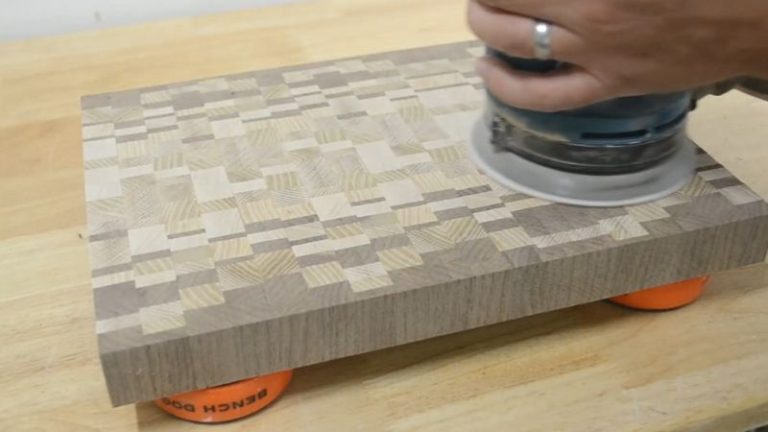
Finally, I lightly sand the surface with an orbital sander using low-grit sandpaper (around 60 grit) just to remove any marks left by the flattening bit. This step is optional, as the final sanding will come later, but it helps you see how the surface is shaping up.
🔗 You can see how I built my DIY Jointer Sled — it’s a great jig for straightening edges and squaring boards like this one.

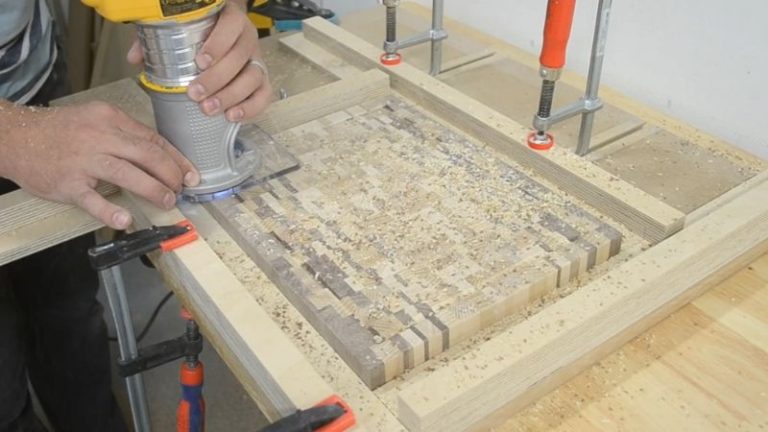
Step 5: Cutting the Juice Groove
Now it’s time to add a juice groove — that clean detail that not only looks great but also helps catch any liquids when you’re cutting or serving food.
Place the board securely inside your juice groove jig and make sure it’s firmly clamped in place. I use a trim router fitted with a juice groove bit, which makes this job precise and consistent.
This step takes a steady hand — after all the work you’ve put into the board, the last thing you want is to slip. Take it slow and move with control. When cutting inside the board, always route clockwise around the edge. This direction helps you maintain control and prevents the router from jumping out of the groove.
For end grain boards, use lower RPMs and multiple shallow passes. End grain is tougher and burns easily, and sanding out burn marks can be tricky. Taking your time here ensures a clean, even groove and a professional finish.
Once done, lightly sand the groove by hand to smooth out the edges and prepare it for oiling later.
🔗 Check out how I built my DIY Juice Groove Jig — it’s simple to make and makes routing juice grooves much more accurate and stress-free.

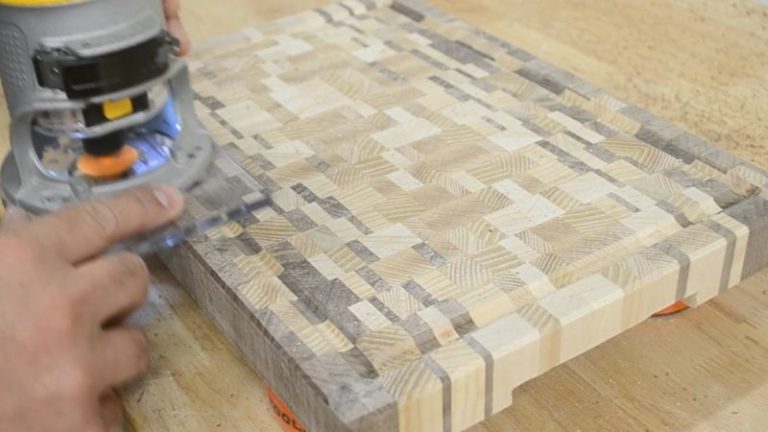
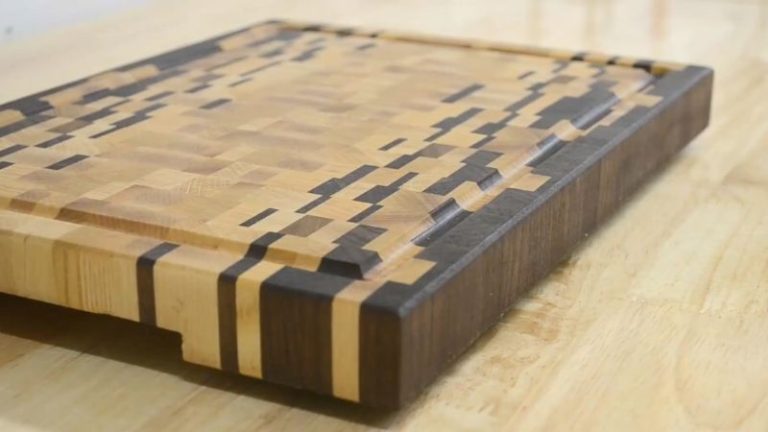
Step 6: Routing the Handles and Beveling the Edges
Now it’s time to add the finishing touches — routing the handles and beveling the edges of the board. These details make the board easier to handle and give it that clean, professional look.
I’m using my router handle jig for this step. Place it on the bottom of the board, center it, and align it with the edges. Then, using a straight router bit, make your cuts — just deep enough so your fingers fit comfortably. I typically cut around 0.8 cm deep, which is plenty, especially since the board will sit slightly elevated once the rubber feet are added.
Repeat the same process on the other side for the second handle. Once the handles are done, switch to a 45° bevel bit to bevel the edges of the board. Because this is an outside cut, route against the direction of the clock for better control and a cleaner finish. Take multiple shallow passes if needed to avoid tear-out.
If you don’t want to use a router, you can always use a sanding block to manually round or bevel the edges. It takes a bit longer, but it still gives a nice, soft edge and keeps the handmade feel.

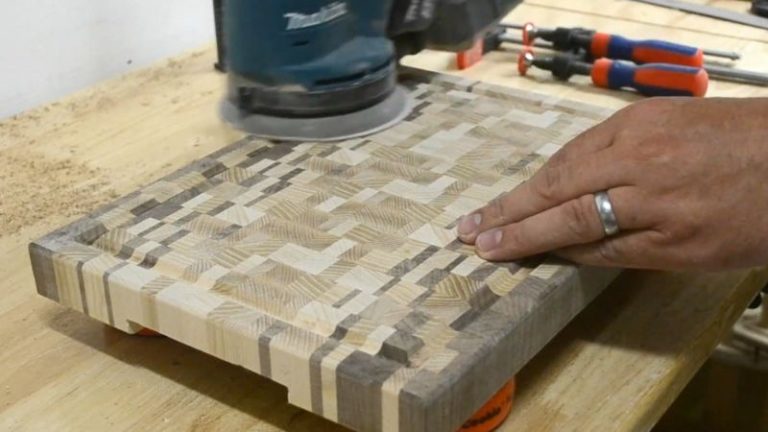
Step 7: Sanding, Oiling, and Adding Rubber Feet
For sanding, I’m using an orbital sander — if yours has variable speed, even better. I start with 60 or 80 grit sandpaper and work my way up to 240 or 300 grit. Make sure to sand the juice grooves too, and take your time — sanding an end grain cutting board takes patience.
Once the surface feels flat and even, spray a little water on the board to raise the wood fibers, then sand it again lightly until it’s smooth to the touch.
💡 Tip: Use bench cookies while sanding. They keep the board from sliding, raise it slightly off the bench, and make it easy to reach every side.
When sanding’s done, it’s time for oiling. I like using Clarks Cutting Board Oil or Belinka Oil — both are food-safe and give the wood a deep, rich tone. Apply the oil generously on both sides and let it soak in for a few hours – end grain boards absorb a lot of oil.
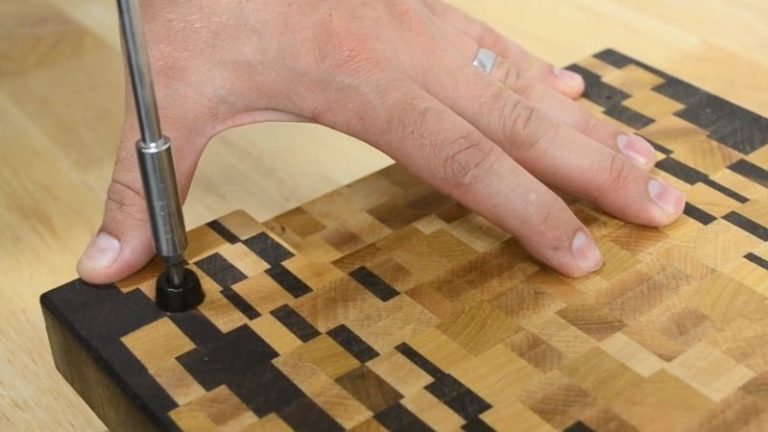
Finally, add the rubber feet. Mark their positions using a ruler marking gauge, pre-drill small holes, and screw the feet in place. They’ll elevate the board slightly, make it easier to pick up, and keep it stable during use.

That’s it — your ombré end grain cutting board is finished!

Care Tips for Your Cutting Board
Taking care of your board isn’t complicated, but consistency matters — especially with end grain boards, which need a bit more oil and attention.
Cleaning
Wipe the board with a damp cloth after each use.
Use mild soap if needed, then dry thoroughly.
❌ Never soak the board or put it in the dishwasher — moisture is the enemy of wood.
Oiling
End grain absorbs oil faster than face or edge grain — it’s more porous.
Apply a food-safe oil like Belinka or Clarks Cutting Board Oil once a month (or when the surface looks dry).
Let the oil soak in overnight, then wipe off any excess in the morning.
Regular oiling keeps the surface hydrated, prevents cracking, and makes cleaning easier.
Refreshing the Surface
If the board starts to feel rough, sand it lightly with 320-grit sandpaper, then re-oil.
For end grain boards, you’ll notice a big difference after re-oiling — the color and contrast pop right back.
Pro Tip
Always oil both sides to prevent warping.
Store the board upright or on its side so air can circulate evenly.
With just a little upkeep, your ombré end grain cutting board will stay smooth, durable, and as beautiful as the day you made it.
Wrap-Up
End grain cutting boards are definitely a step up from face grain or edge grain ones, but once you get the hang of it, it’s not hard at all. There are plenty of different styles and patterns you can try — this ombré design is one of my favorites. The way the darker woods fade into lighter tones looks amazing, especially when you apply the first coat of oil and watch the colors come alive.
If you’re just starting with cutting boards, begin with a face grain or edge grain build first to get comfortable with the basics. Along the way, you’ll also make a few jigs — like a flattening jig or handle jig — that you’ll reuse over and over for future projects. Once you’re ready, this ombré end grain is a perfect entry point into more advanced designs.
End grain boards are the top tier of cutting boards — strong, durable, and built to last for years. They’re worth the extra effort and a great way to push your woodworking skills a little further.
💡 If you’d like to build your own setup, take a look at my post on the best jigs for making cutting boards — I go through all the jigs I used in this build and how they make the process much easier.
FAQs
1. What is an ombré end grain cutting board?
It’s an end grain board that fades smoothly from dark to light wood tones by arranging strips of walnut, ash, and beech to create a natural gradient pattern.
2. Why make an end grain cutting board?
End grain boards are extremely durable and gentle on knives. The upright wood fibers absorb cuts and “self-heal,” making them last longer than face or edge grain boards.
3. How do you create the ombré fade?
Glue up separate edge grain panels with slightly different wood mixes, crosscut them into strips, then flip and rotate the strips during the final glue-up to create the gradual dark-to-light transition.
4. What woods work best for this design?
Walnut (dark), ash (medium), and beech or maple (light) work perfectly for contrast and a smooth fade. Varying strip widths gives the board a more natural look.
5. Can I run an end grain board through a planer?
It’s not recommended — end grain can tear out or chip. A router flattening jig is a safer, more controlled way to get a perfectly flat surface.

About the author, Lukas
Meet the creator of AllFlavor Workshop! As a passionate DIYer and woodworking enthusiast, Lukas is always looking for ways to make things himself rather than buying them off the shelf. With a keen eye for design and a knack for working with wood, Lukas enjoys sharing his craft with others and helping them discover the joy of building. Whether you're an experienced woodworker or a novice looking to try your hand at a new hobby, you're sure to find plenty of inspiration and tips on AllFlavor Workshop.