
If you’ve ever tried cutting a juice groove freehand, you know how tricky it can be to get it clean and consistent — especially across multiple boards. That’s exactly why I built this DIY Juice Groove Jig.
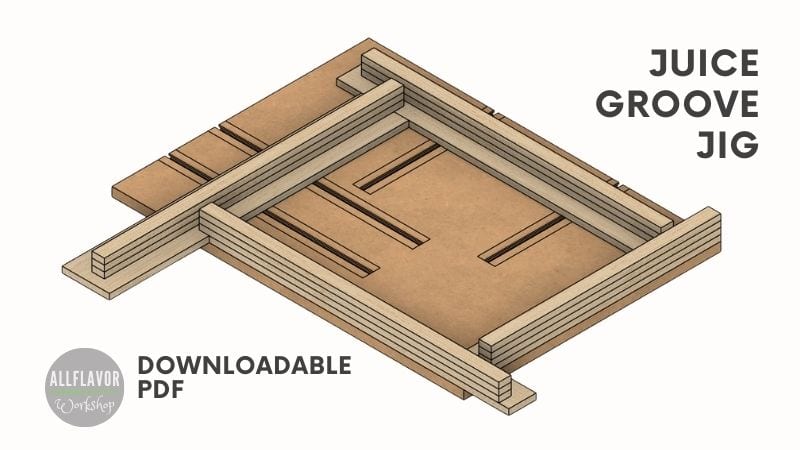
This jig is designed to make the whole process smooth and repeatable. It’s adjustable, works with a wide range of board sizes (up to 40×69 cm), and clamps down securely to your workbench whenever you need it. I built mine using MDF for the base and Baltic birch plywood for the fences. The tracks are routed directly into the MDF using a 6mm router bit, so there’s no need to buy aluminum t-tracks — though you could definitely go that route too.
What I really like is how easily you can adjust the jig to fit different board sizes — just slide the fences in place, lock them down, and you’re ready to go. You can even tweak the groove offset by adding spacers under your cutting board.
I usually use this jig right after trimming a board to final size and before routing handles or sanding. It’s quick to set up, easy to use, and gives you perfectly clean juice grooves every time.
👉 If you’re working on cutting boards, check out Best Jigs for Making Cutting Boards for more builds like this one. I also now offer premium woodworking plans for selected cutting board jigs and bundles if you want the more complete version of the builds.
How to Make a Juice Groove Jig Video
Want to see how it’s built? Watch the full step-by-step video below. I walk through each part of the process — from making the jig base to cutting a clean juice groove in a cutting board.
I appreciate every YouTube subscriber. It’s free and easy to subscribe to — just Click Here To Subscribe. Thank you!
Table of Contents
- Watch the Build (Video)
- Downloadable Plans
- Tools and Materials
- Step-by-Step Build Guide
- Step 1: Cut the Base to Size
- Step 2: Add T-Tracks to the Base
- Step 3: Build the Adjustable Side Fences
- Assembling the Juice Groove Jig
- How to Use the Jig
- Wrap-Up
- FAQ
- Jigs I Used for The Project
*Safety is your responsibility. Make sure you know what you’re doing and take all necessary safety precautions while working with power tools. Safety comes first!
Juice Groove Jig Plans
If you want the more complete version of the plans, I also now offer premium woodworking plans for selected cutting board jigs and bundles. This juice groove jig is one of the jigs I reach for regularly when I want clean, repeatable grooves and a more finished-looking cutting board.
Tools and Materials
Here’s what I used to build the juice groove jig. Many of these are standard tools you likely already have in the shop. I’ve added affiliate links for your convenience — they help support the site at no cost to you.
As an Amazon Associate, I may earn from qualifying purchases at no extra cost to you.
PIN THIS TO PINTEREST
📌 Save THIS PIN to your Board on Pinterest!

Let's start building!
The jig is built from two main parts — a flat MDF base with routed T-slots and four adjustable side fences made from Baltic birch plywood. I went with MDF because it’s straight and easy to cut clean slots into. The homemade T-tracks keep the build budget-friendly and work with standard shop clamps, which is a nice bonus.
All the components are laid out with cutting boards in mind — both in size and in how the jig adjusts. Before routing the groove, the board is held in place between the fences, locked down with clamps, and if needed, small spacers can be added underneath to fine-tune the groove offset.
It’s a straightforward build, and once assembled, the jig handles a variety of board sizes with ease. Let’s walk through it step by step.
How to Make a Juice Groove Jig
Step 1: Cut the Base to Size
To start, I’m cutting the base of the juice groove jig to its final dimensions — 51.5 × 70.5 cm. I’m using 18mm thick MDF, which offers plenty of rigidity and stays nice and flat over time. You can cut it on a table saw, like I did, or use a circular saw with a guide if that’s what you have on hand. A straight and solid base is key, since all the other parts of the jig will be mounted to it.

Step 2: Add T-Tracks to the Base
Once the base is ready, it’s time to create the homemade T-track system. I start by marking a matrix of tracks — two slots from one side and two from the adjacent side. These will later hold the adjustable fences in place.
To make clean, straight slots, I use my router dado jig. After routing, I clean up the edges of each slot with a chisel. Before moving forward, I test my homemade T-track bolts in the slots to make sure they slide freely.
Next, I cut MDF strips to form the walls of the T-tracks and glue them into the slots. I use just enough glue to hold them — too much and cleanup becomes a hassle. I also fix each strip in place with screws, making sure they sit flush with the surface. Finally, I sand everything down lightly to remove any bumps and make sure the surface stays flat.


Step 3: Build the Adjustable Side Fences
Next up are the adjustable side fences — you’ll need four in total, and they’re made from Baltic birch plywood. Each fence is built from a wider base strip and a few narrower strips stacked on top. The base not only gives the fence structure, but it also creates a small offset between the cutting board and the fence, which helps when routing juice grooves.
I cut all the strips to size on my table saw, then glue the narrower strips on top of the base to form each fence. The height is up to you — it depends on the typical thickness of your cutting boards. Once everything is glued up, clean any glue squeeze-out to make sure the surface stays nice and flat.


Step 4: Assemble the Juice Groove Jig
Now that the fences are ready, it’s time to assemble the jig. To hold cutting boards securely, the fences need to be perpendicular to each other — this way, you can easily copy the board’s shape and route a precise groove around it.
- One fence is permanently fixed to one of the shorter sides of the base. I attach it with wood glue and screws.
- The opposite shorter fence gets a routed slot, so I can attach it with T-track bolts and adjust it as needed.
- The two longer side fences don’t have any slots. I attach them with T-track clamps, depending on the size of the cutting board I’m working on.
This setup gives you a fully adjustable jig that works for boards of various sizes. You can tighten everything in place once the board is inside, and then you’re ready to route.


Find This Blog Post Useful?
Join my newsletter to receive the latest news, tutorials, and project plans sent directly to your inbox!
How to Use the Juice Groove Jig
Once your cutting board is trimmed to final size (and before sanding or adding rubber feet), it’s time to cut the juice groove.
Here’s how I use the jig:
- Place the board against the fixed fence on the base.
- Adjust the remaining three fences so they fit snugly around the cutting board.
- Secure the fences using either T-track bolts or clamps.
- Clamp the whole jig to your workbench or table so nothing moves during routing.
- Grab your handheld router fitted with a round nose bit (aka juice groove bit).
- Start in one corner and work your way around the board, following the inner fence outline.
This setup gives you consistent results and helps avoid mistakes like slipping or uneven grooves.
Juice Groove Routing Tips
| Tip | Why it Matters |
|---|---|
| 1. Cut slowly and evenly | Keeps the groove smooth without chatter marks |
| 2. Make multiple shallow passes | Reduces tear-out and prevents burning |
| 3. Clear chips between passes | Prevents clogging, keeps the router bit cool, and avoids chips getting under the base plate — so your juice groove stays clean and at a consistent depth |
| 4. Move in a clockwise direction | Safer and helps the bit pull into the fence for a cleaner cut |


Wrap-Up
I’ve used this juice groove jig on every cutting board I’ve made in the past year — and it just works. It saves a ton of time, gives me consistent results, and I don’t have to worry about wobbly setups or freehand mistakes. Once it’s clamped down, I know the cut will be clean.
One of the things I really appreciate is how versatile it is. You can use it with different board sizes and thicknesses, and it works great alongside other jigs I use in the process. If you’re building boards regularly, this one’s right up there with the best woodworking jigs for cutting boards.
If you haven’t built one yet, I’d definitely recommend it. It’s one of those jigs that earns its place on the wall because you keep reaching for it. If you want the more complete version of the build, you can also browse my woodworking plans page along with the rest of my cutting board jig collection.
FAQ – Juice Groove Jig
What router bit do I need to cut a juice groove?
You’ll need a round nose router bit — often labeled as a juice groove bit. I recommend a 6mm or 8mm diameter depending on the groove style you’re after.
Can I use this jig for different cutting board sizes?
Yes, the jig is fully adjustable. The fences can be moved to fit a variety of board sizes and thicknesses.
How do I avoid burning the edges while routing?
Use multiple light passes rather than one deep cut, move at a consistent pace, and make sure to clear the chips between each pass. This prevents heat buildup and keeps the bit clean.
Can I use shop-bought T-tracks instead of making my own?
Absolutely. While I built mine with MDF and homemade bolts to keep costs down, you can swap in aluminum T-tracks and hardware if preferred.
