I recently discovered the beauty of patterned plywood and decided to turn some scraps in my shop into a patterned plywood handle for a coping saw. I used a simple herringbone (tree) pattern, and the result honestly surprised me — it came out far better than I expected.
Patterned plywood isn’t just for shop jigs or furniture. With the right technique, you can use it for tool handles, mallets, knives, or even decorative projects. Once I saw how good my plywood vise jaws looked, I wanted to explore the design side of plywood further — and this handle was the perfect test project.
I was inspired by other patterned plywood projects (like those from Michael Alm), and I wanted to see how far I could push the design using just birch plywood. The outcome: a sturdy, beautiful handle that shows plywood can be much more than a “make-do” material.
👉 Check out my Moxon Vise and Coping Saw builds, where I also used patterned plywood for both strength and style.
We may earn an affiliate commission when you buy through our links. As an Amazon Associate, AllFlavor Workshop earns from qualifying purchases.
What is Plywood Used For in Woodworking?
Plywood is one of the most versatile materials in the shop. It’s strong, flexible, lightweight, and much more affordable compared to solid hardwoods. Most people think of it as a “construction material” — for roofing, flooring, or wall sheathing — but it goes far beyond that.
In woodworking, you’ll see plywood used for furniture, cabinets, shop jigs, and even decorative pieces. With the right approach, it doesn’t just serve a purpose — it can actually become a design element. That’s exactly the idea behind this patterned plywood handle.
What is Patterned Plywood (Herringbone, Chevron, Hexagon)?
Patterned plywood takes ordinary sheets and turns them into something beautiful. By ripping plywood into strips and gluing them back together in different orientations, you can create bold decorative designs.
Chevron: cleaner angled stripes, often used in tables or boxes.
Hexagon: more advanced, but stunning for decorative panels or art pieces.
For this project, I went with a herringbone pattern. It’s simple to make, strong, and it gives the handle a unique look that plywood alone could never achieve.
How to Make Patterned Plywood (Step by Step)
The basic process is always the same:
Rip the plywood sheets into strips (the strip width becomes the panel’s thickness).
Glue the strips together in the pattern of your choice.
Flatten, plane, and sand until you have a smooth sheet.
Cut it to size for your project.
Quick Comparison: Difficulty, Best For & Visual Effect
There are many designs you can try with patterned plywood. Here’s a quick comparison of common patterns and where they work best:
Pattern
Difficulty
Best For
Visual Effect
Tree / Herringbone
Easy
Handles, tool grips, small panels
Bold chevron-like lines
Chevron
Medium
Tabletops, boxes, furniture accents
Clean, angled stripes
Hexagon
Advanced
Decorative panels, art pieces
Geometric honeycomb
For my handle, I chose the herringbone pattern. It’s quick to glue up, easy to line up, and looks great once shaped.
How to Finish End Grain Plywood (Tips & Products)
Finishing patterned plywood is all about protecting the exposed end grain. Without a finish, the surface will soak up moisture and wear out quickly.
Here’s the finishing process I recommend:
Sand through several grits (start at 60 and go up to 300).
Apply a sanding sealer or shellac to stop the wood from drinking in too much finish.
Use polyurethane, lacquer, or epoxy for protection and to bring out the contrast in the pattern.
For handles and tools, I prefer spray lacquer — it’s quick to apply and holds up well.
That’s the exact process I used on this patterned plywood handle, and the finish really makes the herringbone pop.
Now that we’ve covered what patterned plywood is and how it works, it’s time to put it into practice. For this project, I’m making a patterned plywood handle for a coping saw using the herringbone (tree) pattern.
I’ll walk you through the steps I used — from ripping plywood strips to gluing, shaping, and finishing. The same process can be used for other handles, mallets, or even knife grips, so feel free to adapt it to your own project.
Let’s get started!
How to Make a Patterned Plywood Handle (Herringbone Design)
Step 1: Cut Plywood Strips for the Patterned Panel
I started by cutting a piece of birch plywood into short strips on the table saw using my DIY Mini Table Saw Sled. The width of each strip becomes the thickness of the finished patterned panel, so keep that in mind when sizing.
💡 Tip: Cut the strips a little wider than needed. You’ll lose material when trimming and sanding, and this ensures you won’t come up short.
Ripping plywood into strips — the first step to create the herringbone pattern.
Step 2: Glue the Strips in a Herringbone Pattern
With the strips ready, I glued them together in a simple herringbone (tree) pattern, keeping the end grain facing up. To protect my workbench, I laid down painter’s tape — it also makes removing the panel easier once the glue dries.
I clamped the panel tight to close up any gaps. Since I needed two matching panels (one for each side of the handle), I repeated the glue-up twice.
💡 Tip: These panels use a lot of glue. Keep a damp rag nearby to wipe away squeeze-out before it hardens.
Gluing plywood strips in a herringbone pattern to form the handle panels.
Step 3: Flatten and Level the Panel
Once the glue dried, it was time to flatten the surface. I used my router dado jig as a sled to trim the panel evenly, but a planer or a wide sander works too.
The goal is to get a smooth, even sheet with the herringbone pattern clearly visible.
Leveling the plywood panel with a router jig for an even surface.
Step 4: Cut the Panels into Rectangles
After flattening, I cut the panels into rectangles on the table saw. This gave me two mirror-inverted strips — one for each side of the handle. When glued together, the patterns line up and follow beautifully from one side to the other.
Cutting the glued panels into rectangles — one for each side of the handle.
Step 5: Glue the Patterned Strips to the Tool
I then glued the patterned strips directly to the tool body, making sure the patterns aligned. Careful alignment here really pays off in the final look.
💡 Tip: Use plenty of clamps and check both sides before the glue sets. Once it dries, you won’t be able to adjust the alignment.
Aligning and gluing the patterned strips directly to the tool body.
Step 6: Shape and Refine the Handle
Now the fun part — shaping the handle! After the glue cured, I roughed out the shape with a wheel grinder, then refined it with an orbital sander and hand sanding blocks through multiple grits.
This is where the pattern really comes alive. Every curve reveals a slightly different look in the plywood layers, so no two handles will ever look exactly the same.
Shaping and refining the handle — this is where the pattern really comes alive.
Step 7: Apply Finish to Highlight the Pattern
To protect the handle and make the design pop, I applied a few coats of spray lacquer. It not only adds durability but also brings out the color contrast in the herringbone pattern.
💡 Tip: If you want a glossier finish, sand lightly between coats. For heavy-use tools, you could also seal with epoxy or polyurethane for extra toughness.
Applying spray lacquer to protect the handle and highlight the plywood pattern.
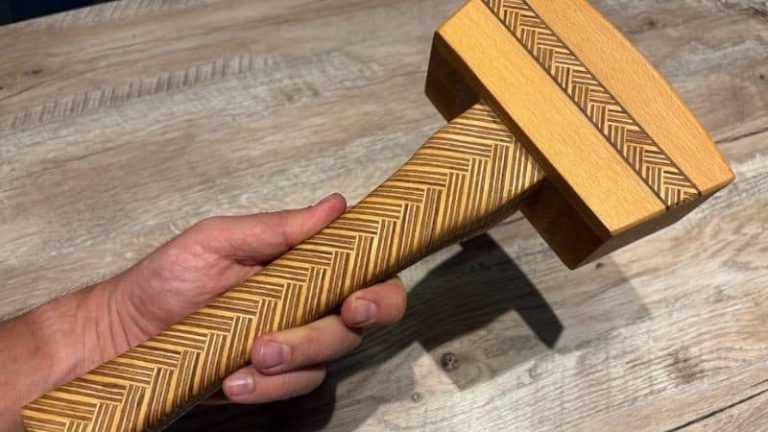
DONE! This is what the finished handle looks like!
The finished patterned plywood handle — strong, unique, and made from scraps.
Wooden Handle made from patterned plywood
My Thoughts on Patterned Plywood Handles
I’m really happy with how this patterned plywood handle turned out. It started as a pile of plywood scraps, but the result looks like something much more special. This build proved to me that plywood isn’t just for shop furniture or construction — it can be used for design, detail, and durability too.
The herringbone pattern lined up beautifully, and it’s exciting to see how the look changes as you shape the curves of the handle. Every edge reveals a new piece of the pattern.
I’ve since used the same technique on a wooden mallet handle, and it turned out amazing. The patterned plywood really makes the mallet stand out and gives it a unique, custom look. (Picture below)
👉 If you’d like to try your own patterned plywood project, check out my free woodworking jig plans to help you get started. They’re the same jigs I use for building handles, vises, and other workshop projects.
This was a simple project, but it really showed me how much potential patterned plywood has. Whether it’s a saw handle, a mallet, or even a knife grip — I definitely encourage you to give it a go.
Wooden mallet with a patterned plywood handle. The same herringbone design works beautifully for different tools, not just saw handles.
Frequently Asked Questions
Is patterned plywood strong enough for handles?
Yes. With high-quality birch plywood, a tight glue-up, and a durable finish, a patterned plywood handle is strong and stable for everyday use.
What plywood should I use for a patterned plywood handle?
Go for void-free birch (e.g., Baltic birch). Fewer internal gaps = cleaner edges and better durability. 12 mm (1/2″) sheets work great for most handle sizes.
Which patterns work best for handles?
Herringbone (tree pattern) is the easiest and looks bold on small parts. Chevron also works well; hexagon is advanced and better for larger decorative panels.
How do you finish a patterned plywood handle?
Sand through the grits (≈60→300), seal with sanding sealer or shellac, then apply lacquer or polyurethane. For maximum durability, consider a thin epoxy coat. Lightly sand between coats if you want a glossier finish.
Can I use this for knife or mallet handles?
Absolutely. For knives, consider epoxy plus mechanical pins. For mallets and other heavy-use tools, use a tougher finish (poly/epoxy) for longer wear.
Meet the creator of AllFlavor Workshop! As a passionate DIYer and woodworking enthusiast, Lukas is always looking for ways to make things himself rather than buying them off the shelf. With a keen eye for design and a knack for working with wood, Lukas enjoys sharing his craft with others and helping them discover the joy of building. Whether you're an experienced woodworker or a novice looking to try your hand at a new hobby, you're sure to find plenty of inspiration and tips on AllFlavor Workshop.