

A DIY circular saw guide is one of the most useful jigs you can build for a regular circular saw. It helps you make straighter, cleaner, and more controlled cuts without needing to buy a commercial track saw system.
I have built a few different circular saw guides for my workshop, and each one has a slightly different purpose. This version is useful because it has T-slots built into the guide, which makes it more flexible than a simple straight edge.
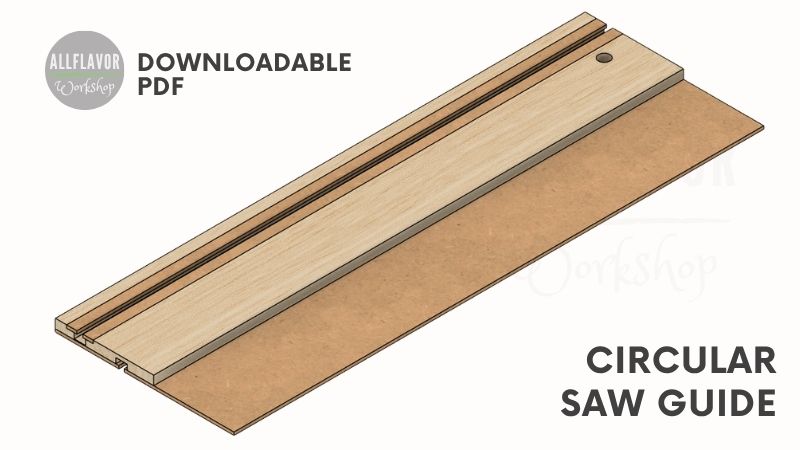
The bottom T-slot lets you clamp the guide to the workpiece or workbench using T-track clamps. This helps keep the guide stable during the cut and makes the setup more secure.
The upper T-track can be used to connect two or more guides together. That means you can use one guide for shorter cuts, or connect multiple guides when you need a longer straight edge for larger boards or plywood sheets.
This is not a replacement for a full commercial track saw, but it is a practical, shop-made alternative if you already have a circular saw. It is simple to build, affordable, and easy to adapt to your own workshop.
In this article, I’ll show you how to build a simple DIY circular saw guide with T-slots step by step. I’ll cover the base, bottom clamping slot, upper T-track, trimming the reference edge, and how to use the guide for straight cuts. I also have downloadable plans available if you want the dimensions and part layout organized in one place while building the jig in the shop.
DIY Circular Saw Guide Video
If you want to see the full build process, watch the video below. I show how to make the circular saw guide base, cut the bottom clamping slot, build the upper T-track, and trim the reference edge.
This guide is a little different from a basic straight edge because it has T-slots built into the track. The bottom slot helps with clamping, and the upper T-track can be used for connecting guides or adding accessories.
If you enjoy the video, I’d really appreciate it if you subscribed to my YouTube channel. It helps me keep creating more woodworking jigs, circular saw guides, and step-by-step build projects.
Table of Contents
- DIY Saw Guide Video
- Circular Saw Guide Plans
- Materials and Tools
- Quick Build Overview
- Before You Start
- How to Make a DIY Circular Saw Guide (Step-by-Step)
- Step 1: Cut the Wood Pieces for the Base
- Step 2: Cut the Bottom Clamping Slot
- Step 3: Assemble the Track Base
- Step 4: Make the Upper T-track
- Step 5: Trim the Guide Edge
- How to Use This Guide
- Tips for Better Cuts
- My Take
- Related Jigs Used for the Build
*Safety is your responsibility. Make sure you know what you’re doing and take all necessary safety precautions while working with power tools. Safety comes first!
DIY Circular Saw Guide Plans
You can download the DIY circular saw guide plans below. This guide is built from plywood and HDF, and the T-slots are the most important part of the design. The bottom slot is used for clamping the guide to the workpiece or workbench, while the upper T-track can be used to connect multiple guides together.
Materials and Tools
Before starting the build, prepare the materials and tools for the DIY circular saw guide. This guide is made from plywood and HDF, with homemade T-slots for clamping and connecting guide sections together.
The dimensions below are for one guide section.
Circular Saw Track
- A sheet of plywood for the guide
- HDF Strips for T-slots
- Plywood (Base) – 700 mm x 130 mm x 12 mm – https://amzn.to/3TPULp2
- HDF (Base) – 700 mm x 140 mm x 4 mm
- HDF (Base) – 700 mm x 84 mm x 4 mm
- HDF (T-tracks) 2x – 700 mm x 13,5 mm x 4 mm
Other:
- Wood Glue – https://amzn.to/48ltKhJ
- Sandpaper Sheets – https://amzn.to/41OMx2p
- Wood Screws – https://amzn.to/41PodgQ
DIY T-track Bolts
Tools:
- Trim Router – https://amzn.to/3HbQcOg
- Circular Saw – https://amzn.to/4aMD0xg
- Cordless Hand Drill – https://amzn.to/3HqLEnH
- T-track Clamps – https://amzn.to/3tEKaCW
- One Hand Clamps – https://amzn.to/48jGxkZ
- Spring Clamps – https://amzn.to/41Nuh9D
- F-Clamps – https://amzn.to/48ArzY1
Check all the Tools I Use
Disclosure: Some of the links above are affiliate links. If you purchase through them, I may earn a small commission at no extra cost to you. Thanks for supporting AllFlavor Workshop.
📌 Pin this to you Pinterest board.

Quick Build Overview
Here is a quick overview of the DIY circular saw guide before we get into the build. This guide is simple, but the T-slots make it more flexible than a basic straight edge.
| Item | Details |
|---|---|
| Project | DIY circular saw guide with T-slots |
| Main use | Straight cuts, longer guide setups, and clamped circular saw cuts |
| Overall size | 700 mm × 230 mm × 16 mm |
| Main material | Plywood base with HDF layers and homemade T-slots |
| Bottom T-slot | Used for clamping the guide to the workpiece or workbench |
| Upper T-track | Used for connecting two or more guides together or adding accessories |
| Guide style | Straight-edge circular saw guide with clampable and extendable features |
| Difficulty | Beginner to intermediate |
| Best for | Short straight cuts, longer connected-guide cuts, plywood, boards, and workshop projects |
| Plans | Downloadable DIY circular saw guide plans available in the article |
Before You Start: Circular Saw Guides and T-Slots
Before building the guide, it helps to understand what makes this version different from a basic circular saw straight edge.
A simple straight edge helps guide the circular saw, but this version adds T-slots to make the guide easier to clamp, adjust, and extend when needed.
What Makes This DIY Circular Saw Guide Different?
This DIY circular saw guide is built as a straight-edge cutting guide, but it also includes two T-slot features.
The bottom T-slot is used for clamping the guide to the workpiece or workbench. The upper T-track can be used to connect two or more guide sections together or to add simple accessories.
This makes the guide more flexible than a plain straight edge. You can use it for shorter cuts as one guide section, or extend it when you need a longer cutting guide.
What Are the T-Slots Used For?
The T-slots make the guide more practical in the workshop.
The bottom T-slot lets you use T-track clamps, shop-made clamps, or DIY T-track bolts to secure the guide to the workpiece or workbench. This helps keep the guide stable during the cut.
The upper T-track can be used for connecting multiple guide sections together. It can also be useful for adding stops or other simple accessories later.
Can You Connect Multiple Circular Saw Guides Together?
Yes. That is one of the main reasons for adding the upper T-track.
You can build more than one guide section and connect them together when you need a longer straight edge. This makes the jig more modular, so you do not need one very long guide taking up space in the workshop.
For shorter cuts, one guide section is easier to handle. For longer cuts, connecting two or more sections gives you more reach.
Let’s Start Building
This DIY circular saw guide is built from a plywood base and several HDF layers. Together, they create a straight cutting guide with two useful T-slot features.
The bottom T-slot lets you clamp the guide to the workpiece or workbench. The upper T-track can be used to connect two or more guide sections together when you need a longer straight edge.
One guide section is 700 mm long, which makes it easy to handle for shorter cuts. If you need more length, you can build additional sections and connect them together.
The most important part of the build is keeping the guide straight and the slots clean. The final reference edge will be trimmed with your circular saw, so it matches your saw and blade setup.
💡TIP: Keep glue out of the T-slots. Any dried glue inside the slots can make clamping or connecting the guide harder later.
NOTE: This guide is designed as a straight-edge cutting guide. It is best for straight cuts, not angled or crosscut setups.
How to Make a Circular Saw Guide with T-Slots
Step 1: Cut the Wood Pieces for the Base
Start by cutting all the plywood and HDF pieces for the circular saw guide.
For one guide section, you need the plywood base, two HDF layers, and two narrow HDF strips for the T-track. Try to keep all cuts straight and square, because the guide needs a clean reference edge later.
The easiest way to cut the pieces is on a table saw, but you can also use a circular saw with a straight edge, spirit level, or another long guide.
After cutting the parts, lightly sand the edges and remove any rough spots. The HDF pieces should sit flat on the plywood base before gluing.
💡TIP: Cut the HDF pieces cleanly and keep the edges straight. The cleaner the parts are now, the easier it will be to build smooth T-slots later.
NOTE: HDF works well for this guide because it is smooth, flat, and lets the circular saw slide easily along the track.

Step 2: Cut the Bottom Clamping Slot
Next, cut the bottom clamping slot in the plywood base. This slot will later allow you to use T-track clamps, DIY T-track bolts, or shop-made clamps to secure the guide while cutting.
Start by marking the slot location on the plywood. A marking gauge works well here because it helps keep the layout line straight and consistent along the full length of the guide.
Then cut the slot with a trim router. You can use a long straight edge, aluminum bar, or router guide to keep the cut straight.
After routing the slot, sand the edges smooth. The slot should be clean enough for clamps or T-track bolts to slide without catching.
💡TIP: Test your clamp or T-track bolt in the slot before moving to the next step. It should slide smoothly without too much play.
NOTE: Take your time with this slot. If it is crooked or rough, clamping the guide later will be less comfortable.


Step 3: Assemble the Track Base
Now assemble the main track base by gluing the HDF pieces to the plywood base.
The HDF layers create the bottom T-slot, which will later be used for clamping the guide to the workpiece or workbench. Apply wood glue carefully and keep the slot area clean.
Start by gluing the smaller HDF board first. Once the glue dries, place spacers in the slot and then attach the second HDF board. This helps keep the slot straight and parallel along the full length of the guide.
After the HDF pieces are glued in place, add screws around the T-slot area for extra strength.
💡TIP: Use spacers when gluing the second HDF piece. This helps keep the clamping slot consistent from one end of the guide to the other.
NOTE: Avoid getting glue inside the T-slot. Dried glue can block clamps or T-track bolts from sliding smoothly.


Find This Blog Post Useful?
Join my newsletter to receive the latest news, tutorials, and project plans sent directly to your inbox!
Step 4: Make the Upper T-Track
Now make the upper T-track on top of the circular saw guide. This track can be used to connect two or more guide sections together, or to add simple accessories later.
Start by cutting two narrow HDF strips. Then mark the position of the T-track on the guide base.
Use a trim router to cut the center slot. Keep the cut straight and clean so the T-track bolts can slide smoothly.
Once the slot is ready, glue the HDF strips in place on both sides of the slot. Use only a small amount of glue and keep the center slot clear.
You can also add a few small screws to reinforce the strips, especially if you plan to connect multiple guide sections together.
💡TIP: Test your T-track bolt in the upper slot before the glue dries fully. It is much easier to adjust the spacing while the strips are still being positioned.
NOTE: Keep glue out of the center slot. If glue dries inside the T-track, the bolts will not slide smoothly.


Step 5: Trim the Guide Edge
The last build step is trimming the guide edge. This creates the final reference edge that you will use to line up the guide with your cut marks.
At this point, the guide should still be slightly wider than needed. Place the circular saw against the plywood guide edge and cut off the excess material.
After this cut, the edge of the guide will match your circular saw and blade setup. That means you can place the guide edge directly on your pencil line when making cuts.
Take your time with this first cut. Keep the circular saw pressed gently against the guide and move slowly and steadily from one end to the other.
Once the edge is trimmed, sand it lightly to remove splinters. The DIY circular saw guide is now ready to use.
💡TIP: Use the same circular saw and blade setup when trimming the guide edge that you plan to use with the guide later. This keeps the reference edge accurate.
NOTE: The trimmed edge becomes your cutting reference. If you change the saw, blade, or setup later, the edge may no longer match perfectly.

And this is what the finished saw guide track looks like.

How to Use a DIY Circular Saw Guide with T-Slots
Using this DIY circular saw guide is simple. The trimmed edge of the guide shows exactly where the circular saw blade will cut, so you can line it up directly with your mark.
- Mark the cut line
Measure and draw a clear pencil line on the workpiece where you want to make the cut. - Position the guide edge
Place the trimmed reference edge of the guide directly on the cut line. - Clamp the guide in place
Use the bottom T-slot with T-track clamps, DIY T-track bolts, or shop-made clamps to secure the guide to the workpiece or workbench. - Check the saw setup
Set the blade depth and make sure the circular saw can move freely along the guide without hitting any clamps. - Make the cut
Hold the circular saw firmly against the guide edge and push it forward slowly and steadily. - Connect guides for longer cuts
If you need a longer guide, use the upper T-track to connect two or more guide sections together before setting up the cut.
💡TIP: Always check that the clamps are clear of the saw path before starting the cut.
NOTE: The trimmed guide edge is matched to your circular saw and blade setup. If you change the saw or blade, make a test cut before using the guide on a final workpiece.


Tips for Better Cuts
A few small setup details will help you get cleaner and more accurate cuts with this DIY circular saw guide.
| Tip | Why It Helps |
|---|---|
| Clamp the guide securely | The bottom T-slot helps hold the guide in place so it does not move during the cut. |
| Keep clamps away from the saw path | Before cutting, check that the circular saw will not hit any clamps or bolts. |
| Use the same saw and blade setup | The trimmed reference edge matches your circular saw and blade, so changing the setup can affect accuracy. |
| Connect guides carefully | When joining two guide sections, make sure the reference edges stay straight and aligned. |
| Cut slowly and steadily | A steady feed gives a cleaner cut and keeps the saw pressed against the guide edge. |
My Take
This DIY circular saw guide with T-slots is a simple but very practical jig for the workshop.
What I like about this version is the flexibility. You can use one guide section for shorter straight cuts, or connect multiple sections together when you need a longer guide. The bottom T-slot also makes clamping easier, which helps keep the guide more stable during the cut.
It is not as refined as a commercial track saw or guide rail system, but it is a useful shop-made alternative if you already have a circular saw. It is affordable, easy to build, and the materials are easy to find.
The most important part is keeping the guide straight and trimming the reference edge with the same circular saw and blade setup you plan to use later. Once that edge is cut, setup becomes simple — place the guide on the line, clamp it, and make the cut.
If you want to build this jig, you can download the DIY circular saw guide plans here. You can also browse my woodworking plans page for more circular saw jigs, workshop tools, and step-by-step woodworking projects.
Related Jigs Used in This Build
I only used one simple jig while making this DIY circular saw guide, but it made the layout easier and more accurate.
