
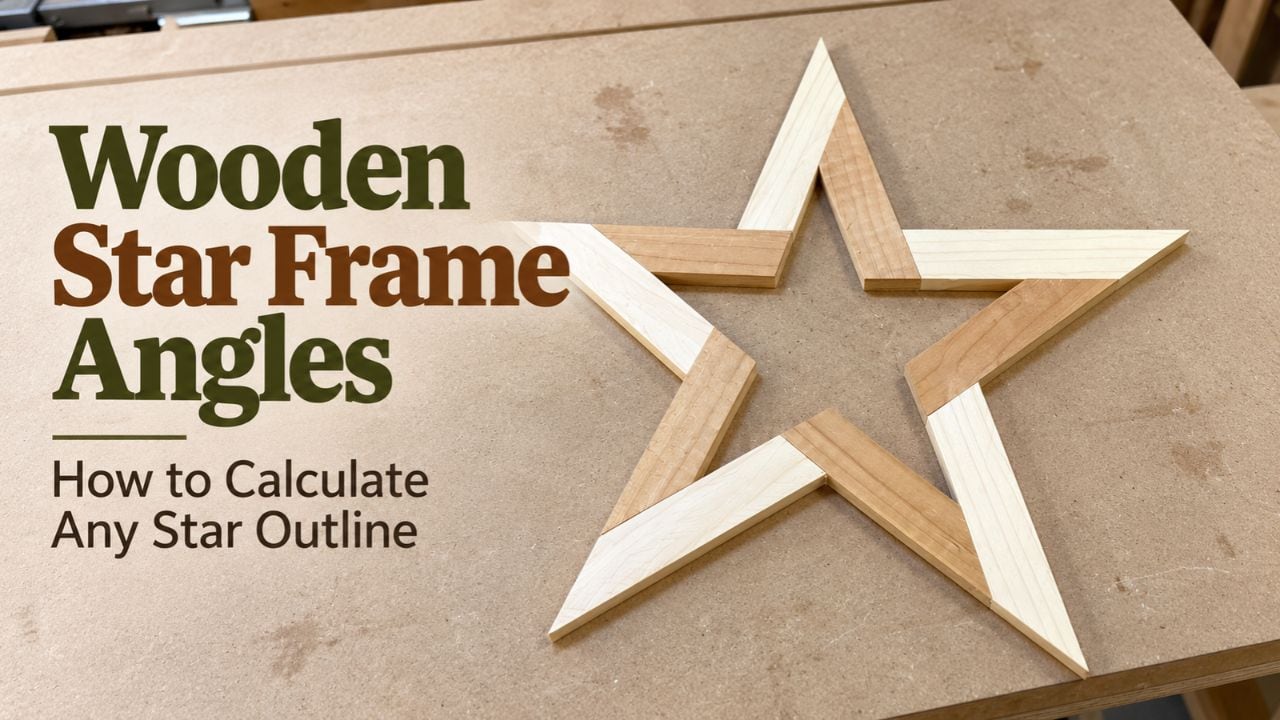
The most confusing part about making a wooden star frame is usually not the cutting itself — it is figuring out the wooden star frame angles before you start. That is because an open star frame is calculated differently from a solid wooden star.
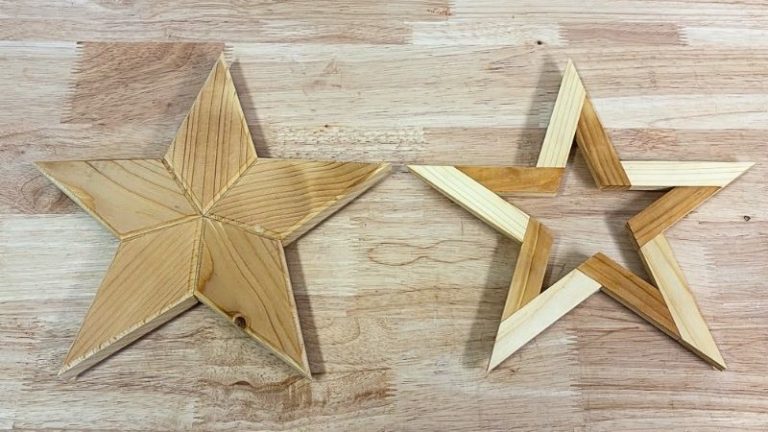
With a solid star, the pieces meet in the center, so the geometry starts from the center angle.
With a wooden star frame, there is no shared center point. Instead, you need to work from:
- the outer star point
- the inner corner
- the way the two strips meet at each joint
That difference changes both the math and the actual cutting angles. For the stars I made, I worked mainly with:
- a 5-point wooden star frame
- a 4-point wooden star frame
- centered miter joints
- offset joints
Once you understand those two joint styles and the two key angles, the rest becomes much easier.
If you want the complete build process first, see my How to Make a Wooden Star Frame guide. If you are making solid stars instead, use my separate Wooden Star Angles article because the geometry is different.
Table of Contents
- Why Star Frame Angles Are Different
- The Two Angles You Need
- How to Calculate the Main Star Frame Angles
- Centered Miter vs Offset Joints
- 5-Point Star Frame Angles
- 4-Point Star Frame Angles
- Wooden Star Frame Angle Chart
- How to Calculate Other Star Frames
- How I Set the Angles on the Table Saw
- Why Cut Orientation Matters
- How to Check the Fit
- Common Angle Mistakes
- Table Saw vs Miter Saw
- Wooden Star Frame Plans
- Wrap-Up
- Frequently Asked Questions
*Safety is your responsibility. Make sure you know what you’re doing and take all necessary safety precautions while working with power tools. Safety comes first!
📌 Save THIS PIN to your Board on Pinterest!

Why Star Frame Angles Are Different
The first thing to understand is that a wooden star frame is not calculated the same way as a solid star. In a solid star, all of the pieces meet in the center. That means the main calculation is based on dividing 360° by the number of star points.
For example:
- 4-point solid star → 90° center angle
- 5-point solid star → 72° center angle
- 6-point solid star → 60° center angle
That method does not work for an open star frame.
A wooden star frame has no shared center. Instead, each strip runs from one outer point to an inner corner, then another strip continues toward the next outer point. So the geometry is based on the outline of the star, not the center.
That means we need to find two different values:
- the angle at the outer point
- the angle at the inner corner
The Two Angles You Need
Every star frame repeats the same pattern around its outline: outer point → inner corner → outer point → inner corner
For a 5-point star, there are:
- 5 outer points
- 5 inner corners
For a 4-point star:
- 4 outer points
- 4 inner corners
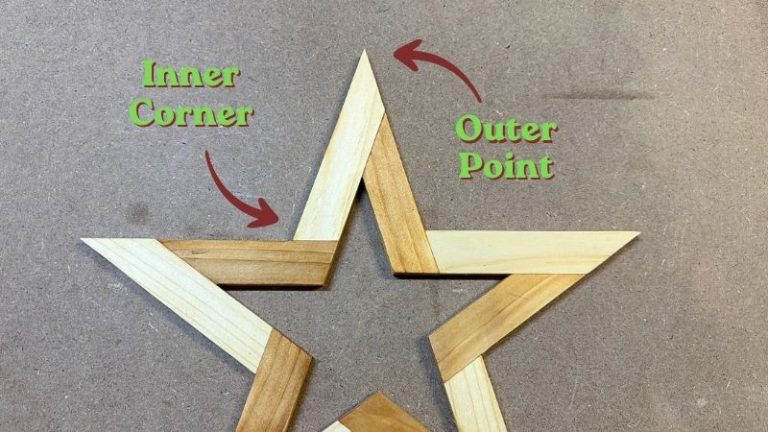
The outer point is the sharp tip of the star. The inner corner is the recessed angle between two neighboring star points. Both need to be calculated before you can determine the actual saw cuts.
How to Calculate the Main Star Frame Angles
Before deciding on centered or offset joints, we first need to find the full outer-point angle and full inner-corner angle of the star itself. This is the part that gives us the 36° and 108° angles for a 5-point star, or 45° and 135° for a 4-point star.
The easiest way to understand it is to treat the outline of the star as a polygon.
A 5-point star has 10 corners in total:
- 5 outer points
- 5 inner corners
A 4-point star has 8 corners:
- 4 outer points
- 4 inner corners
We can then use the polygon interior-angle formula: (number of corners − 2) × 180°
5-Point Star
A 5-point star outline has 10 corners.
- First calculate the total sum of its interior angles: (10 − 2) × 180° = 1440°
- The five outer star points together account for 180°: 180° ÷ 5 = 36°
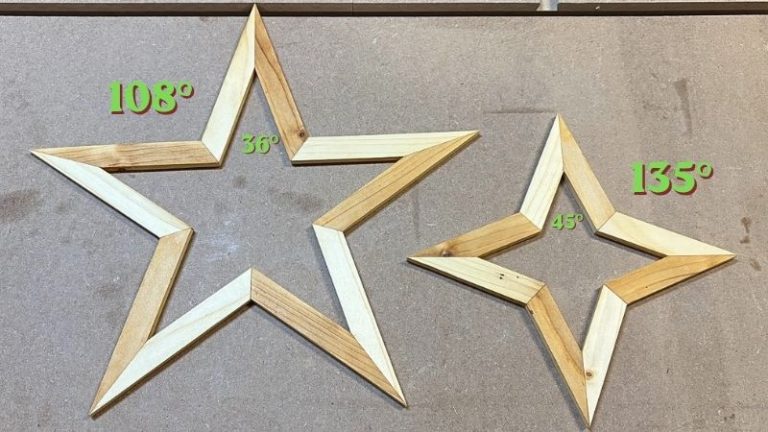
- So each outer star point is: 36°
- Now subtract those five outer points from the total: 1440° − 180° = 1260°
- Divide that between the five recessed inner corners: 1260° ÷ 5 = 252°
The 252° angle is the reflex interior angle at each recessed corner. For woodworking, we want the smaller angle between the two strips on the other side of that corner: 360° − 252° = 108°
So the two main angles for a 5-point star frame are:
Outer point = 36°
Inner corner = 108°
| 5-Point Star Calculation | Result |
|---|---|
| Total corners | 10 |
| (10 − 2) × 180° | 1440° total interior angles |
| 180° ÷ 5 outer points | 36° outer point |
| (1440° − 180°) ÷ 5 | 252° reflex inner angle |
| 360° − 252° | 108° inner corner |
4-Point Star
We can use exactly the same process for a 4-point star. This outline has 8 corners (4 outer, 4 inner).
- First calculate the total interior-angle sum: (8 − 2) × 180° = 1080°
- Divide 180° between the four outer points: 180° ÷ 4 = 45°
- So each outer point is: 45°
- Now subtract the outer points from the complete polygon: 1080° − 180° = 900°
- Divide this between the four recessed corners: 900° ÷ 4 = 225°
Again, that is the reflex interior angle. The smaller angle we use for our star-frame joint is: 360° − 225° = 135°
So the two main angles for a 4-point star frame are:
- Outer point = 45°
- Inner corner = 135°
| 4-Point Star Calculation | Result |
|---|---|
| Total corners | 8 |
| (8 − 2) × 180° | 1080° total interior angles |
| 180° ÷ 4 outer points | 45° outer point |
| (1080° − 180°) ÷ 4 | 225° reflex inner angle |
| 360° − 225° | 135° inner corner |
💡TIP: At this stage we are calculating the full geometry of the star, not yet the individual saw cuts. Whether you use the full angle or divide it in half depends on whether you build the frame with offset joints or centered miter joints.
Centered Miter vs Offset Joints
Once you know the full star angles, the next question is how the pieces meet. This matters because it changes the actual cutting angle.
Centered Miter Joint
With a centered miter joint, the joint line runs through the middle of the angle. Both pieces contribute equally. That means you divide the full angle by two.
For example: 36° outer point ÷ 2 = 18° per piece
This creates the clean, mirror-like joint I used on the more symmetrical star frames.
Offset Joint
With an offset joint, the pieces do not split the angle equally. One piece effectively carries the full angle and the next piece joins against it. So you use the full angle.
For example: 36° outer point = 36° cut
That is why centered and offset versions of the same star use different cutting angles, even though the overall star shape is similar.
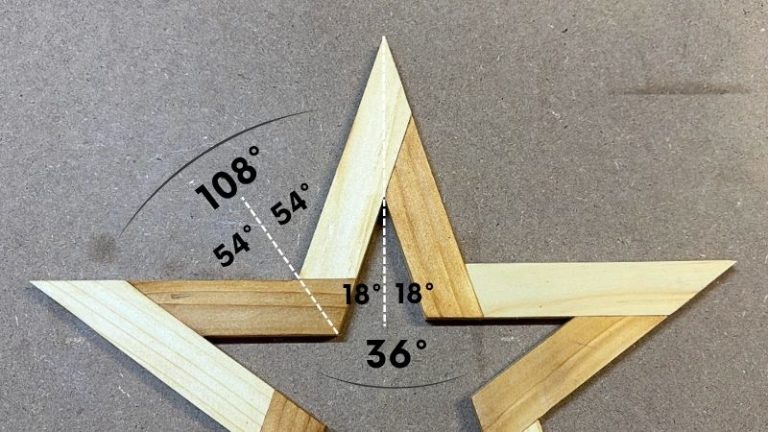
5-Point Star Frame Angles
The 5-point version is probably the most familiar star outline, so this is the one I used as my main example.
A 5-point star has ten corners in total:
- 5 outer points
- 5 inner corners
The angles I used are:
- outer point = 36°
- inner corner = 108°
For centered miter joints, both are divided equally between the two pieces.
That gives:
- outer cut = 18°
- inner cut = 54°
For offset joints, use the full values:
- outer cut = 36°
- inner cut = 108°
| 5-Point Star | Outer Cut | Inner Cut |
|---|---|---|
| Centered Miter | 18° | 54° |
| Offset Joint | 36° | 108° |
These are the exact angles I used when building the two 5-point versions.
4-Point Star Frame Angles
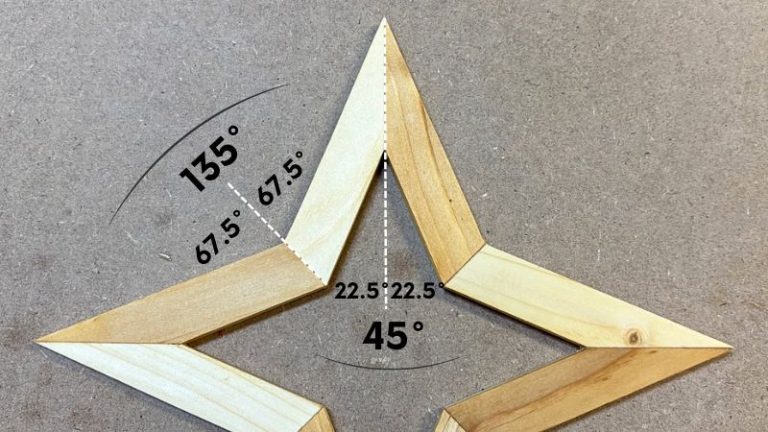
I then tested the same method on a 4-point star. The geometry changes, but the method stays the same.
For the 4-point star:
- outer point = 45°
- inner corner = 135°
For centered miter joints:
- outer cut = 22.5°
- inner cut = 67.5°
For offset joints:
- outer cut = 45°
- inner cut = 135°
| 4-Point Star | Outer Cut | Inner Cut |
|---|---|---|
| Centered Miter | 22.5° | 67.5° |
| Offset Joint | 45° | 135° |
I built both versions to verify that the same approach works beyond the 5-point star, including the change in cut orientation and the shorter pieces needed for the offset version.
Wooden Star Frame Angle Chart
Here is the practical summary for the two star types I built and tested.
| Star Type | Joint Style | Outer Cut | Inner Cut |
|---|---|---|---|
| 5-Point | Centered Miter | 18° | 54° |
| 5-Point | Offset Joint | 36° | 108° |
| 4-Point | Centered Miter | 22.5° | 67.5° |
| 4-Point | Offset Joint | 45° | 135° |
OTE: These are the angles I actually used for the builds shown in this article. For stars with a different number of points, the same general approach applies, but you need to calculate the geometry first.
How to Calculate Other Star Frames
Once you understand the 4-point and 5-point examples, you can use the same method for other regular wooden star frames with evenly spaced points. The process always starts with the full outer point angle and the full inner corner angle.
Let N = number of star points. A regular star frame has twice as many total corners: Total corners = 2 × N
For example:
- 4-point star → 8 total corners
- 5-point star → 10 total corners
- 6-point star → 12 total corners
Step 1: Calculate the Outer Point
The outer star points together account for 180°. So the full angle at one outer point is: Outer point angle = 180° ÷ N
For example:
- 4 points → 180° ÷ 4 = 45°
- 5 points → 180° ÷ 5 = 36°
- 6 points → 180° ÷ 6 = 30°
Step 2: Calculate the Inner Corner
You can calculate the inner corner using the full polygon method shown earlier, but once the relationship is understood, it simplifies to: Inner corner angle = 540° ÷ N
For example:
- 4 points → 540° ÷ 4 = 135°
- 5 points → 540° ÷ 5 = 108°
- 6 points → 540° ÷ 6 = 90°
These are the full star angles before deciding how the strips will be joined.
Step 3: Convert the Star Angles Into Cutting Angles
Now decide which joint style you want.
For centered miter joints, divide both full angles by two:
- Centered outer cut = 90° ÷ N
- Centered inner cut = 270° ÷ N
For offset joints, use the full angles:
- Offset outer cut = 180° ÷ N
- Offset inner cut = 540° ÷ N
Here is the complete relationship:
| Calculation | Formula |
|---|---|
| Full outer point | 180° ÷ N |
| Full inner corner | 540° ÷ N |
| Centered outer cut | 90° ÷ N |
| Centered inner cut | 270° ÷ N |
| Offset outer cut | 180° ÷ N |
| Offset inner cut | 540° ÷ N |
For example, if you wanted to make a 6-point wooden star frame:
Full star geometry:
- outer point → 180° ÷ 6 = 30°
- inner corner → 540° ÷ 6 = 90°
For centered miter joints:
- outer cut → 15°
- inner cut → 45°
For offset joints:
- outer cut → 30°
- inner cut → 90°
| 6-Point Star | Outer Cut | Inner Cut |
|---|---|---|
| Centered Miter | 15° | 45° |
| Offset Joint | 30° | 90° |
So once you know the number of points, you can calculate the complete star geometry first and then convert those angles into the cuts required for your chosen joint style.
💡TIP: Calculate the full star angles first. Only after that should you divide them in half for centered miter joints. This keeps the geometry and the actual saw setup separate and makes the process much easier to follow.
NOTE: These formulas apply to the regular star-frame geometry used in this project, where the outer points and inner corners repeat evenly around the star.
How I Set the Angles on the Table Saw
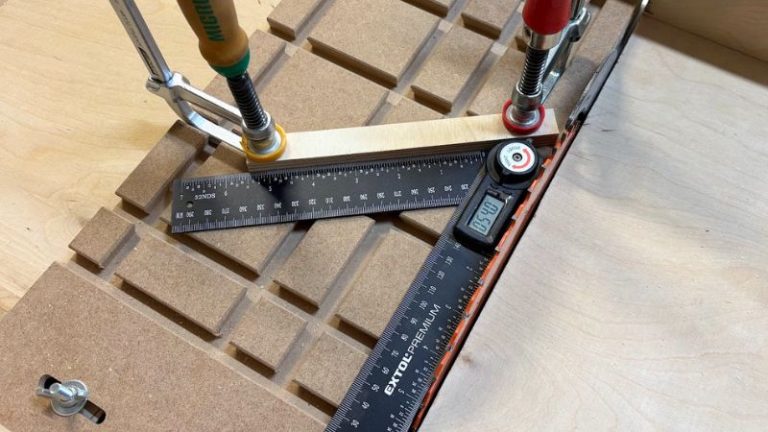
For the actual cuts, I used my Table Saw Sled together with the Table Saw Angle Jig. The biggest advantage here is flexibility.
- Some of these cuts are quite small: 18°, 22.5°
- While others are much wider: 108°, 135°
The adjustable jig lets me rotate the workpiece to the angle I need, clamp it securely, add a stop block, and repeat the same cut across multiple identical strips.
For the 5-point centered-miter star, I first set the outer cut to 18° and cut the same end on all ten pieces. Then I reset the jig to 54° for the inner corners.
💡TIP: Finish every identical cut before changing the jig setup. That gives you much better repeatability than constantly switching back and forth between angles.
Why Cut Orientation Matters
The angle value itself is only half of the setup. The direction of the cut matters too. When you move from the first end of the strip to the second, you need to:
- rotate the piece
- flip it correctly
- make sure the cut slopes in the correct direction
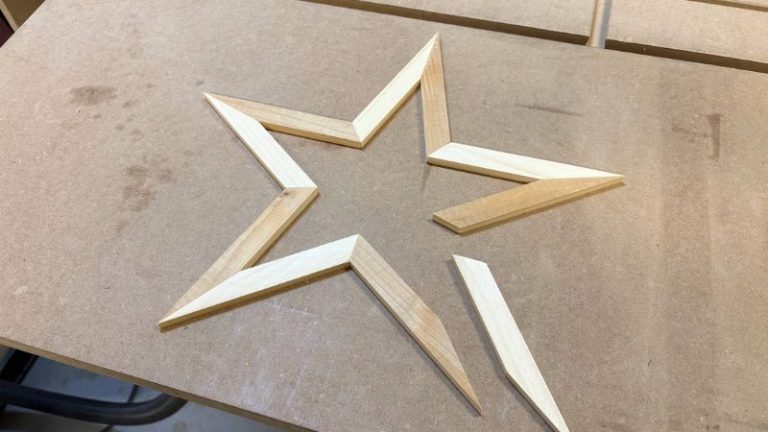
This is especially easy to get wrong on the inner-corner cut. I found the easiest solution was to dry-lay a few strips into the star shape first. Then I could simply see how the second cut should run.
I marked that direction with a pencil and compared the line with the saw blade before cutting. That is much easier than trying to visualize the geometry in your head.
💡TIP: Mark both the cut line and waste side before making the second angle.
How to Check the Fit
Once all the pieces are cut, dry-fit the complete star. This is the best test of whether your angles are correct. Check:
- outer points close cleanly
- inner corners align
- the frame stays symmetrical
- the final joint closes
- all strips stay flat
If there is a tiny gap, you can usually correct it with a few careful passes on a flat sheet of sandpaper. If there is a large gap, the angle setup is probably wrong, and sanding is unlikely to fix it properly.
NOTE: Always fix the geometry before glue-up whenever possible.
Common Angle Mistakes
There are a few easy mistakes to make when cutting wooden star frame angles.
Most of them come from either using the wrong geometry, splitting the angle when you should not, or changing the setup between matching pieces.
The table below summarizes the problems I would watch for most.
| Mistake | What Happens | How to Avoid It |
|---|---|---|
| Using solid-star angles | The frame does not close correctly because a star frame has no shared center. | Calculate the outer points and inner corners of the star outline instead. |
| Not dividing centered miters | The joint angle becomes too wide because both pieces are cut to the full angle. | Split the full angle equally between both strips. For example, 36° becomes 18° + 18°. |
| Dividing offset joints by two | The pieces will not meet in the intended offset arrangement. | Use the full angle for offset joints. |
| Cutting the second end in the wrong direction | The numerical angle can be correct, but the strip still will not fit the star. | Dry fit a few pieces first and mark the cut direction and waste side with a pencil. |
| Changing the setup between matching pieces | Small differences repeat around the frame and can create visible gaps. | Use a stop block and batch-cut all matching pieces before changing the angle setup. |
The last point is especially important on a 5-point star frame because you are working with ten separate strips. Even a very small difference in one setup can be repeated around the whole star.
💡TIP: Once an angle and stop block are set correctly, cut every matching piece before touching the setup again.
Table Saw vs Miter Saw
A miter saw works very well for many common woodworking angles, but star frames can require a broader range than the saw’s normal miter adjustment makes convenient. The frames I built involved angles ranging from 18° up to 135° (keep in mind the range is different for other frames).
With the table saw sled and adjustable angle jig, I can position the workpiece much more freely.
It also gives me:
- a large flat support surface
- secure clamping
- stop blocks
- repeatable setups
- good support for small pieces
That is especially helpful when cutting ten identical strips for one 5-point star. I used the same setup to make four different star frames in roughly two hours, including setup, checking angles, cutting, fitting, cleaning, and gluing.
For a broader comparison of the tools, see my Miter Saw vs Table Saw guide.
Wooden Star Frame Plans
I am also planning on making detailed PDF plans for these wooden star frames. The plans will include the layouts, the different versions (centered and offset), cutting angles, sizes, diagrams, and more.
Until then, you can browse my available Woodworking Plans.
Wrap-Up
The most important thing to remember is that wooden star frame angles are not calculated the same way as solid wooden stars. For an open frame, the geometry comes from three things:
- the outer star point
- the inner corner
- the type of joint you choose
Here is the quick reference for the two star frames I built:
| Star | Full Outer Point | Full Inner Corner | Centered Outer Cut | Centered Inner Cut |
|---|---|---|---|---|
| 5-Point | 36° | 108° | 18° | 54° |
| 4-Point | 45° | 135° | 22.5° | 67.5° |
Once those numbers are correct, the rest of the project becomes mostly about repeatability and orientation.
Set the angle once, cut all matching pieces before changing the setup, mark the second cut carefully, and always dry fit the full star before gluing.
If you want the complete build process, see my How to Make a Wooden Star Frame guide. For solid 4-point, 5-point, and 6-point stars, use my separate Wooden Star Angles article, because the geometry is different.
Frequently Asked Questions
What are the angles for a 5-point wooden star frame?
For a centered-miter 5-point star frame, use 18° outer cuts and 54° inner cuts. For an offset-joint version, use 36° and 108°.
What are the angles for a 4-point wooden star frame?
For centered miter joints, use 22.5° at the outer points and 67.5° at the inner corners. For offset joints, use 45° and 135°.
Why are star frame angles different from solid star angles?
A solid star is calculated from a common center where all segments meet. A star frame is an open outline, so the geometry is based on the outer points and inner corners.
Do I divide the star angle in half?
Only if you are making centered miter joints. Each piece contributes half of the full joint angle. Offset joints use the full angle.
Can I use the same method for other star point counts?
Yes. The same principle applies, but you first need to calculate the correct outer and inner angles for that star outline.
What is the easiest way to avoid cutting the angle in the wrong direction?
Dry fit several strips first and mark the direction of the second cut with a pencil before going back to the saw.
