DIY Table Saw Push Block: How to Build a Safe Push Block for Clean Cuts
Build a DIY table saw push block that keeps your hands safe and your cuts clean. In this guide, I’ll show you step by step how to make a comfortable, grippy push block for ripping narrow pieces on the table saw.
In this blog post I’m going to show you how to build a DIY push block for the table saw—one of those simple jigs that makes ripping much safer and more controlled. A good push block keeps your hands well away from the blade, gives you downward and straight-forward pressure instead of just poking from behind, and really helps on narrow rips and even round stock like dowels and poles. That extra control means less burning, less chance of kickback, and cleaner cuts compared to a simple push stick.
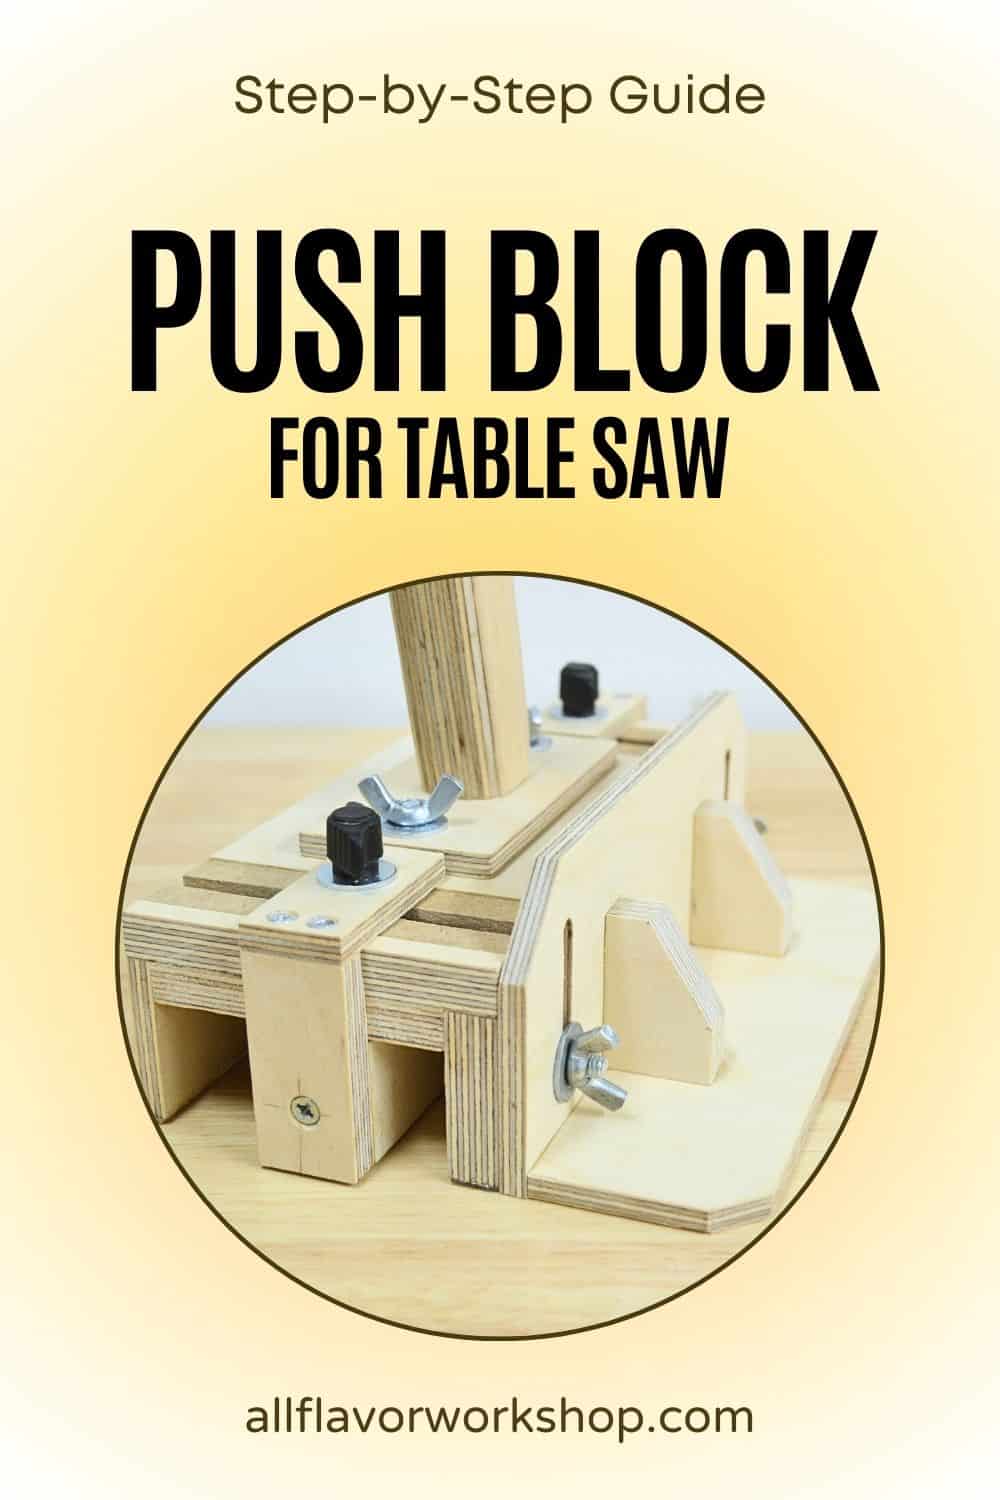
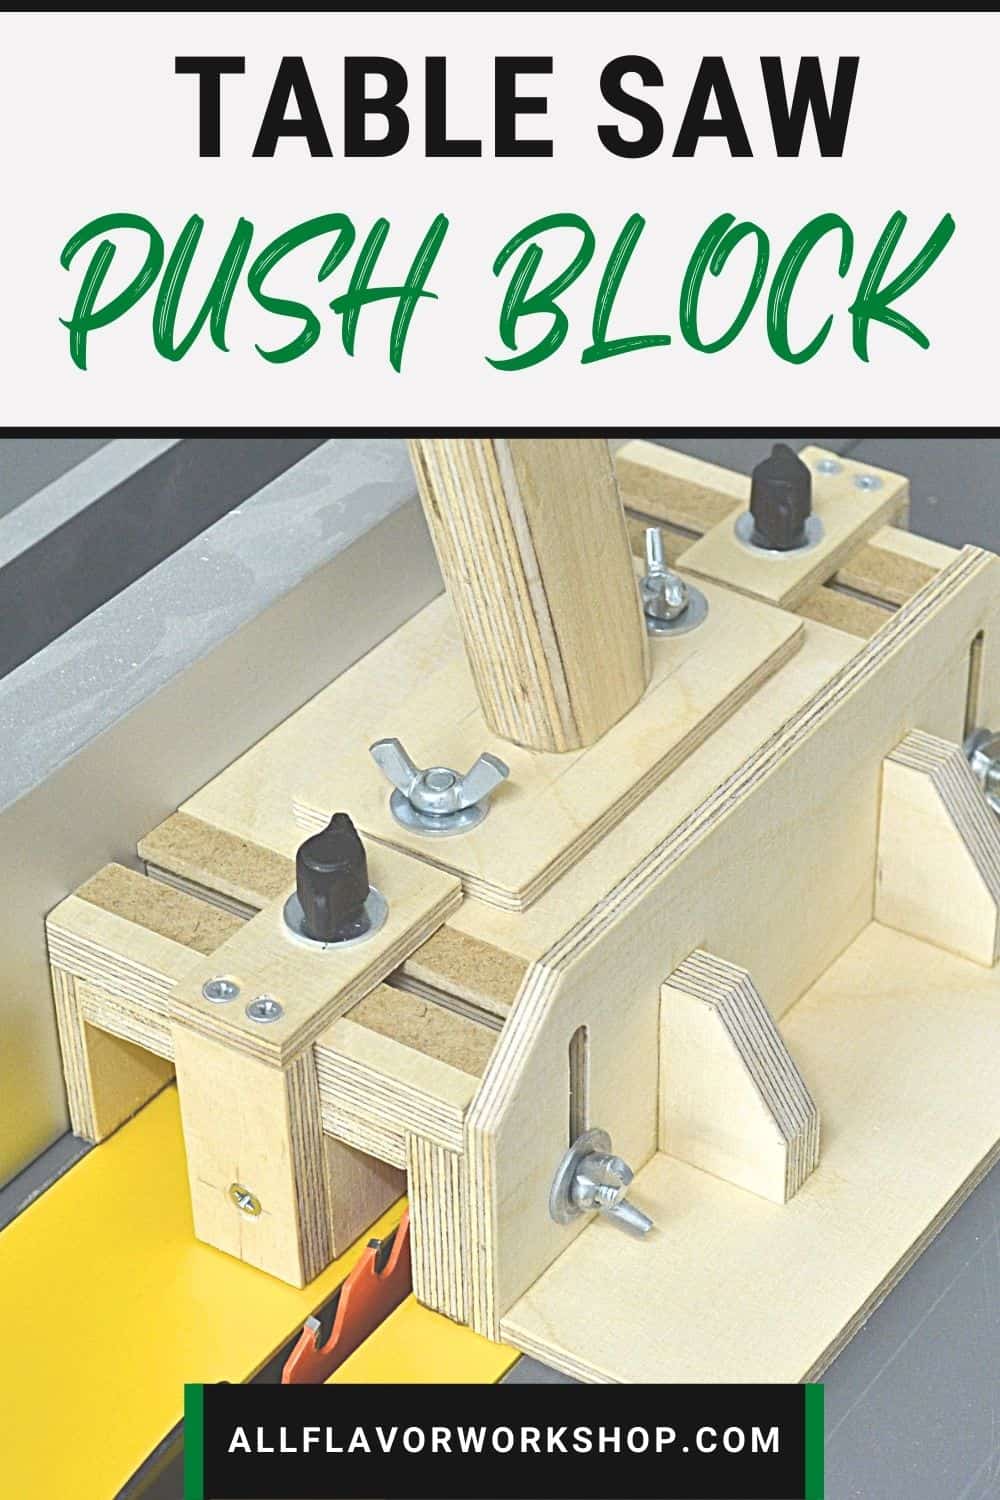
This version is built from Baltic birch plywood and MDF in a size of about 205 × 90 × 60 mm (roughly 8″ × 3½” × 2⅜”). The build includes a base with side stands, a comfortable handle, an adjustable center piece that rides in a T-track, and a detachable side support leg for extra stability. You can also add a rear stop block to push the workpiece from behind. And it’s even better if you build two—perfect for controlling longer pieces during a rip.
👉 If you want to see how this push block fits into a full jig setup, check out my Best Table Saw Jigs for Your Workshop—this build pairs really well with a good crosscut sled, thin strip jig, and spline jig.
Video: Watch the Build
Before we dive into the step-by-step photos, here’s the full build of the DIY table saw push block so you can see how the base, side stands, center piece, side support leg, and handle all come together on the bench and at the saw.
I appreciate every YouTube subscriber. It’s free and easy to subscribe to — Click Here To Subscribe. Thank you!
Let’s Start Building! Step 1: Building the Push Block Base Frame Step 2: Attaching the Side Legs Step 3: Building the T-Tracks on Top of the Base Step 4: Making the Adjustable Center Leg Step 5: Adding the Non-Slip Rubber Pad Step 6: Building the Side Adjustable Stand Step 7: Final Assembly – Putting Everything Together
This DIY table saw push block is made mostly from Baltic birch plywood, MDF, and a few hardware pieces. Here’s what I used in my shop (some of these are affiliate links, which help support my work at no extra cost to you):
📌 Ready to build it? Save THIS PIN to your Board on Pinterest!
DIY Table Saw Push Block — adjustable center leg, side stand, and non-slip base for safer ripping cuts.
How a Push Block Makes Table Saw Rips Safer and Cleaner
A push stick is better than nothing—but it mostly just pushes from the back. A push block, on the other hand, gives you downward and forward pressure at the same time, which changes everything when you’re ripping narrow strips or tricky stock. With a grippy base and heel, the block presses the workpiece down to the table and into the fence, which means less burning, less wandering, and a much lower chance of kickback.
Because your hand is on top of the block, not behind the blade, your fingers stay well away from the danger zone. The wider footprint also supports narrow pieces better than a thin stick, so they don’t chatter or tip as you move past the blade. The adjustable center piece and side support leg on this design let you tune the contact points to the width and shape of the workpiece—even for things like dowels or poles.
In my own shop I use this DIY push block side by side with a commercial one. If you prefer to buy instead of build, the push block I rely on the most is the Grr-Ripper—it’s still the best store-bought push block I’ve used. If you’re considering that route, check out my Grr-Ripper review and my article on the best table saw push blocks for a deeper comparison and ideas on when a premium push block is worth it.
Let’s Start Building!
This push block is built around a sturdy base frame with side stands that straddle the workpiece, so it feels stable as you push along the fence. In the center of the base, we’ll add two homemade T-tracks and a sliding center piece you can position exactly where you want the pressure. On one side, there’s a detachable side support leg, and on top, a shaped handle, allowing you to apply even pressure without straining your wrist.
On the underside, a non-slip foam rubber pad gives the block its grip. We’ll go step by step through:
Building the base frame and side stands
Routing the T-tracks and making the adjustable center piece
Adding the side support leg and anti-slip pad
Assembling all the parts
Once you have the first one done, making a second matching push block will be much easier.
How to Make a Push Block for Table Saw
Step 1: Building the Push Block Base Frame
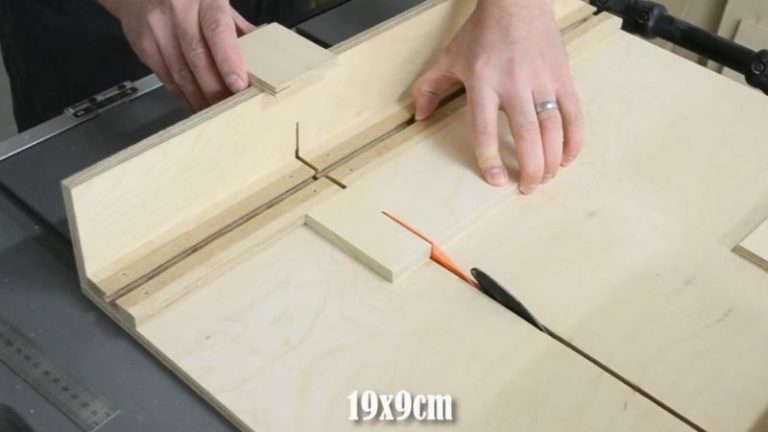
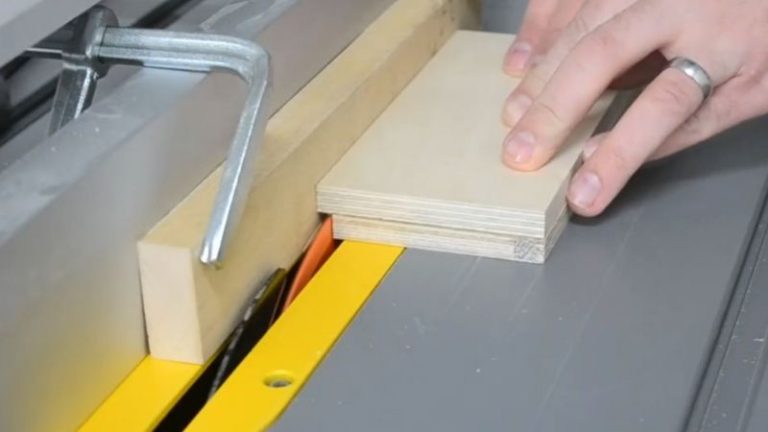
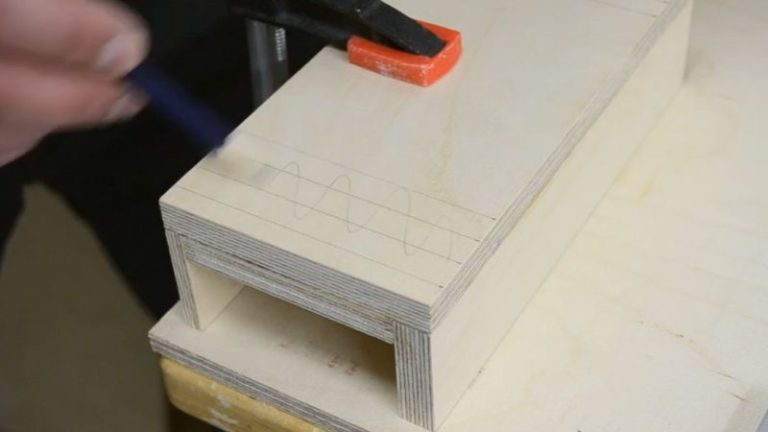
I start by cutting the two base layers to size: both pieces are 190 × 90 mm, one from 12 mm plywood and the other from 9 mm plywood. I rip them to width on the table saw and then crosscut to final length using my table saw sled, so both pieces come out square and identical.
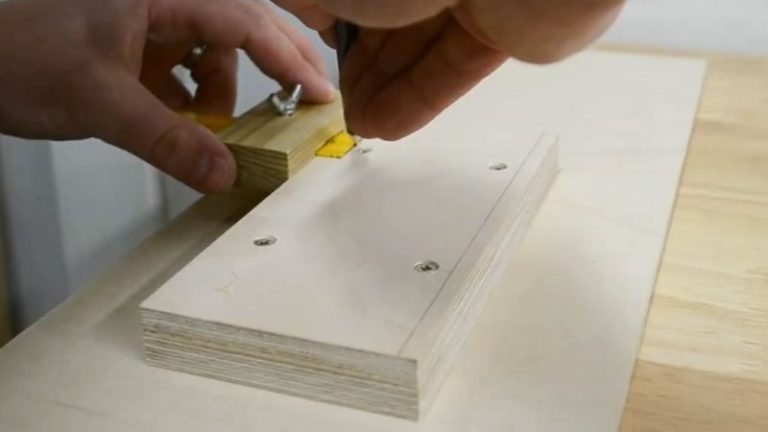
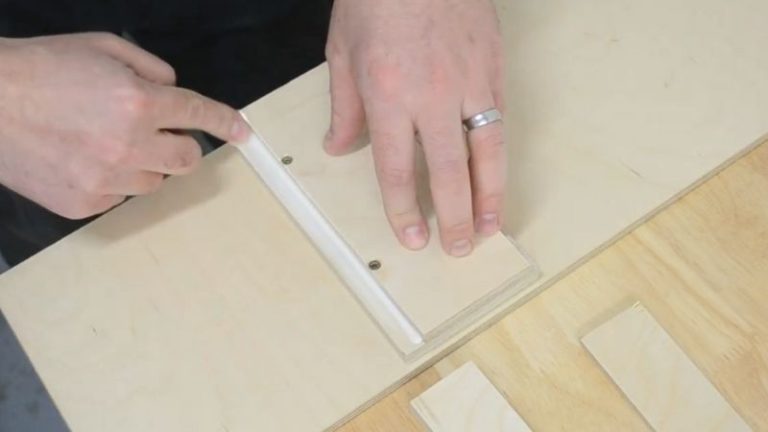
Then I glue the pieces together and additionally add a few screws from the side of the 9 mm plywood (which will be the bottom piece). Before moving on, I also carve two shallow hexagon recesses on the bottom side for the M6 bolt heads that will hold the handle later. It’s much easier to do this now while everything is still accessible. The bolt heads sit flush in the recesses so the base stays flat.
Note: Make sure all screw heads are flush or slightly below the surface so they don’t interfere with the rabbets or with the center leg.
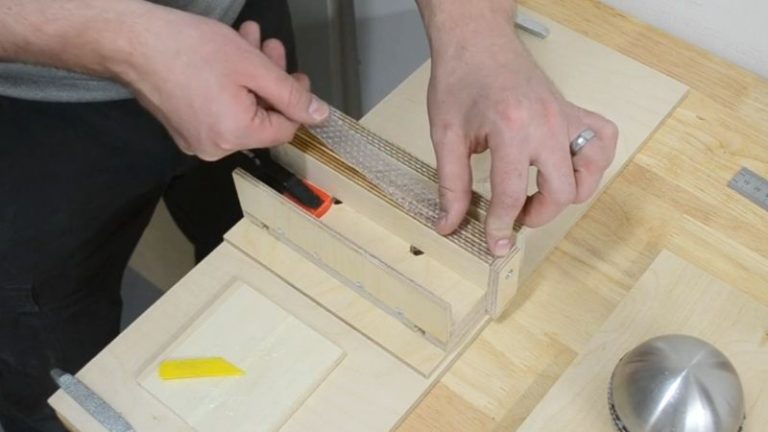
Then I mark out the two rabbets on the bottom piece using my ruler marking gauge—one 12 mm wide, the other 6.5 mm. These will form the “legs” of the push block that straddle the workpiece. I cut the rabbets on the table saw, setting the blade height so the depth equals the full thickness of the 9 mm bottom layer. After the cuts, I clean up and lightly sand the rabbets.
A table saw sled makes it easy to crosscut the base pieces to final length with square, matching ends.
I glue the two base layers together and add screws from the 9 mm side for extra strength—keeping the screw heads flush.
Using a marking gauge, I lay out 12 mm and 6.5 mm rabbets on the bottom layer that will form the push block “legs.”
The rabbets are cut on the table saw to the thickness of the 9 mm layer, then lightly sanded and cleaned up for a smooth, accurate fit.
Step 2: Attaching the Side Legs
With the rabbets cut and cleaned up, it’s time to add the side legs that give the push block its height and help it straddle the workpiece. I cut two plywood pieces to size. Each piece matches the length of the base so everything lines up nicely:
190 × 40 × 12 mm
190 × 40 × 6.5 mm
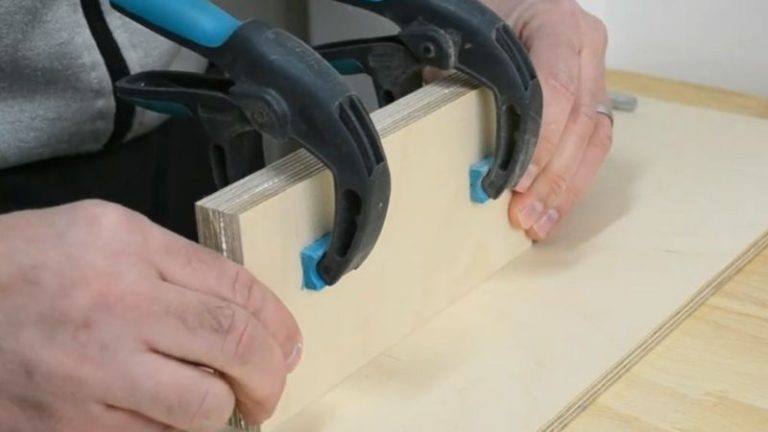
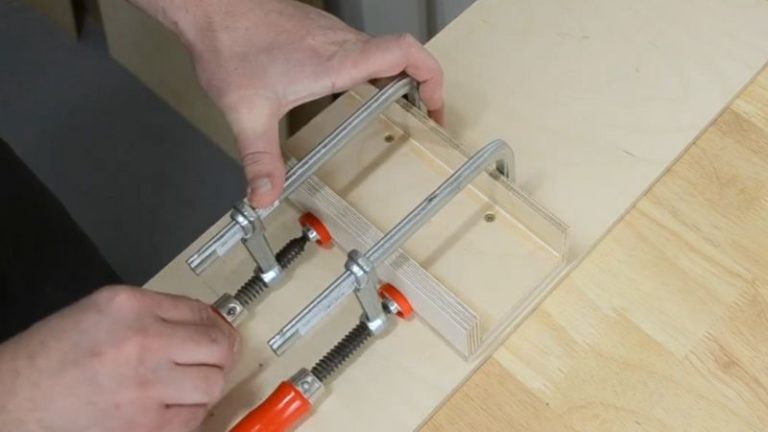
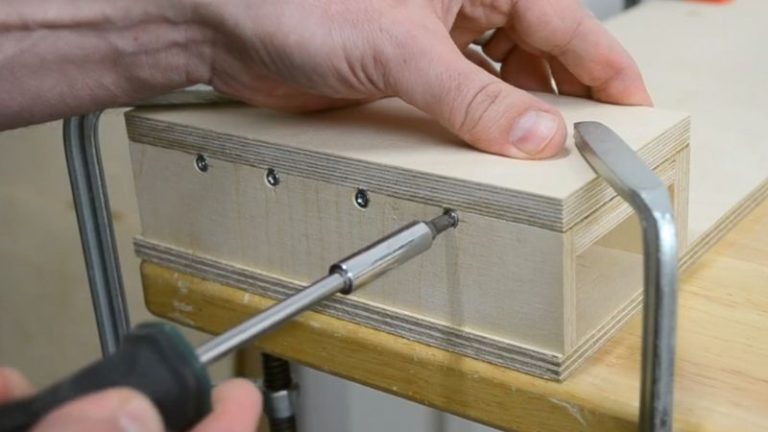
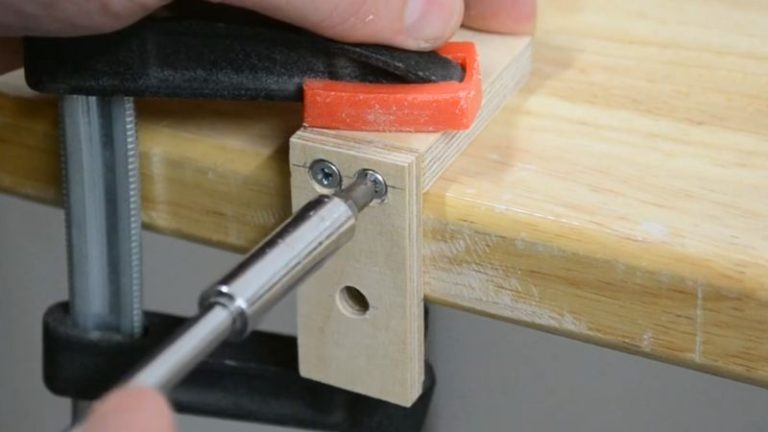
I apply just enough wood glue into the rabbets, then seat the plywood pieces into the grooves and clamp them in place. Once they’re aligned and clamped, I add a few screws from the sides of the stands into the base to reinforce the joint.
Again, all screw heads must sit flush or slightly below the surface, so they don’t catch on the table saw fence or interfere with the adjustable supporting side stand.
Tip: Before gluing the side stands in place, you can carve two hexagon recesses in the 12 mm leg for the M6 bolt heads that will later hold the side adjustable stand. Again, it’s much easier to do this now than after everything is assembled (you can see me do that in step 3).
A thin, even bead of glue in the rabbets is enough to bond the side stands without flooding the corners.
The side stands are pressed into the rabbets and clamped so they stay aligned along the full length of the base.
After clamping, I add a few screws from the sides to lock the side stands in place—keeping all screw heads flush with the surface.
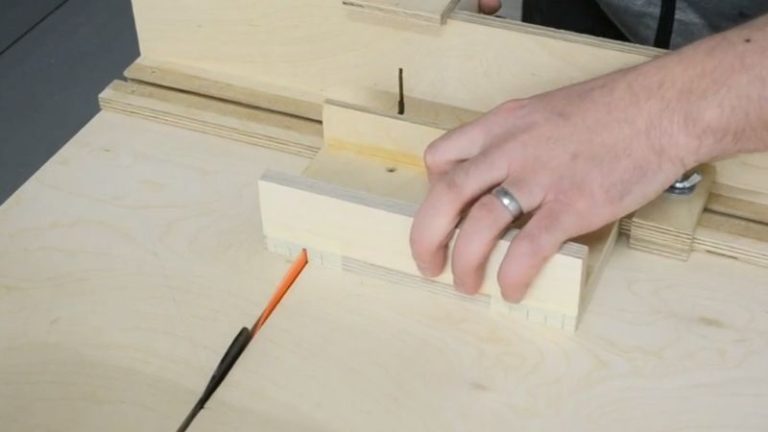
Step 3: Building the T-Tracks on Top of the Base
Next, I add two T-tracks on the top of the push block base—one toward the front and one toward the back. These tracks let the central leg/pressure block slide and lock in place..
I start by marking the track layout on top of the base and then cut the grooves on the table saw using my sled. The tracks are:
One deeper central dado (about 10 mm deep)
Two shallower outer dados (about 3 mm deep each)
After cutting, I clean up the grooves and cut MDF strips to fit the outer dados. With just enough wood glue, I press the MDF strips into the outer slots.
Tip: Be careful with the glue here — if it gets into the central dado, it’s hard to remove later and can stop your T-track bolts from sliding smoothly. Screws can be used too.
Once the glue dries, I test the track with a square-nut setup to make sure it slides freely along the full length.
👉 Check out my DIY T-Tracks and T-Track Bolts guide, where I go step by step through building custom T-tracks for jigs and fixtures.
I start by marking the layout for the front and back T-tracks on top of the base so the central leg can slide and lock in place.
The center and outer dados are cut on the table saw with a sled to keep the T-tracks straight and perpendicular.
MDF strips glued into the shallow outer grooves, together with the deeper middle dado, create a simple T-track channel.
Carving hexagons for bolts to attach the side stand.
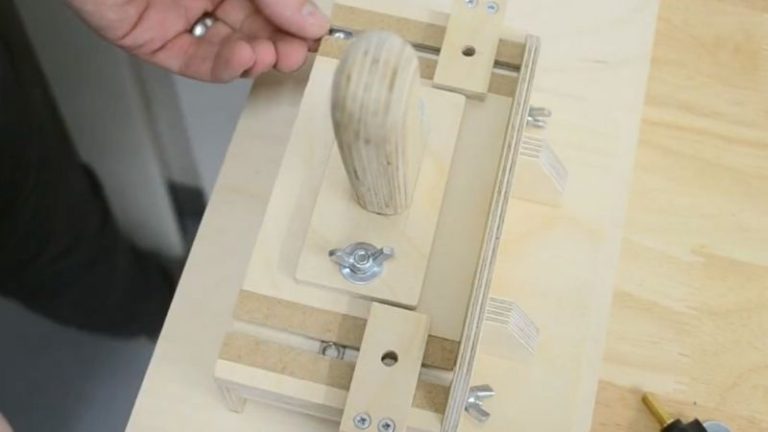
Step 4: Making the Adjustable Center Leg
The adjustable center leg is the part that actually pushes down on the workpiece and slides in the T-tracks so you can position it exactly where you need it.
I start by cutting all the pieces to size. The center leg is made from six small parts:
2 pieces that form the main leg
2 side pieces that connect the leg to the top
2 upper pieces that sit over the T-tracks
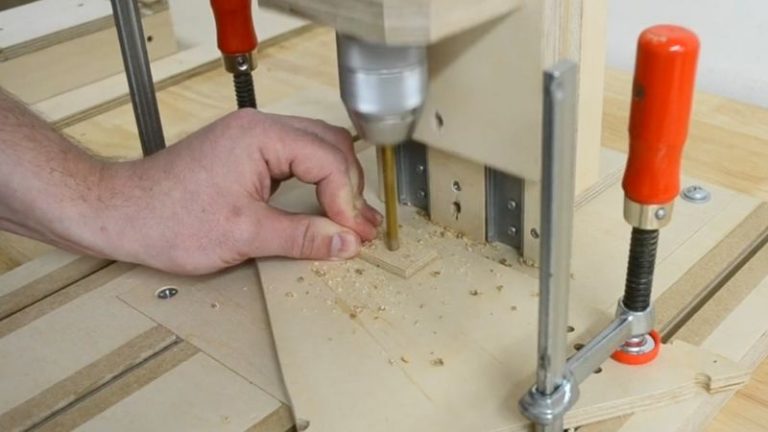
First, I drill the connecting holes in the upper pieces. These holes will later accept the M6 Wing bolts.
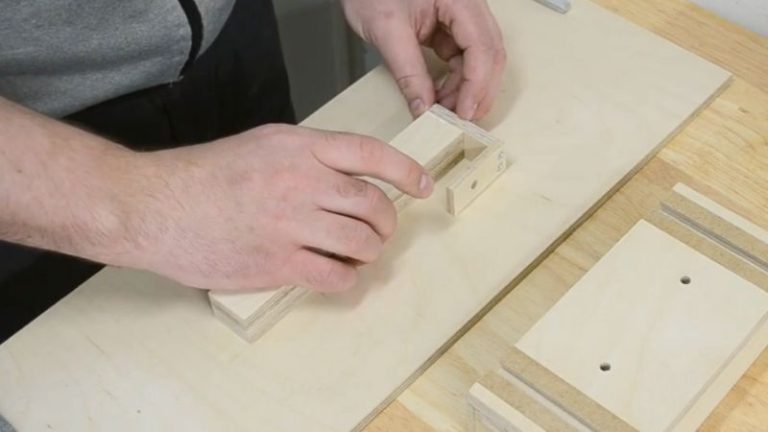
With the holes drilled, I glue up the stack: the leg pieces, side pieces, and top pieces all come together in a small “bridge” that can straddle the T-track and press down on the workpiece. I use a few screws for extra strength.
At this stage I don’t add the wing screws or nuts yet—those will go in during the final assembly. For now, the goal is to have a solid, adjustable center block that fits nicely over the tracks and is ready to be bolted down later.
I drill bolt holes in the upper pieces so they can clamp the center leg down to the T-track with M6 hardware.
A few screws reinforce the glue-up so the center leg stays rigid under pressure when pushing stock.
The leg, side pieces, and top pieces are glued together into one solid block that will ride in the T-track.
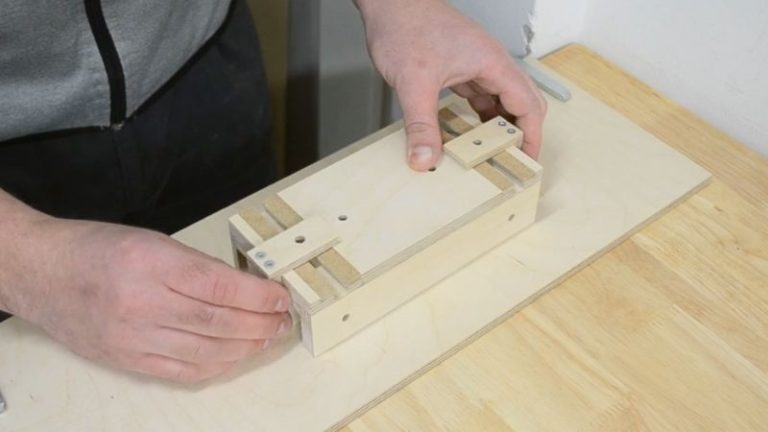
Before adding hardware, I test-fit the center leg over the T-tracks to make sure it slides and sits where I want it.
Step 5: Adding the Non-Slip Rubber Pad
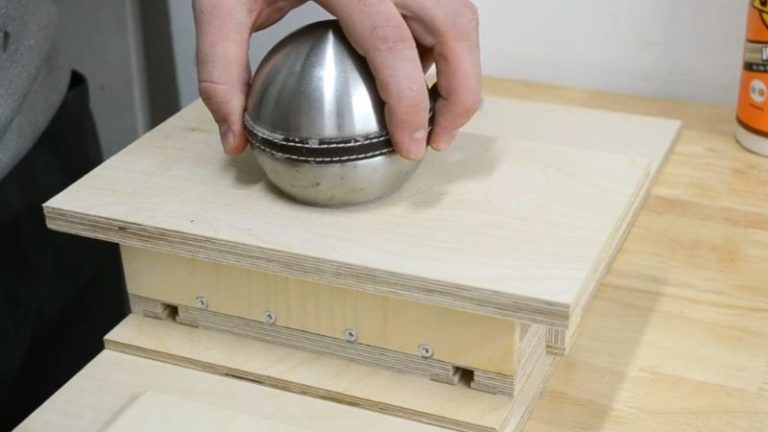
The non-slip rubber pad is what really lets the push block grab the workpiece instead of just sliding over it. The goal here is to create a solid, grippy contact between the jig and the workpiece so you can push it forward with confidence.
This part takes a bit of experimenting to find the right material. I’m using a rubber sheet from a local store that I cut into strips and glue to the bottom of the legs. Over time, the surface can lose some of its bite; when that happens, I just give it a light mist with spray adhesive, and the grip comes back nicely.
I cut all the rubber strips to size and use epoxy to glue them onto the bottom faces of the legs. I press everything firmly in place and let the epoxy fully cure before using the push block on the saw.
A thin layer of epoxy bonds the rubber pads to the legs—once cured, they hold up well under pressure.
With the rubber pads installed, the push block grips the workpiece instead of sliding over it during the cut.
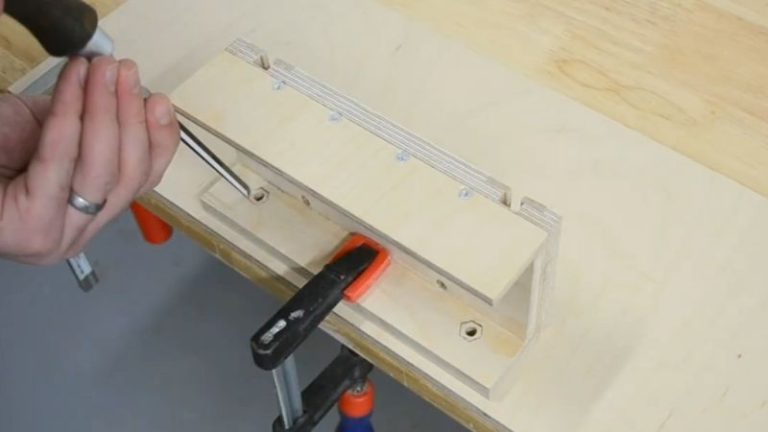
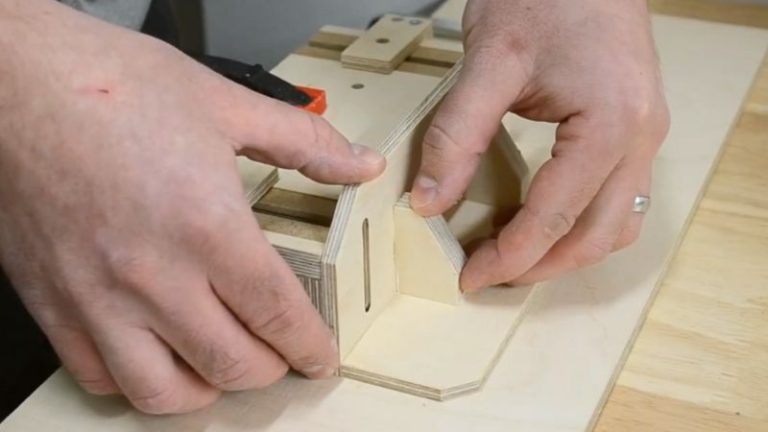
Step 6: Building the Side Adjustable Stand
The side-adjustable stand helps match the height of the workpiece, so the push block sits flat and stable while you cut. With it attached, the jig rests on both the main legs and the stand, which adds support on taller or narrower boards. If you don’t need it, you can simply unbolt it and set it aside.
I cut a horizontal base piece and a vertical piece, then route two vertical slots in the upright for height adjustment. The vertical piece is glued onto the horizontal base, and I add two small support blocks.
The finished side stand is attached to the 12 mm side leg of the push block with bolts and wing nuts passing through the slots. This lets you raise or lower the stand to match your stock and then lock it in place.
I route two vertical slots so the side stand can slide up and down and match the height of different workpieces.
The vertical piece is glued to the base and reinforced with small support blocks to keep the stand rigid.
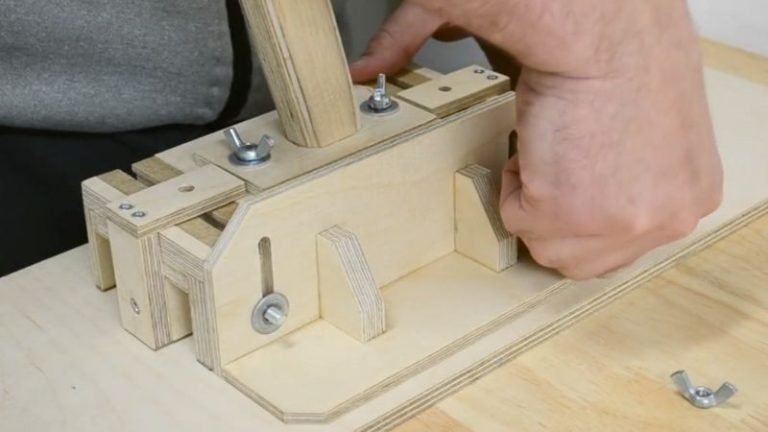
Step 7: Final Assembly – Putting Everything Together
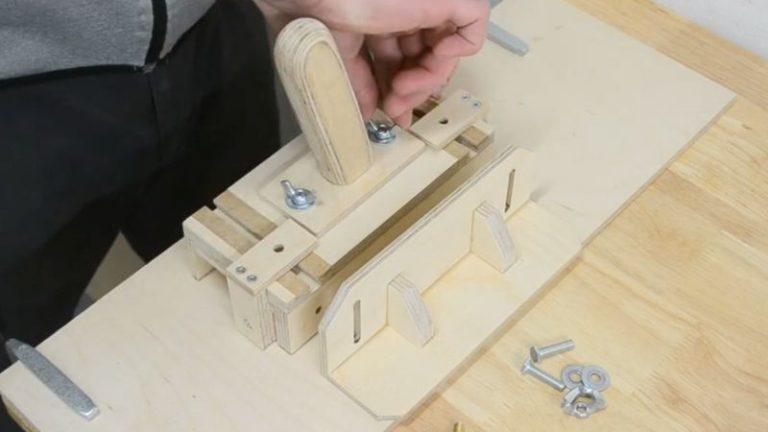
With all the components ready, it’s time to assemble the push block and get it ready for the table saw.
First, I add the handle. It mounts on top of the base and is secured with bolts and wing nuts, so you can remove it and reuse it on other jigs if you want. If you’d like to see how I built this style of handle in detail, check out my article on how to build a table saw thin strip jig—the handle design comes straight from that build.
Next, I attach the side stand to the 12 mm side leg and fix the adjustable center leg to the T-tracks using M6 Wing bolts and square nuts.
Once everything is tightened down and adjusted to your typical stock height, the push block is finished and ready to use.
The handle is bolted on with wing nuts so it’s easy to remove or reuse on other jigs if needed.
The center leg is locked into the T-tracks with M6 bolts and wing nuts so you can set pressure exactly where you need it.
The side stand bolts to the 12 mm side leg and can be adjusted to match the height of different boards.
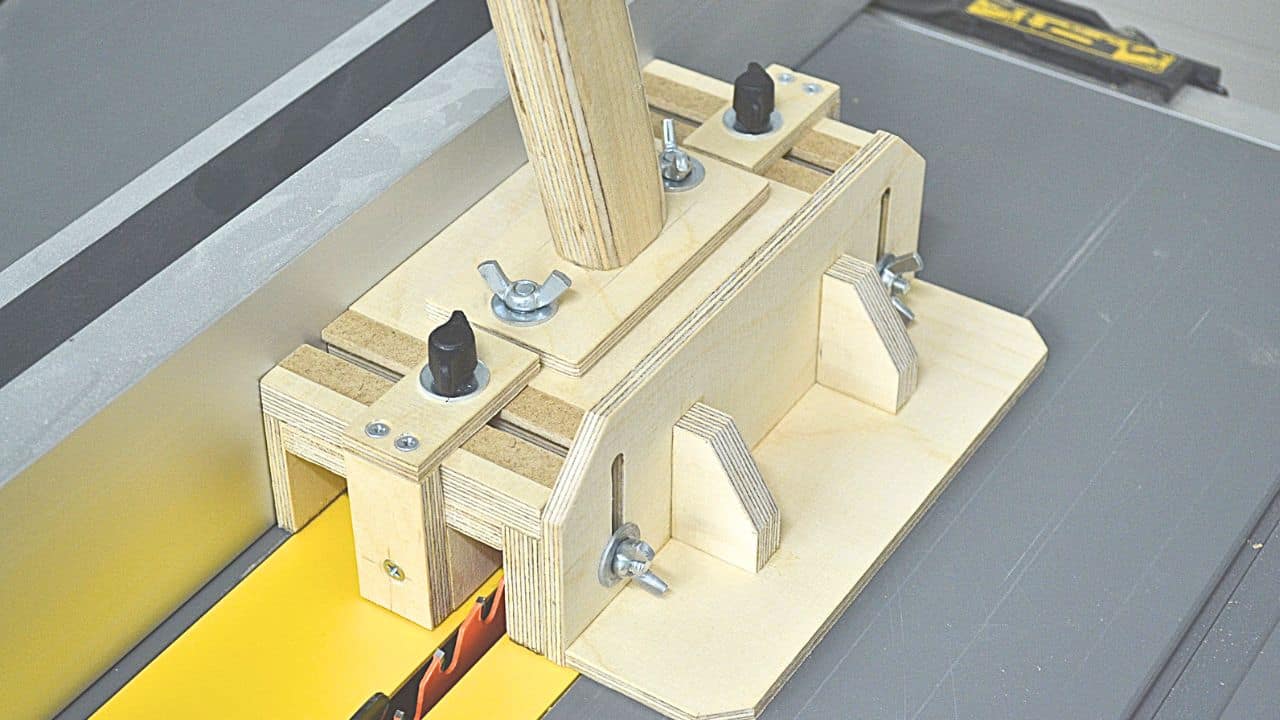
Fully assembled and adjusted—the DIY push block is ready for safe, controlled rips on the table saw.
Wrap-Up: Why This Push Block Is Worth Building
A table saw push block is one of those shop upgrades that absolutely pays off every time you rip stock—better control, cleaner cuts, and your hands stay well away from the blade. This build is a bit more advanced than a simple block of wood, but in return you get an adjustable center leg, a detachable side stand, and a handle, so the block actually does what it should: holds the work down, against the fence, and moves it forward.
The one part I really recommend experimenting with is the bottom material. I’m using a non-slip rubber sheet from a local store, and it works well as long as it’s grippy—you can always refresh it with a light mist of spray adhesive when it starts to lose tack. You could also add a rear stop block later to push from the back of the workpiece if you want even more positive control.
Alongside this jig, I still use a store-bought push block, and the one I reach for most is the Grr-Ripper. If you’re deciding whether to build or buy, you can check out my Grr-Ripper review and my article on the best table saw push blocks to see how this DIY version compares.
Homemade Table Saw Push Block — a simple safety jig that keeps your hands away from the blade and improves control.
FAQs: DIY Table Saw Push Block
1. Why use a push block instead of just a push stick?
A push stick mainly pushes from behind, which can leave the workpiece unstable—especially on narrow rips. A push block gives you downward and forward pressure at the same time, holding the board flat to the table and tight against the fence. That means better control, less burning, less chance of kickback, and your hands stay farther away from the blade.
2. What size should a table saw push block be?
There’s no single “correct” size, but something around 200 mm long × 90 mm wide × 60 mm high (about 8″ × 3½” × 2⅜”) works well for most ripping tasks. It’s big enough to feel stable and keep your hand clear of the blade, but compact enough to maneuver comfortably over the table and past the fence.
3. What material should I use on the bottom for grip?
The most important thing is that the bottom material is non-slip and durable. A rubber sheet or foam rubber mat works great—anything that grips the wood instead of sliding. It’s also handy if you can refresh the grip with a bit of spray adhesive when it starts to wear down, rather than having to replace the pad every time.
4. Do I need one or two push blocks?
One push block is already a big improvement over a bare hand or a simple stick, but two push blocks are ideal for longer or narrower boards. With a pair, you can keep one ahead of the blade and one behind, maintaining steady pressure and control along the entire cut. This setup feels much safer and more stable on the table saw.
5. Can I use this push block on tools other than the table saw?
Yes, depending on its size and shape, you can often use a push block on a router table, jointer, or band saw as well. As long as the bottom is grippy and the block is shaped so it’s comfortable and safe to hold, it can help keep your hands away from blades and cutters on other machines too. Just make sure it gives you solid contact and doesn’t get too close to any cutters in use.
Meet the creator of AllFlavor Workshop! As a passionate DIYer and woodworking enthusiast, Lukas is always looking for ways to make things himself rather than buying them off the shelf. With a keen eye for design and a knack for working with wood, Lukas enjoys sharing his craft with others and helping them discover the joy of building. Whether you're an experienced woodworker or a novice looking to try your hand at a new hobby, you're sure to find plenty of inspiration and tips on AllFlavor Workshop.