How To Make a DIY Jigsaw Guide Rail (Straight, Clean Cuts Made Easy)
Build a DIY jigsaw guide rail for straight, accurate cuts using just a few materials. A great woodworking jig for any skill level—simple, fast, and effective.
If you’re setting up a workshop and choosing your first tools, a jigsaw should definitely be on your list—right after a drill 😉. It’s versatile, easy to handle, and perfect for cutting curves, angles, and even metal.
Early on, I built a small jigsaw crosscut jig that worked great for crosscuts and short cuts. But it didn’t perform well on longer cuts. So I built this simple DIY jigsaw guide rail—a straightforward solution that’s helped me make long, straight cuts without breaking the bank.
This jig is super beginner-friendly and works even better when paired with a jigsaw cutting station. Follow the steps below or check out the video for a full walkthrough.
Want to see how it’s done? Watch the full video below for a clear step-by-step walkthrough of how I built this jigsaw guide rail from start to finish. It’s easy to follow and a great companion to the tutorial on this page.
👉 Click here to subscribe to my YouTube channel if you’d like to support the project and get notified when I publish new jigs and builds. It’s free, and it really helps the channel grow. Thank you!
*Safety is your responsibility. Make sure you know what you’re doing and take all necessary safety precautions while working with power tools. Safety comes first! Always be cautious and careful when using any power tool.
Jigsaw Guide Rail Plans (Free PDF)
You can download the full set of free Jigsaw Guide Rail plans below. The plans include measurements, build steps, and a clear layout to help you build your own guide with confidence.
We may earn an affiliate commission when you buy something through our retail links. As an Amazon Associate AllFlavor Workshop earns from qualifying purchases.
A simple jigsaw guide rail that helps you cut long, straight lines with ease. Build it in an afternoon and upgrade your jigsaw’s accuracy!
Common Questions About Jigsaw Guide Rails
How difficult is building a jigsaw straight cut guide?
Not difficult at all. This is a beginner-friendly project that only requires a few basic tools — a jigsaw and a hand drill. You can finish it in a few hours, and it’s a great first jig to build for your workshop.
It’s simple, low-cost, and makes a huge difference in how clean and accurate your jigsaw cuts are.
Can I cut a straight line with a jigsaw?
Yes, you can — but it takes a little help. While jigsaws are best known for curves and angled cuts, straight cuts can still be clean and precise with the right setup. That’s where a jigsaw guide rail comes in.
Use a guide like this one (or even a straight piece of wood or level) to steer the jigsaw along your cut line. And don’t forget: the right blade matters!
This jigsaw guide rail is made from plywood and spruce wood, but feel free to use MDF or HDF if that’s what you have on hand. It supports straight cuts up to about 500 mm, depending on your jigsaw’s size and shoe type.
You can use it on its own or combine it with my Jigsaw Cutting Station for even more control. If you’re aiming for accurate crosscuts and angle cuts, this setup works surprisingly well — especially for beginners.
How to Make a DIY Jigsaw Guide Rail
Step 1: Build the Jigsaw Guide Base
Start by measuring your jigsaw’s base plate or shoe cover. This will determine how much space you’ll need between the guide rails to allow the jigsaw to slide smoothly with minimal resistance. For reference, the width of my jigsaw’s shoe cover is 84 mm, but be sure to measure your own model.
Next, cut a rectangular base for the guide — I used birch plywood (600 × 140 × 12 mm). You can also use MDF or HDF if that’s what you have available.
I intentionally made the base a bit wider than needed to give some clearance between the rails and the jigsaw. This makes the movement much smoother during cuts.
💡 Tip: A 12 mm thick board feels solid and adds stability, but you could also go for 9 mm if weight is a concern. The thicker base helps support the jigsaw blade better, reducing flex and the risk of a skewed cut.
Measure the width of your jigsaw shoe — this determines the spacing between the guide tracks.
⚠️ Note: Cutting a perfectly straight 90-degree angle with a jigsaw isn’t always easy—especially on thicker materials. To get better results:
Go slower on thick boards — the thicker the wood, the easier it is for the blade to wander.
Apply consistent forward pressure and keep the jigsaw steady.
Most importantly, use a blade designed for long, straight cuts — there are plenty of options tailored to this purpose.
Cut a rectangular base for the guide rail — mine is 600 × 140 mm from 12 mm thick plywood.
Try to keep the cuts as square and clean as possible to help with jig alignment later on.
Step 2: Attach the Guide Tracks
Cut the guiding rails and the front/back stoppers. I used a crosscut jig I already had in the workshop for this step.
I went with planed spruce wood rails (600 x 28 x 13 mm). The jigsaw slides really well between these, and their wider profile makes it easy to clamp the jig down to a workbench during use.
1. Attach the first guide rail
Start by gluing one of the rails to the base. Clamp it down and let the glue dry. If you want, you can also fix the rail with a few screws — I usually do this for added security. 😉
Attaching the first guide track to the base using wood glue
Holding down the guide rail with clamps while the glue dries
Drilling holes into the guide rail to reinforce it with screws
Reinforcing the guide rail with wood screws for extra strength
2. Attach the second guide rail
To install the second rail, place your jigsaw on the guide and position the second rail snugly against the other side of the jigsaw shoe. Clamp it temporarily to test the fit before screwing it down permanently.
💡 TIP: Add a thin piece of tape (like electrical tape) to one side of the jigsaw shoe when fitting the second rail. It creates a tiny bit of space so the jigsaw slides more easily in the track.
Placing the second guide rail snugly against the jigsaw shoe
Securing the second track after a test fit
3. Attach the stoppers
Measure and cut two stoppers so they fit nicely between the rails at the front and back. Fix them in place with glue and screws to keep the jigsaw from sliding out of the track.
Measuring the stopper to fit precisely between the guide rails
Cutting the stopper from a spruce wood strip
Securing the stopper block between the rails with screws and glue
Step 3: Drill in Sight Holes
Once both rails are attached, it’s time to drill sight holes along the base. These holes do two things:
Make it easier to align the jig with your cutting line
Allow you to mount the jigsaw blade precisely
Start by marking the positions for the first and last hole, then evenly space the others in between.
Marking layout lines for sight holes along the base
Preparing to drill sight holes in the jig
Drilling evenly spaced holes along the jigsaw guide
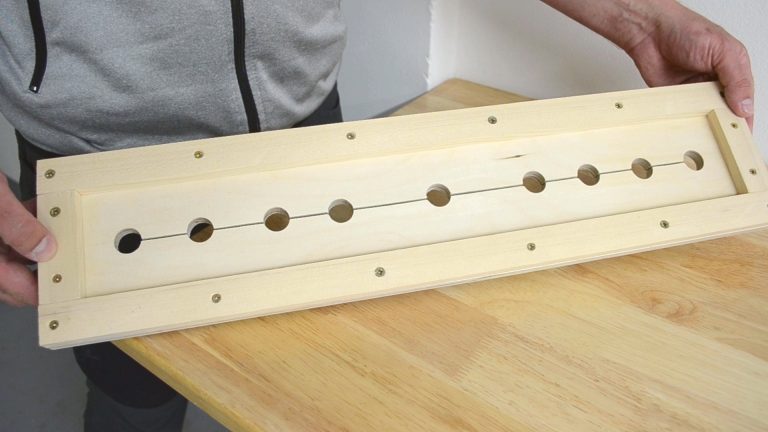
Sight holes drilled for better line visibility and mounting accuracy
Step 4: Cut the Slot & Sand the Guide
With the sight holes in place, the next step is cutting the actual slot for the jigsaw blade. This will guide the jigsaw during every cut.
Place your jigsaw on the rail and slowly make a straight cut from one end to the other, using the sight holes to help you stay aligned.
After cutting the slot, sand the entire jig — especially the edges and inner track — to remove any splinters and ensure a smooth glide for the jigsaw.
TIP: Sanding the inside edges of the guide rails makes a big difference — it helps the jigsaw slide with less resistance and reduces wear on the shoe.
Slowly cutting the slot for the jigsaw blade
Guiding the jigsaw to cut a straight slot along the jig
Sanding the guide rail to ensure smooth sliding
The finished jigsaw guide rail — smooth and ready to use
Enjoying This Blog Post?
Join my newsletter to receive the latest news, tutorials, and project plans sent directly to your inbox!
Using the jigsaw guide rail is straightforward and makes a big difference in cut accuracy — especially on longer boards.
Here’s how to use it step by step:
Mark your cut line on the workpiece with a pencil or marking knife.
Align the guide rail so that the blade lines up with your mark (use the sight holes and the blade slot for alignment).
Secure the jig using clamps. Make sure both the guide rail and your workpiece are firmly fixed.
Check blade clearance — especially underneath the workbench — to avoid hitting anything during the cut.
Make your cut slowly and steadily. Let the jigsaw do the work without forcing it.
⚠️ TIP: Always double-check which side of the line you’re cutting on — inside, outside, or directly on it — to get the exact size you need.
Making a long, straight cut with the jigsaw guide rail
A short, accurate cut with help from the jigsaw guide jig
Straight and clean cuts with a Jigsaw Straight Cut Guide
My Experience Using This Jigsaw Guide Rail
This guide has been a great addition to my workshop. It’s super easy to build, lightweight, and quick to set up. Honestly, it surprised me how accurately I could make long, straight cuts with such a simple jig.
The cuts were clean, straight, and not skewed, which can sometimes happen with a handheld jigsaw — especially without a guide.
✅ My key takeaway: If you’re using a jigsaw often, this is one of the best upgrades you can make. It doesn’t take much time or money to build, and it significantly improves your results.
🔧 Just remember: for the best performance, use the right blade and follow the tips mentioned earlier (especially around blade selection and setup). It’s the combo of the jig + the blade + a steady feed that makes it work so well.
I’ve used this guide across multiple projects and keep coming back to it. It’s portable, reliable, and does exactly what I need — without overcomplicating things.
What materials work best for building a jigsaw guide rail?
Baltic birch plywood is a great option because it’s flat, strong, and stable. Spruce or pine strips also work well for the rails. Avoid warped or knot-filled boards as they’ll affect accuracy.
Can I use this jigsaw guide rail with different jigsaw brands?
Yes — this guide is universal and works with most jigsaws. Just measure your jigsaw’s base plate and adjust the rail spacing during the build to ensure a snug but smooth fit.
How long of a cut can I make with this jigsaw guide?
The cutting length depends on how long you make the guide. This version supports cuts up to around 500 mm, but you can easily adjust the length to suit your needs or workspace.
Meet the creator of AllFlavor Workshop! As a passionate DIYer and woodworking enthusiast, Lukas is always looking for ways to make things himself rather than buying them off the shelf. With a keen eye for design and a knack for working with wood, Lukas enjoys sharing his craft with others and helping them discover the joy of building. Whether you're an experienced woodworker or a novice looking to try your hand at a new hobby, you're sure to find plenty of inspiration and tips on AllFlavor Workshop.