I’m a big fan of modular jigs—simple add-ons that expand what your tools can do without taking up extra space. This hexagon jig is exactly that. It’s an attachment for my table saw sled that lets me cut perfect, repeatable hexagons with ease.
I built it when I needed a fast, accurate way to make geometric pieces for a few projects. Instead of building a separate jig, I designed this one to bolt right onto my existing sled. When I need it, I mount it; when I’m done, I remove it and store it flat.
The back fence is fixed at 120° to the blade, which keeps every cut precise and consistent. It’s compact, quick to set up, and adds a ton of versatility to the sled system. If you haven’t built your sled yet, start with my guide on How to Make a Table Saw Sled—this jig builds directly on top of it.
Video – How to Make a Hexagon Jig for Table Saw
Here’s a quick video showing how I built this hexagon jig add-on and how it works on the table saw. You’ll see the setup, the angle alignment, and a few test cuts to get those perfect hexagons.
👉 Watch the full build on YouTube and don’t forget to subscribe for more DIY jigs and workshop projects.
Table of Contents
- Video
- Materials and Tools
- What Is a Hexagon Jig and Why Build One?
- Let’s Start Building!
- Step 1: Cut the Blanks for the Hexagon Fence (T-Track)
- Step 2: Cut Dados and Assemble the T-Track Fence
- Step 3: Mount the Fence to the Table Saw Sled
- Step 4: Add the Stop and Hold-Down Clamps
- How to Cut a Hexagon with a Hexagon Jig
- Wrap-Up: A Simple, Accurate, and Reusable Add-On
- FAQs
*Safety is your responsibility. Make sure you know what you’re doing and take all necessary safety precautions while working with power tools. Safety comes first.
Materials and Tools
Before you start, make sure you have everything ready. The jig doesn’t require much material — just a few sheet pieces, some hardware, and basic tools you probably already have in your shop.
Measuring & Setup
Clamping & Holding
Bits, Abrasives & Consumables
💡 Tip: I recommend checking your sled’s fence height before cutting the jig pieces — matching the height keeps everything aligned and makes the cuts cleaner.
Some of the links above are affiliate links. If you buy through them, I may earn a small commission at no extra cost to you.
📌 Pin This for Later
Save this project for later so you can add it to your own modular jig system.

What Is a Hexagon Jig and Why Build One?
A hexagon jig is a simple table saw accessory designed to cut perfect, repeatable hexagons at 120° angles. It ensures all six sides are identical and symmetrical without measuring or guessing each cut. If you often make geometric pieces, cutting boards, or decorative panels, this jig will save you time and improve precision.
Unlike standalone versions, this one mounts directly to your table saw sled, which makes it compact, modular, and easy to remove when not in use. It’s part of a larger sled system I use for many jigs in my shop.
Let's start building!
This jig works on a simple idea — the back fence is set at 120° to the saw blade, allowing you to cut perfect, repeatable hexagons just by rotating the workpiece and making six identical cuts.
It’s built from Baltic birch plywood, which gives the jig strength and stability, and features homemade T-tracks made from MDF. The entire setup attaches directly to your table saw sled with a single bolt and a pair of wing nuts. The height matches the sled fence, so the workpiece glides smoothly through each pass. When you’re done, just loosen the bolts and store it flat — it takes almost no space.
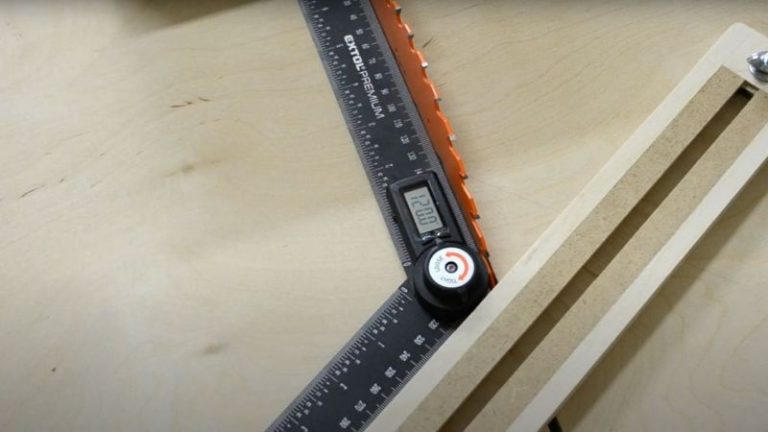
The key here is accuracy. Spend a few minutes setting the fence to a precise 120° using a digital angle gauge or machinist square, and you’ll get clean, consistent results every time.
How To Make a Hexagon Jig for Table Saw
Step 1: Prepare the Wood for the Hexagon Fence
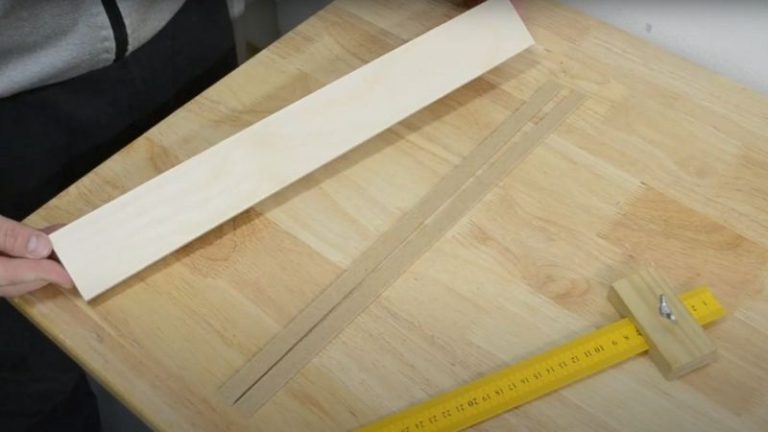
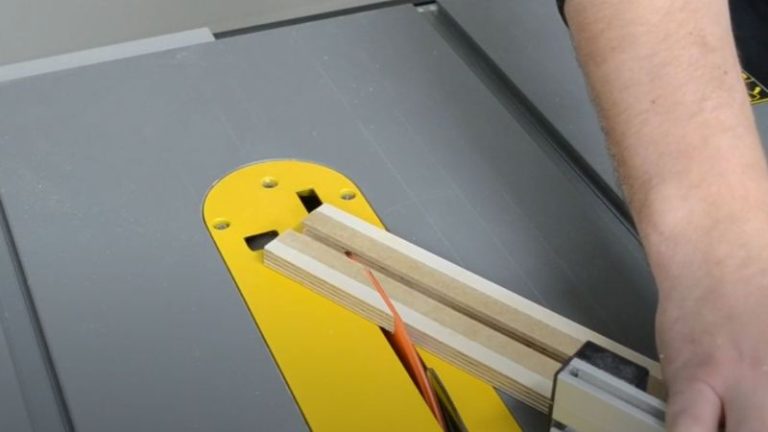
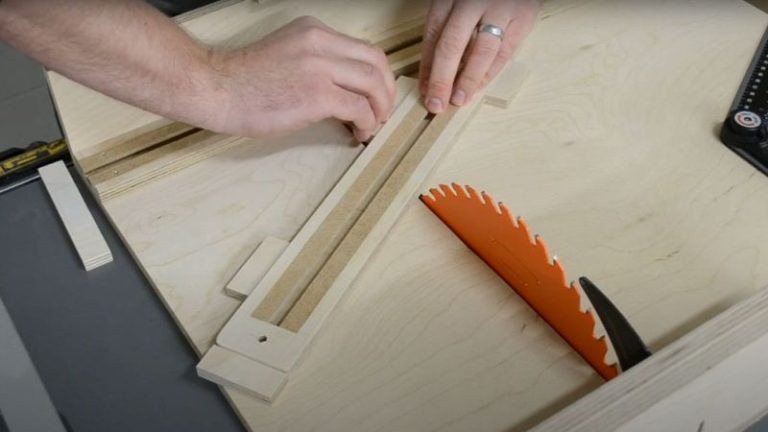
Rip the main fence body from Baltic birch plywood to 450 × 55 × 12 mm. This strip will later receive dados that capture two MDF rails, forming your homemade T-track (for stops, hold-downs, and other accessories). For now, you’re just prepping blanks—no assembly yet.
Using the table saw sled, cut two narrow MDF strips that will become the T-track rails. Keep their widths consistent; it’s fine to leave them slightly oversized for now—we’ll sneak up on the final sliding fit after the dados are cut in the plywood.
💡 Pro tip: Mark a reference edge/face on the plywood body and both MDF rails. Keep those references against the fence for every cut—this preserves parallelism and makes the later dado fit-up far more predictable.


Step 2: Cut Dados and Assemble the T-Track Fence
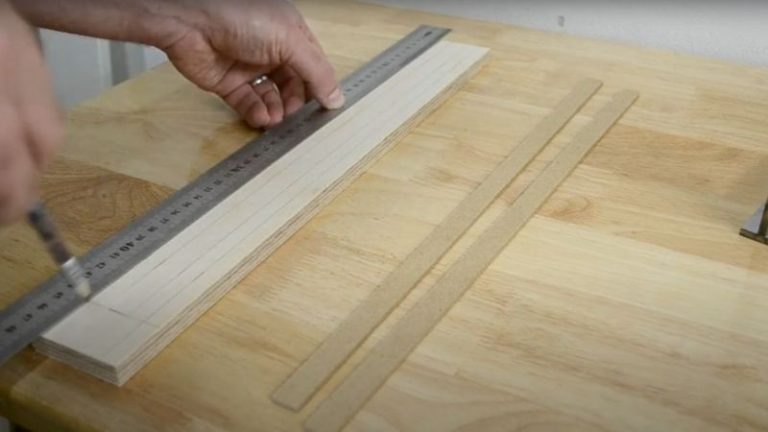
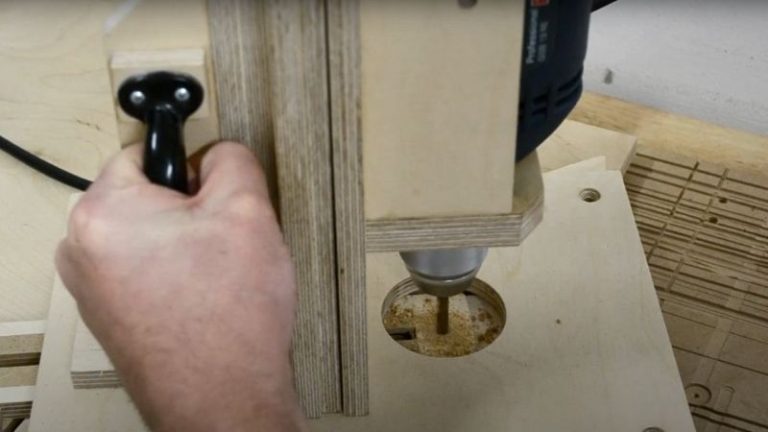
Next, it’s time to turn the plywood blank into a working T-track fence. Start by using a marking gauge to mark the layout lines for three dados along the plywood strip. These will hold the MDF rails that form the sides of the track.
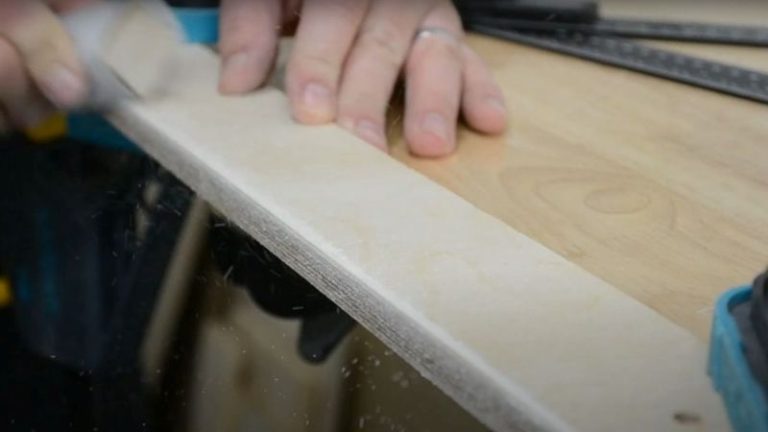
I cut all the dados with my multipurpose router jig — it’s quick, precise, and keeps the cuts perfectly parallel. Once the dados are done, lightly sand the grooves and clean up the ends with a chisel to remove the material the router couldn’t reach.
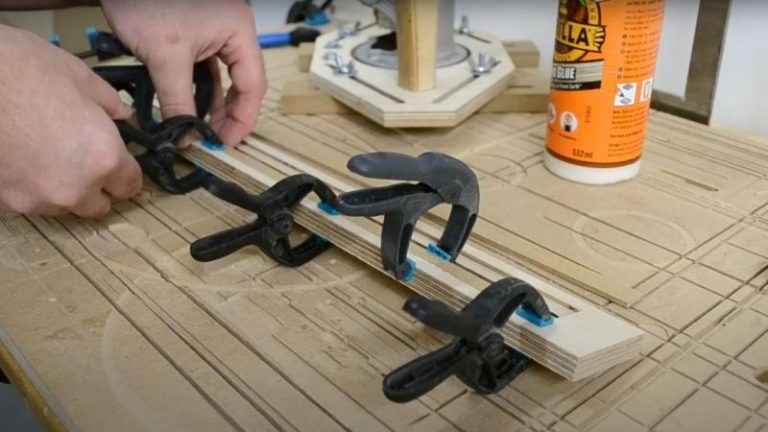
Test the fit with the MDF strips before gluing. The dado width should match the thickness of your MDF so everything stays flush. When satisfied with the fit, add a thin layer of glue inside the dados and insert the strips. Avoid using too much glue — if it squeezes into the track, it’s a pain to clean later. You can also add a few screws for extra strength if you like.
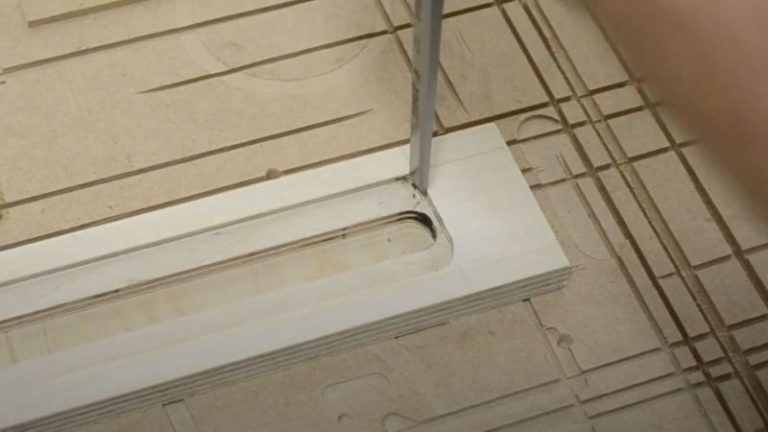
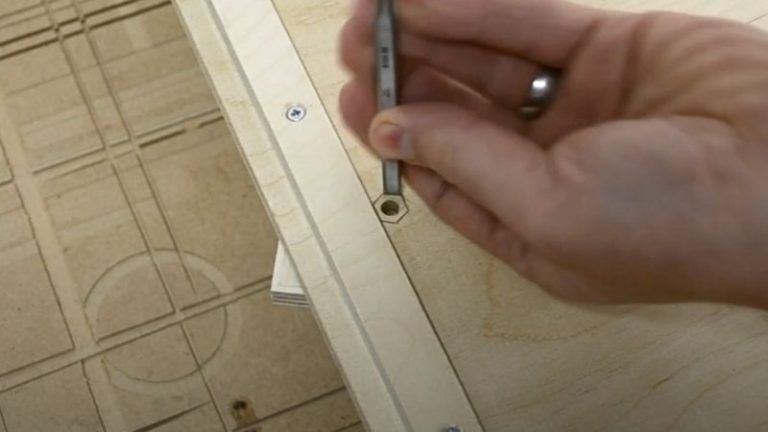
Drill a 6 mm hole through the center at one end of the track — this will later be used to attach the jig to the table saw sled. On the other end, bevel the edge closest to the blade to help remove sawdust while cutting. Then, at the far end of the fence, mark and cut a 120° angle on the table saw — this is the reference edge that will align with the sled fence.
💡 Tip: Don’t throw away the 120° cutoff piece — you’ll need it later when setting up the jig for your first hexagon cuts.

This is the same DIY T-track system I use in many of my builds — simple to make, strong, and fully compatible across multiple jigs. You can check out my step-by-step guide on How to Make a DIY T-Track for Woodworking if you’d like to add this setup to your own shop.
Step 3: Mount the Fence to the Table Saw Sled
With the T-track fence complete, it’s time to mount it onto the table saw sled. Start by aligning the 120° cut edge of the fence with the sled’s fence. This angle needs to be precise, so check that there’s a true 120° between the jig fence and the saw blade using a digital angle gauge.
Once aligned, temporarily fix the fence in place. I use a few plywood cutouts and double-sided tape to hold everything steady while I mark and drill. With the fence secured, extend the existing 6 mm hole through the sled base — this will serve as the mounting point.
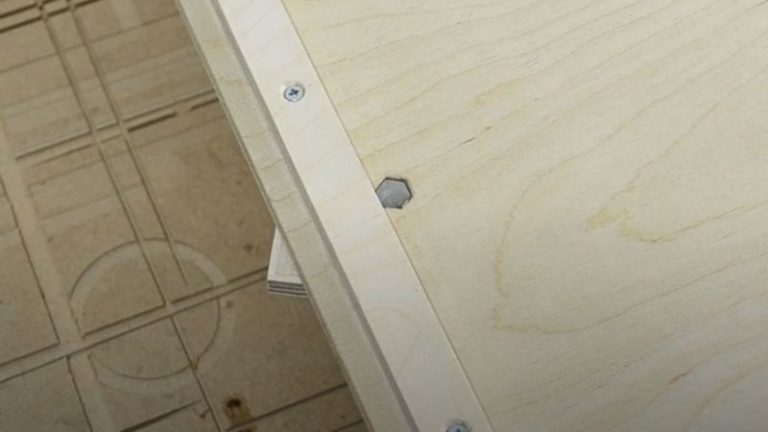
Next, flip the sled upside down. Using a chisel, carve a hexagon recess around the drilled hole to fit the bolt head. The recess needs to be deep enough for the bolt head to sit flush or slightly below the sled’s surface. This ensures the sled slides smoothly across the table without obstruction.
After carving, insert the bolt from the bottom, position the fence on top, and secure it using a wing nut. Check the alignment one more time to confirm the 120° setup is still spot-on.
💡 Tip: Take your time with the alignment. Small errors at this stage will multiply across all six cuts when forming the hexagon.
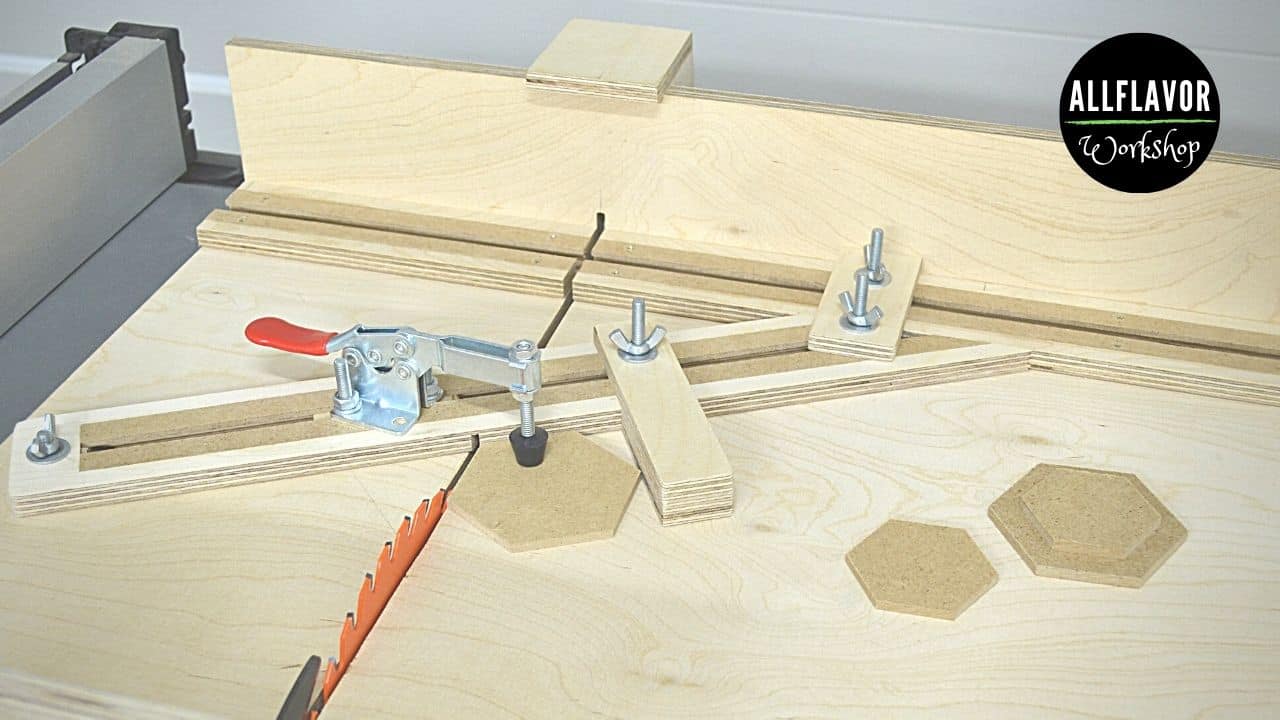
Step 4: Add the Stop and Hold-Down Clamps
With the fence mounted and aligned, it’s time to add the accessories that make the jig truly functional — the stop block and the hold-down clamps. These are mounted directly into the homemade T-track, which allows for quick adjustment and reuse across other jigs in the workshop.
- Install the hold-down clamps first. They’ll keep each workpiece firmly in position during cutting and prevent any movement. I’m using shop-made clamps, secured with homemade T-track bolts, standard bolts, and wing nuts — the same system I use across all my jigs.
- Next, attach the stop block. Mine is made from plywood and lets me set the workpiece position for repeatable cuts of the same length. Just slide it to the desired spot, tighten it down, and you’re good to go.
Once both accessories are mounted, secure the outer end of the hexagon fence to the table saw’s fence. I use another pair of T-track bolts, a thin plywood strip, and wing nuts to lock it firmly in place. When everything is tightened, the jig sits solid and ready to cut.
💡 Tip: Keeping all your T-tracks the same size means your homemade bolts, clamps, and stops can be reused across different jigs — a huge time saver when switching setups.

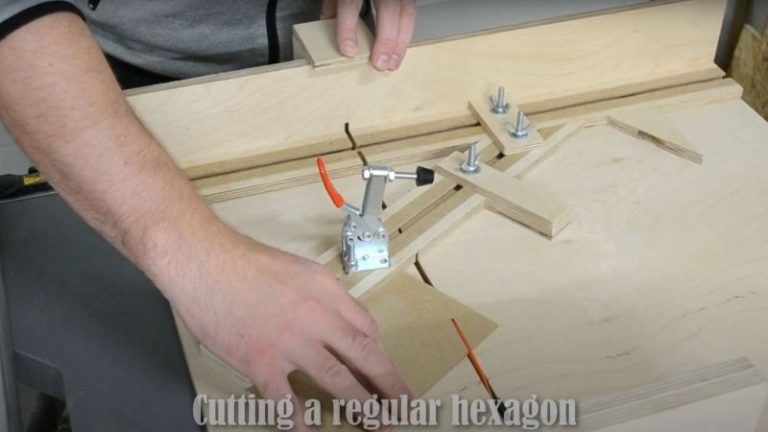
How to Cut a Hexagon with a Hexagon Jig
Now that the jig is ready, here’s how to use it to cut clean, even hexagons on your table saw. The process is quick and repeatable once you have everything set.
🔧 Setup
Mount the jig to your table saw sled and secure it with the bolt and wing nut.
Insert the hold-down clamps into the T-track to keep your workpiece firmly in place.
Add the stop block into the same track and set the desired hexagon size. Tighten it down with a wing nut.
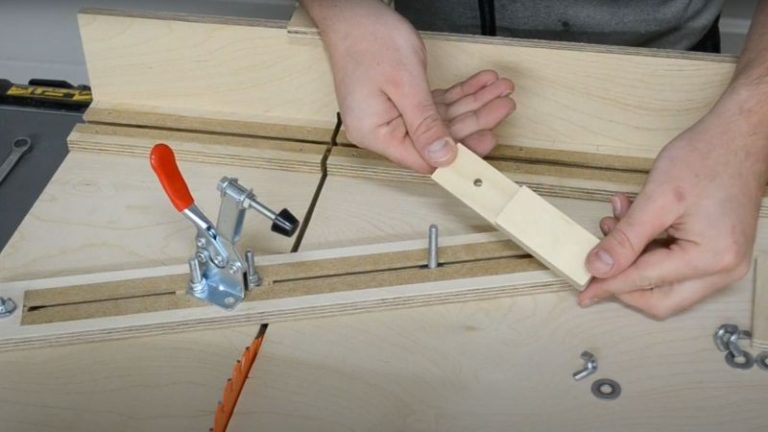
Take the 120° cutoff piece you saved earlier and place it between the stop block and your workpiece. This acts as a support wedge, ensuring perfect alignment.
🪚 Cutting the Hexagon
Make the first cut — align the edge of your board with the fence and make a clean pass. This defines your first 120° edge.
Rotate the workpiece to the next side, aligning it against the stop block and the cutoff wedge, and make the next cut.
Repeat the rotation and cutting process until all six sides are cut. The result is a perfectly symmetrical hexagon with equal facets.
⚠️ Safety note: Always use your hold-down clamp when cutting small pieces. Keep your hands well away from the blade and use push blocks whenever possible.
💡 Pro tip: Create a few custom stop blocks sized for different hexagon patterns — one for standard hexagons, others for irregular shapes or unique layouts.


Wrap-Up: A Simple, Accurate, and Reusable Add-On
This hexagon jig is one of those small but powerful add-ons that make workshop life easier. It’s quick to build, mounts in minutes, and when you’re done, it stores flat and out of the way. All its components — the stop blocks, hold-down clamps, and T-track bolts — fit right into my modular system, so they can be reused with other jigs and setups around the shop.
What I like most is its simplicity and reusability. Everything fits together cleanly, and because the alignment is adjustable, hitting those perfect 120° angles is quite achievable even if your setup isn’t 100% precise at first. The more accurate you are during the build, the better — but there’s still room to fine-tune later.
Of course, there are limits — this add-on isn’t meant for very large hexagons, since the size depends on your table saw sled. But for small to mid-sized projects, it’s a compact, reliable jig that produces clean, consistent results every time.
📘 Plans coming soon! I’ll be sharing downloadable plans for this jig along with my other modular table saw add-ons. Until then, you can check out all my current free woodworking plans and start building your own workshop jigs today.
FAQs
What angle do you need to cut a hexagon on the table saw?
A hexagon requires 120° between adjacent faces. On this jig, the back fence is set at 120° to the blade, so you simply rotate the workpiece and make six identical cuts.
Do I need a table saw sled for this hexagon jig?
Yes. This jig is designed as an add-on for a table saw sled. The sled gives you stability, accuracy, and a safer workflow. Build the sled first, then mount the jig on top.
What materials should I use for the jig?
I build the fence from Baltic birch plywood and the tracks from MDF (my homemade T-track system). Hardware is simple: M6 bolt + wing nut for mounting, plus T-track bolts for the stop and hold-downs.
How big of a hexagon can I cut with this jig?
Size is limited by your sled capacity. For very large hexagons, a standalone jig or different approach is better. For small to mid-sized parts, this add-on is ideal.
How do I keep the cuts accurate and repeatable?
Take a few minutes to dial the fence to a true 120° with a digital angle gauge or machinist square. Use the saved 120° cutoff as a wedge against the stop, and clamp the workpiece with hold-downs. Make a light test cut and fine-tune if needed.
Is the system reusable with other jigs?
Yes. I keep all my homemade T-tracks the same size, so T-track bolts, stops, and hold-downs move between jigs—fast setup, less clutter, and consistent results.
