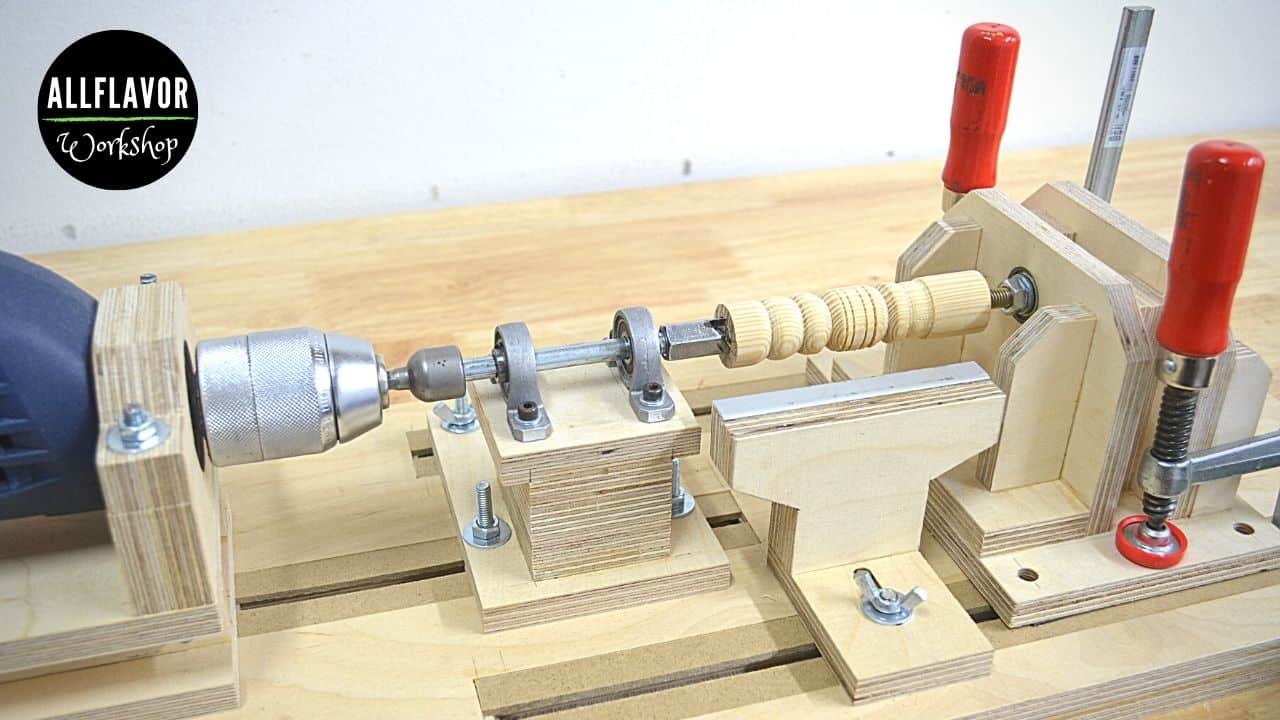
A DIY wood lathe like this is a great way to add another useful setup to the workshop without needing a full-sized machine. This one is a drill-powered lathe that sits on the workbench and is meant mainly for smaller workpieces like knobs, handles, chess pieces, and similar parts. It is compact, removable, and easy to set up only when needed, which is exactly what I like about builds like this.
One of the things I like most here is that the whole build is modular. I am reusing parts and ideas from some of my other jigs, so if you already built those, this project becomes even easier. The lathe uses a standard smaller electric drill as the drive unit, but the design can be adjusted to fit a different drill as well.
The whole setup sits on a base with homemade T-tracks, which let you mount and reposition the drill holder, spindle, tool rest, and tailstock as needed. That makes the lathe much more flexible than a fully fixed setup, and all the main parts are removable, replaceable, and upgradeable.
NOTE: I am currently working on the plans for this build, and once they are ready, they will be available here.
👉 If you want to see more workshop builds and jig ideas like this, have a look at my woodworking plans page.
Video: DIY Wood Lathe / Drill Lathe Build
If you want to see the build in action, watch the video below. It gives you a better look at how the modular drill lathe comes together and how the individual parts work as one compact setup.
And if you enjoy builds like this, feel free to subscribe to my YouTube channel for more woodworking jigs, shop projects, and workshop ideas.
Table of Contents
- Plans
- Materials
- What Can You Make with a DIY Wood Lathe?
- Let’s Start Building!
Step 1: Build the Base
Step 2: Build the Spindle
Step 3: Build the Drill Holder
Step 4: Build the Tool Rest
Step 5: Add the Tailstock - Wrap-Up
- Frequently Asked Questions
*Safety is your responsibility. Make sure you know what you’re doing and take all necessary safety precautions while working with power tools. Safety comes first!
Plans: DIY Wood Lathe
Plans for this DIY wood lathe are coming soon. I am currently working on them, and once they are ready, I will add them here.
The plans will make it easier to build the full setup, including the base, drill holder, spindle, tool rest, and tailstock, with the key dimensions and layout shown clearly.
Materials and Tools
- Baltic birch plywood
- MDF
- M6 T-nuts
- Aluminum L angle
- Wood glue – https://amzn.to/48ltKhJ
- Steel epoxy – https://amzn.to/422T5L7
- Table saw – https://amzn.to/47mWiGf
- Trim router – https://amzn.to/3HbQcOg
- Hand drill – https://amzn.to/3HqLEnH
- Corded drill – https://amzn.to/3NSA3Bo
- Angle grinder – https://amzn.to/48K2klD
- Japanese dozuki saw – https://amzn.to/3NS5viZ
- Woodturning tools – https://amzn.to/47FWQra
- Narex chisels – https://amzn.to/3tHNJrT
- One-hand clamps – https://amzn.to/48jGxkZ
- F-clamps – https://amzn.to/48ArzY1
- T-track clamps – https://amzn.to/3tEKaCW
- Spring clamps – https://amzn.to/41Nuh9D
- Mini F-clamps – https://amzn.to/3RJwNJK
- Machinist square – https://amzn.to/48fT6xw
Bits, Blades, and Accessories
- Table saw blade – https://amzn.to/48maocv
- Straight router bit – 6 mm – https://amzn.to/4aWQEOl
- Drill bits – https://amzn.to/48Kaaf7
- Forstner bits – https://amzn.to/3Hd1aDb
- Hole saw – https://amzn.to/3S52Rb4
- MicroJig GRR-Ripper push block – https://amzn.to/3vjQSP7
Hardware
- Block bearings – ID 8 mm – https://amzn.to/3u1UaGu
- Bearings – ID 6 mm – https://amzn.to/428lH5D
- Coupling nut – https://amzn.to/425o6hn
- M6 T-nuts
Affiliate Disclosure
We may earn an affiliate commission when you buy something through our retail links. As an Amazon Associate AllFlavor Workshop earns from qualifying purchases.
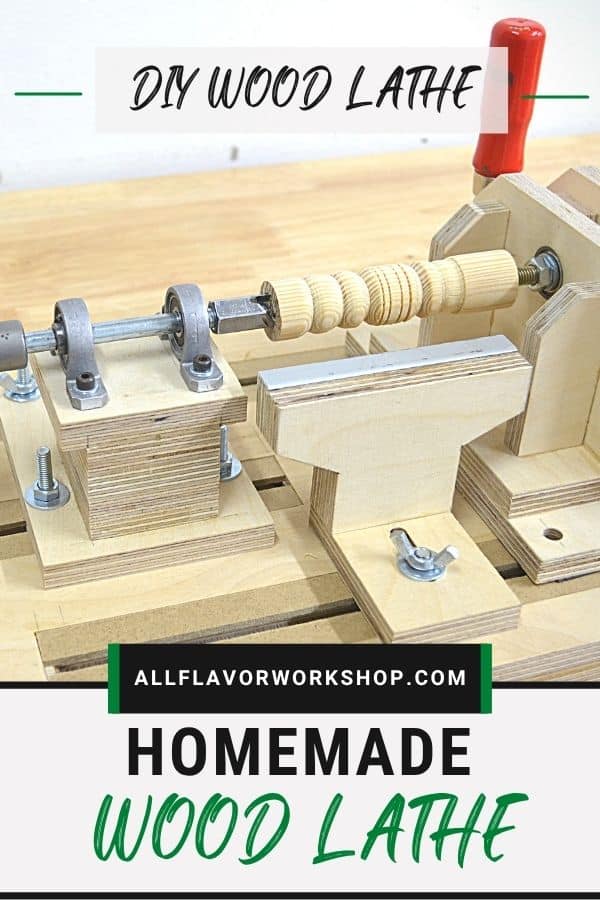
📌 Save THIS PIN to your Board on Pinterest!
What Can You Make with a DIY Wood Lathe?
This kind of DIY wood lathe is meant mainly for smaller workpieces, not for large bowls or long spindle work. But for the size it has, it is actually a very useful setup to keep in the workshop. If you like making your own knobs, handles, or small decorative parts, a compact drill lathe like this can go a long way.
That is one of the reasons I like this build. It does not try to replace a full-sized wood lathe. Instead, it gives you a smaller, modular setup that you can bring out when needed, use for more precise small projects, and then store away again.
A few examples of what you can make with it:
- Wooden knobs
- Small handles
- Chess pieces
- Decorative turned details
- Other small round wood parts for jigs or workshop projects
So even though it is a smaller setup, it still opens up a lot of useful possibilities. And if you already build jigs and workshop tools, this kind of lathe can be a really handy addition for making custom wooden parts yourself.
Let’s Start Building!
The idea behind this build is quite simple: make a small bench-top drill lathe with adjustable parts that can be mounted, moved, and reused as needed. Instead of building one fixed unit, we are making a modular setup with a base, drill holder, spindle, tool rest, and tailstock that all work together through the T-track system.
That gives you a compact lathe for smaller parts, but it also keeps the whole build more flexible. You can remove parts, replace them, improve them later, or adapt the setup to your own drill and workshop needs.
The full lathe measures 65 × 24 × 14.5 cm (25.6 × 9.4 × 5.7 in), so it stays compact enough for a workbench while still giving you enough room for small turning work. The individual parts are also manageable in size:
- Base: 65 × 24 × 24 cm (25.6 × 9.4 × 9.4 in)
- Drill Holder: 17 × 11 × 12 cm (6.7 × 4.3 × 4.7 in)
- Spindle: 13 × 9 × 9.5 cm (5.1 × 3.5 × 3.7 in)
- Tool Rest: 7.5 × 10 × 7.5 cm (3 × 3.9 × 3 in)
- Tailstock: 12 × 18 × 10.5 cm (4.7 × 7.1 × 4.1 in)
How to Make a DIY Wood Lathe
Step 1: Build the Base
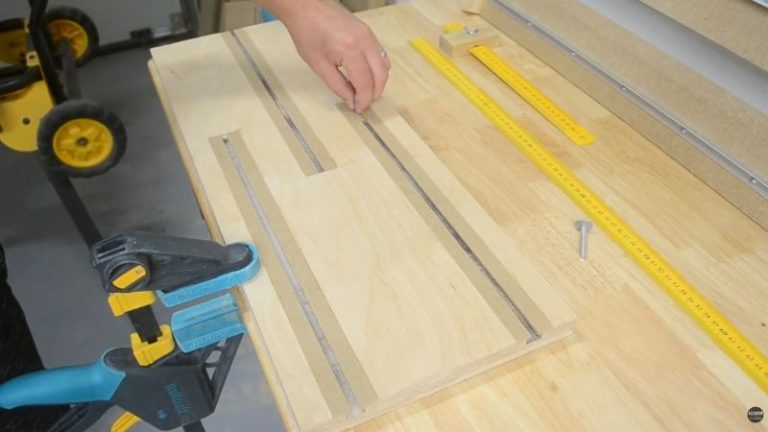
The base is the foundation of the whole DIY wood lathe, so I wanted it to be sturdy, flat, and stable enough to support all the removable parts. It is made from two base pieces laminated together, which gives it more strength and helps prevent warping over time. The final base size is 65 × 24 cm (25.6″ × 9.4″), with a total thickness of about 24 mm / 2.4 cm (0.94″).
I made the base from Baltic birch plywood, then added MDF strips to create the homemade T-track system. First, I cut the base pieces to size and glued them together. After that, I marked out the layout for the tracks, cut the slots using a dado jig, cleaned them up, and glued in the strips that form the tracks. It is important that these strips sit flush with the surface, because the base needs to stay flat while still allowing all the lathe parts to slide, lock, and adjust properly.
This base does a lot of the heavy lifting in the build. It supports the full drill lathe setup, gives you the track system for adjusting the drill holder, spindle, tool rest, and tailstock, and also makes it possible to clamp the whole jig to the workbench when in use. Without a solid base, the rest of the build would not work as well.
Step 2: Build the Spindle
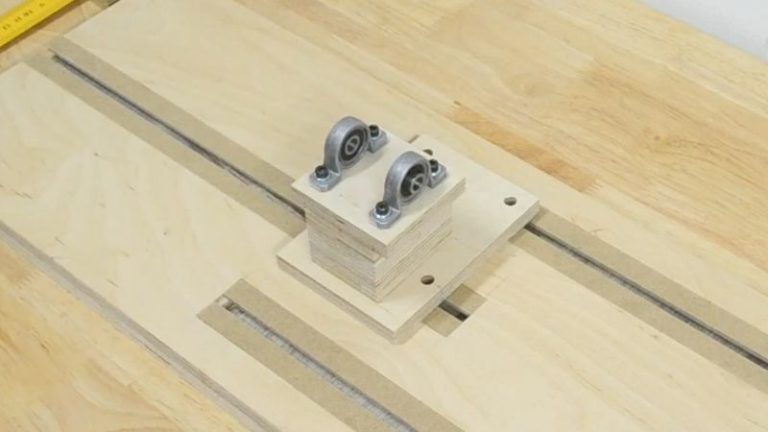
The spindle is the part that supports the rotating workpiece on one side, so it needs to be solid, accurate, and aligned well. I made it from Baltic birch plywood, cutting all the pieces to size first and then assembling them into one compact support unit. The final spindle size is 13 × 9 × 9.5 cm (5.1″ × 3.5″ × 3.7″).
On the top, I mounted two bearings with an 8 mm inner diameter. I spaced the bearings apart from each other to give the spindle better support and help reduce vibrations while turning. That spacing makes a difference, especially on a smaller setup like this, where you want the workpiece to run as smoothly as possible. One important thing here is that the bearing holes need to be level and aligned, otherwise the spindle will not run true.
At the bottom, I added T-nuts so the whole spindle can be mounted onto the base and adjusted through the homemade T-track system. That makes it easy to position the spindle where needed and keeps it consistent with the rest of the modular design.
TIP: Take your time with the bearing alignment. If the bearings are not level with each other, the spindle can introduce wobble and vibrations later.
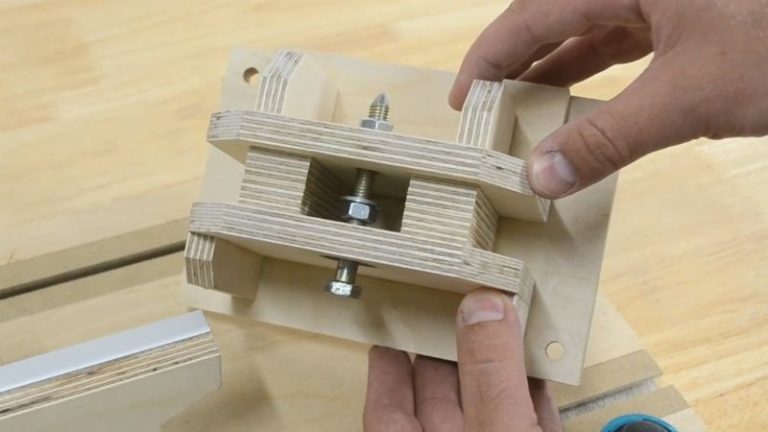
Step 3: Build the Drill Holder
The drill holder is the part that powers the whole DIY wood lathe, so it needs to hold the drill firmly while also keeping it properly aligned with the spindle. I made it from Baltic birch plywood, cutting all the pieces to size first and then assembling them into a compact holder. The final drill holder size is 17 × 11 × 12 cm (6.7″ × 4.3″ × 4.7″).
The most important part here is the adjustable holding collar that grips the neck of the drill. I made this section adjustable so it can fit drills with different collar or neck sizes, which makes the build more flexible. At the same time, the opening of the drill needs to be perfectly level with the spindle bearing holes, otherwise the setup will not run smoothly.
Once the holder is built, I attached it to the base using T-nuts, which makes it adjustable through the homemade T-track system. After that, I leveled it with the spindle and used a long bolt through the drill and bearings to fine-tune the alignment. That way, I could check that the drill and spindle run together smoothly and make any small adjustments before moving on.
TIP: Before locking the drill holder in place, run a long bolt through the drill and spindle bearings to check alignment. It is one of the easiest ways to spot any small offset early.

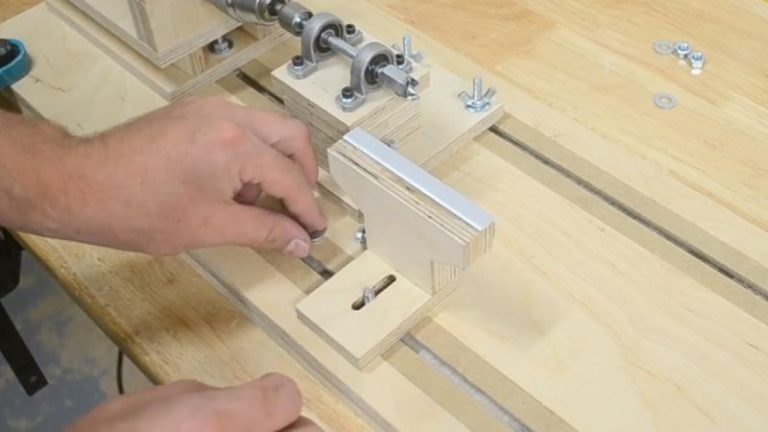
Step 4: Build the Tool Rest
Now make the tool rest, which supports your tools while working on the DIY wood lathe. I made mine from Baltic birch plywood and aluminum, but steel works too. The finished size is 24 × 15 × 16 cm (9.4″ × 5.9″ × 6.3″).
Cut all the parts to size, assemble the base and upright, and then attach the rest to the lathe base. The top support should be stable, smooth, and easy to position close to the workpiece for better control.
This is a simple step, but an important one. A solid tool rest makes the lathe much easier and safer to use.
TIP: Keep the tool rest as close to the workpiece as possible for better support and control.
Step 5: Add the Tailstock
The next part is the tailstock, and here I’m reusing the one from my disc sander build. It is made from Baltic birch plywood, it is adjustable, and it mounts to the base so you can move it depending on the length of the workpiece.
The key part here is the bolt running through two bearings, which serves to support the free end of the workpiece while turning. That support is important because it helps keep the piece stable and reduces wobble during use.
Once attached to the base, the tailstock works together with the spindle to hold the workpiece in position. Because it is adjustable, you can set it where needed and lock it in place for different sizes of stock.
TIP: Make sure the tailstock lines up well with the spindle and drill holder. The better the alignment, the smoother the lathe will run.
Wrap-Up
This DIY wood lathe is the kind of workshop build that makes a lot of sense to me. It is compact, modular, easy to store, and still very useful for turning small parts like knobs, handles, and similar pieces. Instead of taking up space like a full-size lathe, you can bring it out when you need it and put it away when you don’t.
Another big benefit is that the build is based on simple, reusable parts. A lot of the components are adjustable, removable, and tied to other jigs I already use in the shop. That makes the whole setup more practical and worth building.
It is not meant to replace a full wood lathe, but for smaller workpieces it does a really nice job. If you enjoy building your own workshop tools, this is definitely a project worth trying.
And if you want to see more jig builds and workshop ideas like this, have a look at my woodworking plans page.
Frequently Asked Questions
What can you make with a DIY wood lathe?
A DIY wood lathe like this is best for small wood parts such as knobs, handles, chess pieces, and other similar round parts. It is not meant for large bowls or long spindle work, but for smaller projects it can be very practical.
Can I use any drill for this homemade wood lathe?
Yes, the build uses a standard smaller electric drill, but the holder can be adjusted to fit different drill collar sizes. The important part is making sure the drill is held firmly and aligned well with the spindle.
Is this DIY drill lathe accurate enough for real woodworking?
For small workpieces, yes. If the spindle, drill holder, and tailstock are aligned properly, the setup works well and gives you enough control for smaller turning tasks. The more accurate you are during the build, the better the result will be.
What wood is this DIY wood lathe made from?
The main structure is made from Baltic birch plywood, which keeps the build stable and strong. Some parts can also include metal elements like aluminum or steel, depending on the part and your preference.
Is this a replacement for a full-size wood lathe?
No, this build is more of a compact bench-top alternative for small parts. It will not replace a full wood lathe for larger projects, but it is a useful option if you want a smaller setup that is easy to store and use when needed.
